Mushroom Grotto: Difference between revisions
Qwertyxp2000 (talk | contribs) →Strategy: no one did map strategy for later updates since sunset gulch |
|||
| (8 intermediate revisions by 5 users not shown) | |||
| Line 24: | Line 24: | ||
The map features 2 winding tracks that intersect towards the center. The Bloons come from the top-left and bottom-right corners, and move towards the opposite corner. The main gimmick of this map is that Monkeys cannot see or damage Bloons that are in the dark, nor can Monkeys be placed in the dark. | The map features 2 winding tracks that intersect towards the center. The Bloons come from the top-left and bottom-right corners, and move towards the opposite corner. The main gimmick of this map is that Monkeys cannot see or damage Bloons that are in the dark, nor can Monkeys be placed in the dark. | ||
By default the center mushroom is the only light source, and the smaller mushroom patches can be lit up for $250 in order to increase the revealed area. | By default the center mushroom is the only light source, and the smaller mushroom patches can be lit up for $250 in order to increase the revealed area. Towers cannot detect Bloons in the hidden area, similar to how Camo Bloons function with towers that cannot see camo, but their projectiles can still hit them normally. [[Downdraft (BTD6)|Downdraft]] and higher can still use its main attack on hidden Bloons, but only on Bloons it has just blown back. Once the four smaller mushroom patches have been purchased, the larger mushroom can be bought for $400, which increases the light radius of all mushrooms. | ||
==Strategy== | ==Strategy== | ||
{{strategy needed}} | {{strategy needed|1=see if mortar/dartling can make for viable lategame towers (don't just add them because they can hit anywhere)}} | ||
{{BTD6 last updated|54.3|section=y}} | {{BTD6 last updated|54.3|section=y}} | ||
Overall, the early game is the hardest part of this map with its darkness gimmick, limiting placement and vision while being not an obstacle. It gets relatively easier | Overall, the early game is the hardest part of this map with its darkness gimmick, limiting placement and vision while being not an obstacle. It gets relatively easier starting from about the 20s once all the mushrooms can be lighted up. That being said, the mushrooms don't have to be lit up, because some towers actually thrive off this. | ||
===Recommended towers and upgrades=== | ===Recommended towers and upgrades=== | ||
| Line 39: | Line 39: | ||
|[[Carpet of Spikes (BTD6)|Carpet of Spikes]] | |[[Carpet of Spikes (BTD6)|Carpet of Spikes]] | ||
|[[File:BTD6 050-SpikeFactory.png|x50px]] | |[[File:BTD6 050-SpikeFactory.png|x50px]] | ||
|When no mushrooms are activated, all its spikes | |When no mushrooms are activated, all its spikes are guaranteed to land on the middle section, concentrating its damage. The Carpet's extreme single-target trivializes the BAD and makes non-dense rounds much easier to handle. Its usual best pairings, like [[Lord of the Abyss]], are recommended. | ||
|- | |||
|[[Mortar Monkey (BTD6)|Mortar Monkey]], [[Dartling Gunner (BTD6)|Dartling Gunner]] | |||
|[[File:BTD6 000-MortarMonkey.png|x50px]][[File:BTD6 000-DartlingGunner.png|x50px]] | |||
|These towers fire their projectiles without requiring a target, granting them much more effective range for the early rounds compared to other tower options. | |||
|} | |} | ||
==Gallery== | ==Gallery== | ||
<gallery> | |||
File:BTD6 Mushroom Grotto 4th of July.png|Fireworks Theme | |||
BTD6_Mushroom_Grotto_Map_Editor.png|Map Editor version | |||
BTD6_Mushroom_Grotto_Island_Statue.png|Island Statue | |||
</gallery> | |||
==In other languages== | ==In other languages== | ||
Latest revision as of 04:17, 16 September 2026

|
| Difficulty | Advanced | ||
|---|---|---|---|
| Music | Tribes & Tribulations | ||
| Default Co-op division | Free-for-all | ||
| Introduced | Version 54.0 | ||
| Entrances | 2 | Exits | 2 |
| Junctions | 0 | Water? | No |
| Removables and gizmos |
|---|
|
| Path lengths (RBS) | ||||
|---|---|---|---|---|
| Path | Easy | Medium | Hard | |
| Left | 23.2 | 21.1 | 18.6 | |
| Right | 23.5 | 21.4 | 18.8 | |
Mushroom Grotto is an Advanced map in Bloons TD 6, introduced in version 54.0. It is set inside a forest populated with mushrooms. The mushrooms apply regions of spore-filled darkness that towers cannot target through, but the player can interact with the mushrooms to illuminate more areas.
Reddit user u/Oski_01 designed this map[1] for the BTD6 7 Year Anniversary Map Competition on the official Bloons TD 6 subreddit.[2] It was one of three winning entries, alongside Tricky Tracks and the upcoming Ship Capture.[3] It was originally created in the Map Editor, and players can access the original map in the Content Browser using the code ZFMVFCD.
Layout
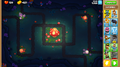
[edit | edit source]The map features 2 winding tracks that intersect towards the center. The Bloons come from the top-left and bottom-right corners, and move towards the opposite corner. The main gimmick of this map is that Monkeys cannot see or damage Bloons that are in the dark, nor can Monkeys be placed in the dark.
By default the center mushroom is the only light source, and the smaller mushroom patches can be lit up for $250 in order to increase the revealed area. Towers cannot detect Bloons in the hidden area, similar to how Camo Bloons function with towers that cannot see camo, but their projectiles can still hit them normally. Downdraft and higher can still use its main attack on hidden Bloons, but only on Bloons it has just blown back. Once the four smaller mushroom patches have been purchased, the larger mushroom can be bought for $400, which increases the light radius of all mushrooms.
Strategy
[edit | edit source]
|
This strategy section is empty or incomplete. See the strategy guidelines for more information on how to write strategy sections. The editor who added this notice elaborates: see if mortar/dartling can make for viable lategame towers (don't just add them because they can hit anywhere) |
Overall, the early game is the hardest part of this map with its darkness gimmick, limiting placement and vision while being not an obstacle. It gets relatively easier starting from about the 20s once all the mushrooms can be lighted up. That being said, the mushrooms don't have to be lit up, because some towers actually thrive off this.
Recommended towers and upgrades
[edit | edit source]| Name | Portrait | Reasoning |
|---|---|---|
| Carpet of Spikes | 
|
When no mushrooms are activated, all its spikes are guaranteed to land on the middle section, concentrating its damage. The Carpet's extreme single-target trivializes the BAD and makes non-dense rounds much easier to handle. Its usual best pairings, like Lord of the Abyss, are recommended. |
| Mortar Monkey, Dartling Gunner |  
|
These towers fire their projectiles without requiring a target, granting them much more effective range for the early rounds compared to other tower options. |
Gallery
[edit | edit source]-
 Fireworks Theme
 -
 Map Editor version
 -
 Island Statue


In other languages
[edit | edit source]| Language | Text | Notes |
|---|---|---|
| Arabic | مغارة الفطر | — |
| Danish | Svampegrotten | — |
| German | Pilzgrotte | — |
| Spanish | Gruta de hongos | — |
| Spanish (Latin America) | Gruta de hongos | — |
| Finnish | Sieniluola | — |
| French | Grotte des champignons | — |
| Italian | Grotta dei funghi | — |
| Japanese | キノコ洞窟 | — |
| Korean | 버섯 동굴 | — |
| Dutch | Paddenstoelengrot | — |
| Norwegian | Soppgrotte | — |
| Polish | Grota grzybów | — |
| Portuguese (Brazil) | Gruta dos Cogumelos | — |
| Russian | Грибной грот | — |
| Swedish | Svampgrotta | — |
| Thai | ถ้ำเห็ด | — |
| Turkish | Mantar Mağarası | — |
| Chinese (simplified) | 蘑菇洞窟 | — |
| Chinese (traditional) | 蘑菇洞窟 | — |
References
[edit | edit source]- ↑ "Map submission. Mushroom Grotto. More info in the post. ZFMVFCD". Reddit. Retrieved Sat, 4 Apr 2026.
- ↑ "https://www.reddit.com/r/btd6/comments/1lbl6pg/btd6_7_year_anniversary_map_competition/". Reddit. Retrieved Sat, 4 Apr 2026.
- ↑ CoreyNK (Thu, 17 Jul 2025). "7th Anniversary Map Competition Winners!". Ninja Kiwi on Reddit. Retrieved Sat, 4 Apr 2026.