Forest Terrain: Difference between revisions
Jump to navigation
Jump to search
mNo edit summary |
mNo edit summary |
||
| (8 intermediate revisions by 3 users not shown) | |||
| Line 2: | Line 2: | ||
{{BMC terrain info | {{BMC terrain info | ||
|id F=ForestTerrain | |id F=ForestTerrain | ||
|id M= | |id M=level_ForestTerrain | ||
|name =Forest Terrain | |name =Forest Terrain | ||
|image F= | |image F=BMCF Forest terrain icon.svg | ||
|image M= | |image M= | ||
| Line 11: | Line 11: | ||
|favoured =[[Ninja Monkey (BMC)|Ninja Monkey]] | |favoured =[[Ninja Monkey (BMC)|Ninja Monkey]] | ||
|restricted =[[Tack Shooter (BMC)|Tack Shooter]], [[Banana Farm (BMC)|Banana Farm]] | |restricted =[[Tack Shooter (BMC)|Tack Shooter]], [[Banana Farm (BMC)|Banana Farm]] | ||
|special terrain=[[Wattle Trees]] | |special terrain=[[Wattle Trees (BMC)|Wattle Trees]] | ||
|music =Monkey Hermanos | |music =Monkey Hermanos | ||
}} | }} | ||
| Line 23: | Line 23: | ||
{{BMC track info | {{BMC track info | ||
|id F=Forest1 | |id F=Forest1 | ||
|id M= | |id M=level_Forest1Def | ||
|name =Junior | |name =Junior | ||
| Line 44: | Line 44: | ||
{{BMC track info | {{BMC track info | ||
|id F=Forest2 | |id F=Forest2 | ||
|id M= | |id M=level_Forest2Def | ||
|name =Hexagonal | |name =Hexagonal | ||
| Line 65: | Line 65: | ||
{{BMC track info | {{BMC track info | ||
|id F=Forest3 | |id F=Forest3 | ||
|id M= | |id M=level_Forest3Def | ||
|name =Pop | |name =Pop | ||
| Line 86: | Line 86: | ||
{{BMC track info | {{BMC track info | ||
|id F=Forest4 | |id F=Forest4 | ||
|id M= | |id M=level_Forest4Def | ||
|name =U-Bends | |name =U-Bends | ||
| Line 107: | Line 107: | ||
{{BMC track info | {{BMC track info | ||
|id F=Forest5 | |id F=Forest5 | ||
|id M= | |id M=level_Forest5Def | ||
|name =YMY | |name =YMY | ||
| Line 129: | Line 129: | ||
===Bulbs=== | ===Bulbs=== | ||
{{BMC track info | {{BMC track info | ||
|id M= | |id M=level_Forest6Def | ||
|name =Bulbs | |name =Bulbs | ||
| Line 147: | Line 147: | ||
===Necklace=== | ===Necklace=== | ||
{{BMC track info | {{BMC track info | ||
|id M= | |id M=level_Forest7Def | ||
|name =Necklace | |name =Necklace | ||
| Line 180: | Line 180: | ||
{{empty}} | {{empty}} | ||
{{clear|right}} | {{clear|right}} | ||
==Strategy== | |||
With exception of YMY, Forest is one of the easiest terrains because of the favored Ninja and the generally long tracks. The lack of Farm is generally overshadowed by how well Ninja can carry the early game and deal massive MOAB damage when spamming [[Bloonjitsu (BMC)|Bloonjitsu]]s (including to DDTs with an [[Monkey Intelligence Bureau (BMC)|Monkey Intelligence Bureau]]) and stunning Bloons with [[Flash Bomb (BMC)|Flash Bomb]]. | |||
On YMY, the bends near the start are useful for area-based towers to cover, such as [[Bomb Shooter (BMC)|Bomb Shooter]]s, while the main cleanup should be nearer the back and is recommended to be a Spike Factory with at least [[Faster Production (BMC)|Faster Production]]. | |||
==Gallery== | |||
<gallery> | |||
BMCM max subs on bulbs.png|Maximum Monkey Sub and Buccaneer Placements on Bulbs (14) | |||
</gallery> | |||
==Navigation== | ==Navigation== | ||
{{BMC terrain nav}} | {{BMC terrain nav}} | ||
Latest revision as of 03:30, 20 September 2026

|
This article is a stub. You can help out by expanding it. The editor who added this notice elaborates: lede is too short, needs overviews of each track |
| Forest Terrain | |||||||||||||||
|---|---|---|---|---|---|---|---|---|---|---|---|---|---|---|---|
| |||||||||||||||
| |||||||||||||||


Forest Terrain is a type of Terrain in Bloons Monkey City.
Tracks
[edit | edit source]Note: due to a lack of distinct official names, this article uses popular community-created names for these tracks for the sake of familiarity.
Junior
[edit | edit source]| Junior | ||||||||||||||
|---|---|---|---|---|---|---|---|---|---|---|---|---|---|---|
| ||||||||||||||
| ||||||||||||||


|
This section is empty. You can help out by adding to it. |
Hexagonal
[edit | edit source]| Hexagonal | ||||||||||||||
|---|---|---|---|---|---|---|---|---|---|---|---|---|---|---|
| ||||||||||||||
| ||||||||||||||


|
|
This section is empty. You can help out by adding to it. |
Pop
[edit | edit source]| Pop | ||||||||||||||
|---|---|---|---|---|---|---|---|---|---|---|---|---|---|---|
| ||||||||||||||
| ||||||||||||||


|
|
This section is empty. You can help out by adding to it. |
U-Bends
[edit | edit source]| U-Bends | ||||||||||||||
|---|---|---|---|---|---|---|---|---|---|---|---|---|---|---|
| ||||||||||||||
| ||||||||||||||


|
|
This section is empty. You can help out by adding to it. |
YMY
[edit | edit source]| YMY | ||||||||||||||||||||
|---|---|---|---|---|---|---|---|---|---|---|---|---|---|---|---|---|---|---|---|---|
| ||||||||||||||||||||
| ||||||||||||||||||||


|
|
This section is empty. You can help out by adding to it. |
Bulbs
[edit | edit source]| Bulbs | ||||||||||
|---|---|---|---|---|---|---|---|---|---|---|
| ||||||||||
|

|
|
This section is empty. You can help out by adding to it. |
Necklace
[edit | edit source]| Necklace | ||||||||||
|---|---|---|---|---|---|---|---|---|---|---|
| ||||||||||
|

|
|
This section is empty. You can help out by adding to it. |
Battleaxe
[edit | edit source]| Battleaxe | ||||||||||
|---|---|---|---|---|---|---|---|---|---|---|
| ||||||||||
|

|
|
This section is empty. You can help out by adding to it. |
Strategy
[edit | edit source]With exception of YMY, Forest is one of the easiest terrains because of the favored Ninja and the generally long tracks. The lack of Farm is generally overshadowed by how well Ninja can carry the early game and deal massive MOAB damage when spamming Bloonjitsus (including to DDTs with an Monkey Intelligence Bureau) and stunning Bloons with Flash Bomb.
On YMY, the bends near the start are useful for area-based towers to cover, such as Bomb Shooters, while the main cleanup should be nearer the back and is recommended to be a Spike Factory with at least Faster Production.
Gallery
[edit | edit source]-
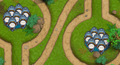 Maximum Monkey Sub and Buccaneer Placements on Bulbs (14)
