Ouch: Difference between revisions
mNo edit summary |
m →Recommended towers and upgrades: Grammar fixes |
||
| (10 intermediate revisions by 6 users not shown) | |||
| Line 1: | Line 1: | ||
{{hat|The correct | {{hat|The correct name of this subject is '''#Ouch'''. The "#" is omitted from the title due to technical restrictions.}} | ||
{{BTD6 map info | {{BTD6 map info | ||
|id=#ouch | |id=#ouch | ||
| Line 26: | Line 26: | ||
==Layout== | ==Layout== | ||
<nowiki>#</nowiki>Ouch has 4 entrances and 4 exits that are all active every round, with the two top-bottom paths being about 22% shorter than the left-right paths. The pond being in the middle of the 4 lanes allows for a variety of utilizations of water-based towers on this map, and the pond can be drained for $1,000 if no water tower is placed on it. Unlike every other True Expert map (the other ones being [[Bloody Puddles]], [[Ravine]], [[Quad]], and debatably [[Dark Dungeons]]), #Ouch has no line-of-sight blockers. | |||
==Strategy== | ==Strategy== | ||
The | The short length and presence of 4 simultaneous lanes make #Ouch a True Expert map. Water strategies, such as [[Destroyer (BTD6)|Destroyer]]s coupled with [[Permanent Brew (BTD6)|Permanent Brew]], do relatively well on this map. If the water is drained, [[Grandmaster Ninja (BTD6)|Grandmaster Ninja]] becomes a powerful Black Border strategy when paired with [[Shinobi Tactics (BTD6)|Shinobi Tactics]]. | ||
===Recommended towers and upgrades=== | ===Recommended towers and upgrades=== | ||
| Line 39: | Line 39: | ||
|[[Symphonic Resonance]] | |[[Symphonic Resonance]] | ||
|[[File:BTD6 004-Mermonkey.png|x50px]] | |[[File:BTD6 004-Mermonkey.png|x50px]] | ||
|The central water spot and Symphonic Resonance's greater range on water allows it to cover all 4 lanes on #Ouch at once. It stalls MOABs | |The central water spot and Symphonic Resonance's greater range on water allows it to cover all 4 lanes on #Ouch at once. It stalls MOABs and DDTs very effectively, and the timed nature of the stall makes the stall especially important here due to the very short length of this map's vertical lanes. | ||
|- | |- | ||
|[[Grandmaster Ninja (BTD6)|Grandmaster Ninja]] | |[[Grandmaster Ninja (BTD6)|Grandmaster Ninja]] | ||
|[[File:BTD6 500-NinjaMonkey.png|x50px]] | |[[File:BTD6 500-NinjaMonkey.png|x50px]] | ||
|The center of the map is very optimal for the well-known "Shinobi Strategy", where 1 Grandmaster Ninja and 20 shinobis are used to easily black border this map. Generally speaking, [[Geraldo (BTD6)|Geraldo]] is the preferred hero of choice, as [[Gerry's Fire]] eases the saveup to Grandmaster | |The center of the map is very optimal for the well-known "Shinobi Strategy", where 1 Grandmaster Ninja and 20 shinobis are used to easily black border this map. Generally speaking, [[Geraldo (BTD6)|Geraldo]] is the preferred hero of choice, as [[Gerry's Fire]] eases the saveup to Grandmaster and deals massive damage late-game thanks to shinobis buffing it, Pickles and Sharpening Stone are great on Grandmaster, and Genies do massive damage during the 90s. [[Obyn Greenfoot (BTD6)|Obyn]] can also work, albeit not as effectively. | ||
|} | |} | ||
===CHIMPS starts=== | |||
{{#ev:youtube|JP_2mxlZZBk|dimensions=320x240px}} | |||
==Gallery== | ==Gallery== | ||
<gallery> | |||
BTD6 Ouch easter.png|Easter theme | |||
BTD6 Ouch fireworks.png|Fireworks theme | |||
BTD6 Ouch halloween.png|Halloween theme | |||
BTD6 Ouch holiday.png|Holiday theme | |||
BTD6 Ouch island statue.png|Island statue | |||
</gallery> | |||
==In other languages== | ==In other languages== | ||
{{BTD6 | {{BTD6 last updated|48.1|section=y}} | ||
|ar | {{langlist | ||
|da | |key=#ouch | ||
|de | |ar =#أوتش | ||
|es | |da =#Av | ||
|es-la | |de =#Autsch | ||
|fi | |es =#Ay | ||
|fr | |es-la=#Ay | ||
|it | |fi =#Auts | ||
|ja | |fr =#Aïe | ||
|ko | |it =#Ahia! | ||
|nl | |ja =#痛い | ||
|no | |ko =#아야 | ||
|pl | |nl =#Au | ||
|pt-br | |no =#Ouch | ||
|ru | |pl =#Ała | ||
|sv | |pt-br=#Ai | ||
|th | |ru =#Ай | ||
|tr | |sv =#Aj | ||
|zh-cn | |th =#โอ๊ย | ||
|zh-tw | |tr =#Ah | ||
|zh-cn=#哎哟 | |||
|zh-tw=#哎喲 | |||
}} | }} | ||
Latest revision as of 14:58, 25 April 2026

|
| Difficulty | Expert | ||
|---|---|---|---|
| Music | Tribes & Tribulations | ||
| Default Co-op division | Free-for-all | ||
| Introduced | Launch | ||
| Entrances | 4 | Exits | 4 |
| Junctions | 0 | Water? | Yes |
| Removables and gizmos |
|---|
|
| Path lengths (RBS) | ||||
|---|---|---|---|---|
| Path | Easy | Medium | Hard | |
| Vertical left | 10.0 | 9.1 | 8.0 | |
| Vertical right | 10.0 | 9.1 | 8.0 | |
| Horizontal top | 12.8 | 11.6 | 10.2 | |
| Horizontal bottom | 12.8 | 11.6 | 10.2 | |
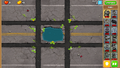
#Ouch is an Expert map in Bloons TD 6. It takes place on a street with eight paths carved into it in the shape of a number sign, hence the name.
Layout
[edit | edit source]#Ouch has 4 entrances and 4 exits that are all active every round, with the two top-bottom paths being about 22% shorter than the left-right paths. The pond being in the middle of the 4 lanes allows for a variety of utilizations of water-based towers on this map, and the pond can be drained for $1,000 if no water tower is placed on it. Unlike every other True Expert map (the other ones being Bloody Puddles, Ravine, Quad, and debatably Dark Dungeons), #Ouch has no line-of-sight blockers.
Strategy
[edit | edit source]The short length and presence of 4 simultaneous lanes make #Ouch a True Expert map. Water strategies, such as Destroyers coupled with Permanent Brew, do relatively well on this map. If the water is drained, Grandmaster Ninja becomes a powerful Black Border strategy when paired with Shinobi Tactics.
Recommended towers and upgrades
[edit | edit source]| Name | Portrait | Reasoning |
|---|---|---|
| Symphonic Resonance | 
|
The central water spot and Symphonic Resonance's greater range on water allows it to cover all 4 lanes on #Ouch at once. It stalls MOABs and DDTs very effectively, and the timed nature of the stall makes the stall especially important here due to the very short length of this map's vertical lanes. |
| Grandmaster Ninja | 
|
The center of the map is very optimal for the well-known "Shinobi Strategy", where 1 Grandmaster Ninja and 20 shinobis are used to easily black border this map. Generally speaking, Geraldo is the preferred hero of choice, as Gerry's Fire eases the saveup to Grandmaster and deals massive damage late-game thanks to shinobis buffing it, Pickles and Sharpening Stone are great on Grandmaster, and Genies do massive damage during the 90s. Obyn can also work, albeit not as effectively. |
CHIMPS starts
[edit | edit source]Gallery
[edit | edit source]-
 Easter theme
 -
 Fireworks theme
 -
 Halloween theme
 -
 Holiday theme
 -
 Island statue


In other languages
[edit | edit source]| Language | Text | Notes |
|---|---|---|
| Arabic | #أوتش | — |
| Danish | #Av | — |
| German | #Autsch | — |
| Spanish | #Ay | — |
| Spanish (Latin America) | #Ay | — |
| Finnish | #Auts | — |
| French | #Aïe | — |
| Italian | #Ahia! | — |
| Japanese | #痛い | — |
| Korean | #아야 | — |
| Dutch | #Au | — |
| Norwegian | #Ouch | — |
| Polish | #Ała | — |
| Portuguese (Brazil) | #Ai | — |
| Russian | #Ай | — |
| Swedish | #Aj | — |
| Thai | #โอ๊ย | — |
| Turkish | #Ah | — |
| Chinese (simplified) | #哎哟 | — |
| Chinese (traditional) | #哎喲 | — |
References
[edit | edit source]- Path lengths sourced from the BTD6 Index