Bloody Puddles
| Removables and gizmos |
|---|
- Jeep: $1000 (×1)
- Jeep and rocks: $500 (×1)
|
| Path lengths (RBS) |
|---|
| Path | Easy | Medium | Hard |
|---|
| Far-left | 11.4 | 10.3 | 9.1 |
|---|
| Middle-left | 11.4 | 10.3 | 9.1 |
|---|
| Middle | 11.4 | 10.3 | 9.1 |
|---|
| Middle-right | 11.4 | 10.3 | 9.1 |
|---|
| Far-right | 11.4 | 10.3 | 9.1 |
|---|
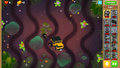
Bloody Puddles is an Expert map in Bloons TD 6, introduced in version 13.0. It is a more difficult version of Muddy Puddles.
Layout
The map has 5 paths with 6 entrances and exits, one on each of the 4 peripheral lanes in addition to 2 overlapping entrances and exits on the middle lane. On Round 1, half of the Bloons move from the far-left path's top to its bottom and the other half move from the far-right path's bottom to its top. The Bloons then spawn towards the middle lane, reaching it on round 3, and then move away from the central lanes and reach the starting lanes on round 5, and the pattern repeats. Boss Bloons always appear at the top of the middle path.
There is a jeep in the middle that can be "removed" for $1000, which adds a falling chinook that blocks more line-of-sight. The jeep and chinook can then be removed for $500.
Strategy
Bloody Puddles is generally considered to be the hardest map in BTD6, due to how Bloons spawn on multiple far-apart locations every round, how the spawning locations change every round, and the short lengths of the tracks. This map was impossible in CHIMPS before the jeep's footprint was decreased to make the early game marginally possible in version 14.0. All parts of the game in Bloody Puddles are difficult, with early game requiring extremely precise placement and some luck, the mid-game being able to stumble many strategies with the far-apart peripheral lanes, and the late-game posing trouble with the 2 short lanes active each round that change every round.
Recommended towers and upgrades
| Name
|
Portrait
|
Reasoning
|
| Giant Condor
|

|
Condor's ability to move many Bloons to a single lane effectively turns most rounds on this map, which spawn from two locations, to single-lane, greatly assisting many towers and improving the strategic variety on this map by allowing the use of many low-range DPS towers. Condor is also a great general support on this map as it is on other maps, as it can stall MOAB-class Bloons very effectively and move Bloons near the exit to the start, such as BFB insides of the BAD.
|
| Airburst Darts
|

|
This tower is the standard early-game for Bloody Puddles, basically essential on this map if you want to beat it without "micro". You can also turn it into an Armor Piercing Darts, buffed by a 301 Alchemist to help with midgame MOAB damage.
|
Gallery
-
Easter theme
-
Halloween theme
-
Holiday theme
-
Island statue
In other languages
| Language
|
Text
|
Notes
|
| Arabic
|
البرك الدموية
|
—
|
| Danish
|
Prøvelser i pytvis
|
—
|
| German
|
Verfluchte Pfützen
|
—
|
| Spanish
|
Charcos difíciles
|
—
|
| Spanish (Latin America)
|
Charcos difíciles
|
—
|
| Finnish
|
Vaaralliset lammikot
|
—
|
| French
|
Flaques mortelles
|
—
|
| Italian
|
Pozze esagerate
|
—
|
| Japanese
|
うざい泥沼
|
—
|
| Korean
|
고난의 웅덩이
|
—
|
| Dutch
|
Plasjes bloed
|
—
|
| Norwegian
|
Blodpøler
|
—
|
| Polish
|
Krwawe kałuże
|
—
|
| Portuguese (Brazil)
|
Lamaçal Terrível
|
—
|
| Russian
|
Мерзкие лужи
|
—
|
| Swedish
|
Krångliga pölar
|
—
|
| Thai
|
แอ่งเลือด
|
—
|
| Turkish
|
Lanet Su Birikintileri
|
—
|
| Chinese (simplified)
|
血腥水坑
|
—
|
| Chinese (traditional)
|
血腥水坑
|
—
|
References
Navigation


 Easter theme
 Halloween theme
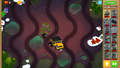 Holiday theme
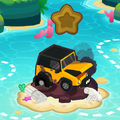 Island statue


