Party Parade: Difference between revisions
Planterror (talk | contribs) →Strategy: probably good enough |
Pixelentropy (talk | contribs) |
||
| (4 intermediate revisions by 3 users not shown) | |||
| Line 24: | Line 24: | ||
Party Parade is one of the harder Advanced Maps, debatably leaning towards a casual Expert map. Both lanes are short, and the complete separation of said lanes makes this map difficult during all parts of the game. Snipers can only hit one side of the map, and Heli Pilots in Pursuit mode will be stuck moving back and forth between both lanes, unable to hit either consistently. Despite these setbacks, some towers do work surprisingly well here. | Party Parade is one of the harder Advanced Maps, debatably leaning towards a casual Expert map. Both lanes are short, and the complete separation of said lanes makes this map difficult during all parts of the game. Snipers can only hit one side of the map, and Heli Pilots in Pursuit mode will be stuck moving back and forth between both lanes, unable to hit either consistently. Despite these setbacks, some towers do work surprisingly well here. | ||
===Recommended towers and upgrades=== | |||
{|class="wikitable center-col-1" | {|class="wikitable center-col-1" | ||
!Name | !Name | ||
| Line 31: | Line 32: | ||
|[[Psi (BTD6)|Psi]] | |[[Psi (BTD6)|Psi]] | ||
|[[File:BTD6 PsiPortrait.png|50x50px]] | |[[File:BTD6 PsiPortrait.png|50x50px]] | ||
|Psi is one of the few | |Psi is one of the few towers unbothered by the massive wall and dual lanes, and the advanced map levelling allows them to reach level 14 in a reasonable time to assist in MOAB-Class destruction. | ||
|- | |- | ||
|[[Prince of Darkness (BTD6)|Prince of Darkness]] | |[[Prince of Darkness (BTD6)|Prince of Darkness]] | ||
| Line 39: | Line 40: | ||
|[[Spirit of the Forest (BTD6)|Spirit of the Forest]] | |[[Spirit of the Forest (BTD6)|Spirit of the Forest]] | ||
|[[File:BTD6 050-Druid.png|50x50px]] | |[[File:BTD6 050-Druid.png|50x50px]] | ||
|Spirit of the Forest leaves a permanent layer of vines on all parts of the track, covering both lanes with a crowd control option as well as earning income at the end of every round. It’s best during the mid-game, and struggles to keep up in the 80s and 90s, but is a good pick all around. | |Spirit of the Forest leaves a permanent layer of vines on all parts of the track, covering both lanes with a crowd control option as well as earning income at the end of every round outside of CHIMPS. It’s best during the mid-game, and struggles to keep up in the 80s and 90s, but is a good pick all around. | ||
|- | |- | ||
|[[Carpet of Spikes (BTD6)|Carpet of Spikes]] | |[[Carpet of Spikes (BTD6)|Carpet of Spikes]] | ||
|[[File:BTD6 050-SpikeFactory.png|50x50px]] | |[[File:BTD6 050-SpikeFactory.png|50x50px]] | ||
| | |It regularly covers both lanes in a thick layer of spikes, serving a similar purpose as Spirit of the Forest, but exchanges permanence for MOAB-class popping power. It defeats DDT rounds with ease, and trivializes the round 100 BAD. | ||
|- | |- | ||
|[[Monkey Ace (BTD6)|Monkey Ace]] | |[[Monkey Ace (BTD6)|Monkey Ace]] | ||
| Line 51: | Line 52: | ||
==Gallery== | ==Gallery== | ||
{{Screenshot needed|Seasonal themes | {{Screenshot needed|Seasonal themes}}<gallery> | ||
File:BTD6 Party Parade 4th of July.png|Fireworks Theme | |||
BTD6 Party Parade Island Statue.png|Island Statue | |||
</gallery> | |||
==In other languages== | ==In other languages== | ||
Latest revision as of 17:14, 9 August 2026

|
This article is a stub. You can help out by expanding it. The editor who added this notice did not specify a reason. |

|
| Difficulty | Advanced | ||
|---|---|---|---|
| Music | Sunshine - Fiesta | ||
| Default Co-op division | Vertical | ||
| Introduced | Version 53.0 | ||
| Entrances | 2 | Exits | 2 |
| Junctions | 0 | Water? | No |
| Path lengths (RBS) | ||||
|---|---|---|---|---|
| Path | Easy | Medium | Hard | |
| left | 14.1 | 12.8 | 11.3 | |
| right | 14.1 | 12.8 | 11.3 | |
Party Parade is an Advanced map in Bloons TD 6, introduced in version 53.0. It is set at an urban garden with brick floors and hedges.
Layout
[edit | edit source]This map is horizontally symmetrical with two simultaneously active paths. The left path starts at the top and exits at the bottom, while the right path starts at the bottom and exits at the top, and both paths round a large curve in the middle. The wide wall separating the two sides of the map blocks placement and line of sight.
Strategy
[edit | edit source]Party Parade is one of the harder Advanced Maps, debatably leaning towards a casual Expert map. Both lanes are short, and the complete separation of said lanes makes this map difficult during all parts of the game. Snipers can only hit one side of the map, and Heli Pilots in Pursuit mode will be stuck moving back and forth between both lanes, unable to hit either consistently. Despite these setbacks, some towers do work surprisingly well here.
Recommended towers and upgrades
[edit | edit source]| Name | Portrait | Reasoning |
|---|---|---|
| Psi | 
|
Psi is one of the few towers unbothered by the massive wall and dual lanes, and the advanced map levelling allows them to reach level 14 in a reasonable time to assist in MOAB-Class destruction. |
| Prince of Darkness | 
|
With a single range buff from a Monkey Village or Etienne, a Prince of Darkness can reach and spawn Zombie Bloons on both tracks, trivializing cleanup. |
| Spirit of the Forest | 
|
Spirit of the Forest leaves a permanent layer of vines on all parts of the track, covering both lanes with a crowd control option as well as earning income at the end of every round outside of CHIMPS. It’s best during the mid-game, and struggles to keep up in the 80s and 90s, but is a good pick all around. |
| Carpet of Spikes | 
|
It regularly covers both lanes in a thick layer of spikes, serving a similar purpose as Spirit of the Forest, but exchanges permanence for MOAB-class popping power. It defeats DDT rounds with ease, and trivializes the round 100 BAD. |
| Monkey Ace | 
|
As long as its not set to Wingmonkey (which leaves it in a similar predicament to Pursuit Helis), all paths of Monkey Aces provide constant support and damage on both paths during all parts of the game, and can even carry you through the endgame. |
Gallery
[edit | edit source]
|
This article or section needs more screenshots. See the screenshot guidelines for more information on what screenshots are needed and how to add them. The editor that added this notice elaborates: Seasonal themes |
-
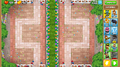 Fireworks Theme
 -
 Island Statue


In other languages
[edit | edit source]| Language | Text | Notes |
|---|---|---|
| Arabic | موكب الحفل | — |
| Danish | Fest Parade | — |
| German | Party-Parade | — |
| Spanish | Desfile de Fiesta | — |
| Spanish (Latin America) | Desfile de Fiesta | — |
| Finnish | Juhlaparaadi | — |
| French | Défilé de Fête | — |
| Italian | Parata della Festa | — |
| Japanese | パーティー・パレード | — |
| Korean | 파티 퍼레이드 | — |
| Dutch | Feest Parade | — |
| Norwegian | Festparade | — |
| Polish | Parada Imprez | — |
| Portuguese (Brazil) | Desfile da Festa | — |
| Russian | Парад вечеринок | — |
| Swedish | Festparad | — |
| Thai | ขบวนพาเหรดปาร์ตี้ | — |
| Turkish | Parti Geçidi | — |
| Chinese (simplified) | 派对游行 | — |
| Chinese (traditional) | 派對巡遊 | — |