Cracked: Difference between revisions
Pymonkibot (talk | contribs) Bot: Automated import of articles |
m →Recommended towers and upgrades: Grammar fix |
||
| (6 intermediate revisions by 4 users not shown) | |||
| Line 3: | Line 3: | ||
|name =Cracked | |name =Cracked | ||
|image=BTD6 | |image=BTD6 MapSelectCrackedButton.png | ||
|introduced= | |introduced= | ||
| Line 16: | Line 16: | ||
|water =Yes | |water =Yes | ||
|removable costs =1000 | |removable costs =1000 | ||
|removable labels = | |removable labels =Rock | ||
|removable amounts= | |removable amounts=1 | ||
|music=Tribes & Tribulations | |music=Tribes & Tribulations | ||
|coop division=3 | |coop division=3 | ||
}} | }} | ||
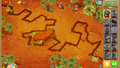
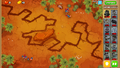
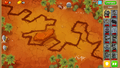
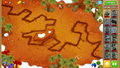
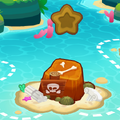
'''Cracked''' is an [[Intermediate]] [[map]] in ''[[Bloons TD 6]]''. | '''Cracked''' is an [[Intermediate]] [[map]] in ''[[Bloons TD 6]]''. It takes placed on a cracked, mostly barren landscape. | ||
==Layout== | ==Layout== | ||
Bloons enter from the top right and exit at the bottom-right. There is a rock at the center, which blocks line-of-sight and can be removed to place water towers for $1000. The trees at the edges of the map also block line-of-sight. Cracked is the 3rd-longest Intermediate map, after [[Quarry]] (Bloons-only lane) and [[Moon Landing (BTD6)|Moon Landing]]. | |||
==Strategy== | ==Strategy== | ||
Being a long single-lane map having plenty of bends, Cracked is one of the easiest Intermediate maps in BTD6. Long-range towers are generally best placed to the right of the rock to cover multiple sectors of the track at once. Global-range towers, such as [[Heli Pilot (BTD6)|Heli Pilots]], function well here due to the relatively spread-out and long track. Cracked can be beaten using general guidelines listed below. | |||
{{BTD6 basic map strategies}} | {{BTD6 basic map strategies}} | ||
Towers that perform especially well on Cracked are listed here. | |||
===Recommended towers and upgrades=== | |||
{|class="wikitable center-col-1" | |||
!Name | |||
!Portrait | |||
!Reasoning | |||
|- | |||
|[[Comanche Defense (BTD6)|Comanche Defense]], [[Comanche Commander (BTD6)|Comanche Commander]] | |||
|[[File:BTD6 004-HeliPilot.png|x50px]] [[File:BTD6 005-HeliPilot.png|x50px]] | |||
|Comanche Defense can take advantage of the whole track length, with its mini comanches doing solid overall damage. It is a solid mid-game tower that saves up comfortably to many win conditions, including its own tier 5, Comanche Commander. After obtaining Comanche Commander, the rest of the game is relatively simple, due to Comanche Commander doing solid overall damage to all of the late-game, especially with [[Geraldo (BTD6)|Geraldo]]'s [[Sharpening Stone]] and [[Glue Storm (BTD6)|Glue Storm]]'s de-buff and de-[[Lead Bloon (BTD6)|Leading]] of [[DDT (BTD6)|DDTs]]. | |||
|- | |||
|[[The Bloon Solver (BTD6)|The Bloon Solver]] | |||
|[[File:BTD6 500-GlueGunner.png|x50px]] | |||
|When placed to the right of the rock, Solver can hit multiple sections of the track at once. Thus, it has many chances to hit Bloons and blimps to trigger its chain effect from the puddles, and if high-health blimps are not popped by the time they reach Solver's range, its glue can damage them somewhat and then clean up their insides later on. Solver pairs well with Comanche Commander, which can face some struggles with dense rounds, the main strength of Solver. | |||
|} | |||
==Gallery== | ==Gallery== | ||
<gallery> | |||
BTD6 Cracked easter.png|Easter theme | |||
BTD6 Cracked fireworks.png|Fireworks theme | |||
BTD6 Cracked halloween.png|Halloween theme | |||
BTD6 Cracked holiday.png|Holiday theme | |||
BTD6 Cracked island statue.png|Island statue | |||
</gallery> | |||
==In other languages== | ==In other languages== | ||
{{BTD6 | {{BTD6 last updated|48.1|section=y}} | ||
|ar | {{langlist | ||
|da | |key=Cracked | ||
|de | |ar =المقسمة | ||
|es | |da =Brudt | ||
|es-la | |de =Rissig | ||
|fi | |es =Resquebrajado | ||
|fr | |es-la=Resquebrajado | ||
|it | |fi =Murtunut | ||
|ja | |fr =À sec | ||
|ko | |it =Spaccatura | ||
|nl | |ja =割れ目がある | ||
|no | |ko =갈라진 땅 | ||
|pl | |nl =Gekraakt | ||
|pt-br | |no =Sprukket | ||
|ru | |pl =Przełamana | ||
|sv | |pt-br=Partido | ||
|th | |ru =Трещины | ||
|tr | |sv =Sprucken | ||
|zh-cn | |th =แตก | ||
|zh-tw | |tr =Çatlak | ||
|zh-cn=龟裂之地 | |||
|zh-tw=龜裂之地 | |||
}} | }} | ||
Latest revision as of 02:16, 19 December 2025

|
| Difficulty | Intermediate | ||
|---|---|---|---|
| Music | Tribes & Tribulations | ||
| Default Co-op division | Diagonal (top-left to bottom-right) | ||
| Introduced | Launch | ||
| Entrances | 1 | Exits | 1 |
| Junctions | 0 | Water? | Yes |
| Removables and gizmos |
|---|
|
| Path lengths (RBS) | ||
|---|---|---|
| Easy | Medium | Hard |
| 41.5 | 37.7 | 33.2 |
Cracked is an Intermediate map in Bloons TD 6. It takes placed on a cracked, mostly barren landscape.
Layout
[edit | edit source]Bloons enter from the top right and exit at the bottom-right. There is a rock at the center, which blocks line-of-sight and can be removed to place water towers for $1000. The trees at the edges of the map also block line-of-sight. Cracked is the 3rd-longest Intermediate map, after Quarry (Bloons-only lane) and Moon Landing.
Strategy
[edit | edit source]Being a long single-lane map having plenty of bends, Cracked is one of the easiest Intermediate maps in BTD6. Long-range towers are generally best placed to the right of the rock to cover multiple sectors of the track at once. Global-range towers, such as Heli Pilots, function well here due to the relatively spread-out and long track. Cracked can be beaten using general guidelines listed below.
 Basic Deflation strategies
 Basic Apopalypse strategies
 Basic Half Cash strategies
 Basic Alternate Bloons Rounds strategies
 Basic Impoppable strategies
 Basic CHIMPS strategies
Towers that perform especially well on Cracked are listed here.
Recommended towers and upgrades
[edit | edit source]| Name | Portrait | Reasoning |
|---|---|---|
| Comanche Defense, Comanche Commander |  |
Comanche Defense can take advantage of the whole track length, with its mini comanches doing solid overall damage. It is a solid mid-game tower that saves up comfortably to many win conditions, including its own tier 5, Comanche Commander. After obtaining Comanche Commander, the rest of the game is relatively simple, due to Comanche Commander doing solid overall damage to all of the late-game, especially with Geraldo's Sharpening Stone and Glue Storm's de-buff and de-Leading of DDTs. |
| The Bloon Solver | 
|
When placed to the right of the rock, Solver can hit multiple sections of the track at once. Thus, it has many chances to hit Bloons and blimps to trigger its chain effect from the puddles, and if high-health blimps are not popped by the time they reach Solver's range, its glue can damage them somewhat and then clean up their insides later on. Solver pairs well with Comanche Commander, which can face some struggles with dense rounds, the main strength of Solver. |
Gallery
[edit | edit source]-
 Easter theme
 -
 Fireworks theme
 -
 Halloween theme
 -
 Holiday theme
 -
 Island statue


In other languages
[edit | edit source]| Language | Text | Notes |
|---|---|---|
| Arabic | المقسمة | — |
| Danish | Brudt | — |
| German | Rissig | — |
| Spanish | Resquebrajado | — |
| Spanish (Latin America) | Resquebrajado | — |
| Finnish | Murtunut | — |
| French | À sec | — |
| Italian | Spaccatura | — |
| Japanese | 割れ目がある | — |
| Korean | 갈라진 땅 | — |
| Dutch | Gekraakt | — |
| Norwegian | Sprukket | — |
| Polish | Przełamana | — |
| Portuguese (Brazil) | Partido | — |
| Russian | Трещины | — |
| Swedish | Sprucken | — |
| Thai | แตก | — |
| Turkish | Çatlak | — |
| Chinese (simplified) | 龟裂之地 | — |
| Chinese (traditional) | 龜裂之地 | — |
References
[edit | edit source]- Path lengths sourced from the BTD6 Index