Bloons Tower Defense 2: Difference between revisions
→Rounds: Okay, Polavux, is this good? Tags: Mobile edit Mobile web edit |
|||
| (9 intermediate revisions by 4 users not shown) | |||
| Line 33: | Line 33: | ||
[[File:BTD1 dart button.svg|50px]] | [[File:BTD1 dart button.svg|50px]] | ||
|id="Dart Monkey"|'''[[Dart Monkey]]'''<br>Shoots a single dart. Can upgrade to piercing darts and long range darts | |id="Dart Monkey"|'''[[Dart Monkey]]'''<br>Shoots a single dart. Can upgrade to piercing darts and long range darts{{sic}} | ||
|$250 — Easy<br>$280 — Medium<br>$285 — Hard | |$250 — Easy<br>$280 — Medium<br>$285 — Hard | ||
|{{ | |{{BTD3 tower stats | ||
|range =100 | |range =100 | ||
|speed text =Fast | |speed text =Fast | ||
| Line 49: | Line 49: | ||
[[File:BTD1 tack button.svg|50px]] | [[File:BTD1 tack button.svg|50px]] | ||
|id="Tack Shooter"|'''[[Tack Shooter]]'''<br>Shoots volley of tacks in 8 directions. Can upgrade its shoot speed and its range. | |id="Tack Shooter"|'''[[Tack Shooter]]'''<br>Shoots volley{{sic}} of tacks in 8 directions. Can upgrade its shoot speed and its range. | ||
|$340 — Easy<br>$385 — Medium<br>$390 — Hard | |$340 — Easy<br>$385 — Medium<br>$390 — Hard | ||
|{{ | |{{BTD3 tower stats | ||
|range =70 | |range =70 | ||
|speed text =Medium | |speed text =Medium | ||
| Line 67: | Line 67: | ||
|id="Ice Ball"|'''[[Ice Monkey|Ice Ball]]'''<br>Freezes nearby bloons. Frozen bloons are immune to darts and tacks, but bombs will destroy them. Can upgrade to increased freeze time, and larger freeze radius. | |id="Ice Ball"|'''[[Ice Monkey|Ice Ball]]'''<br>Freezes nearby bloons. Frozen bloons are immune to darts and tacks, but bombs will destroy them. Can upgrade to increased freeze time, and larger freeze radius. | ||
|$385 — Easy<br>$435 — Medium<br>$440 — Hard | |$385 — Easy<br>$435 — Medium<br>$440 — Hard | ||
|{{ | |{{BTD3 tower stats | ||
|range =60 | |range =60 | ||
|speed text =Slow | |speed text =Slow | ||
| Line 84: | Line 84: | ||
|id="Cannon"|'''[[Bomb Shooter|Cannon]]'''<br>Launches a bomb that explodes on impact. Can upgrade to bigger bombs and longer range. | |id="Cannon"|'''[[Bomb Shooter|Cannon]]'''<br>Launches a bomb that explodes on impact. Can upgrade to bigger bombs and longer range. | ||
|$520 — Easy<br>$585 — Medium<br>$600 — Hard | |$520 — Easy<br>$585 — Medium<br>$600 — Hard | ||
|{{ | |{{BTD3 tower stats | ||
|range =120 | |range =120 | ||
|speed text =Medium | |speed text =Medium | ||
| Line 100: | Line 100: | ||
|id="Boomerang"|'''[[Boomerang Monkey|Boomerang]]'''<br>Throws a boomerang that follows a curved path back to the tower. Can pop 2 bloons at once. Sonic booom upgrade allows popping of frozen bloons. | |id="Boomerang"|'''[[Boomerang Monkey|Boomerang]]'''<br>Throws a boomerang that follows a curved path back to the tower. Can pop 2 bloons at once. Sonic booom upgrade allows popping of frozen bloons. | ||
|$475 — Easy<br>$535 — Medium<br>$545 — Hard | |$475 — Easy<br>$535 — Medium<br>$545 — Hard | ||
|{{ | |{{BTD3 tower stats | ||
|range =130 | |range =130 | ||
|speed text =Medium | |speed text =Medium | ||
| Line 115: | Line 115: | ||
|id="Super Monkey"|'''[[Super Monkey]]'''<br>Super monkey shoots incredibly fast. Can upgrade to epic range or laser vision! | |id="Super Monkey"|'''[[Super Monkey]]'''<br>Super monkey shoots incredibly fast. Can upgrade to epic range or laser vision! | ||
|$3,600 — Easy<br>$4,080 — Medium<br>$4,160 — Hard | |$3,600 — Easy<br>$4,080 — Medium<br>$4,160 — Hard | ||
|{{ | |{{BTD3 tower stats | ||
|range =140 | |range =140 | ||
|speed text =Hypersonic | |speed text =Hypersonic | ||
| Line 202: | Line 202: | ||
|} | |} | ||
=== | ===Total costs and sell values=== | ||
{ | {|class="wikitable sortable" style="text-align:center" | ||
!rowspan="2"|Tower | |||
!rowspan="2"|Tiers | |||
!colspan="3"|Total cost | |||
!rowspan="2"|Sell value | |||
|- | |||
!Easy | |||
!Medium | |||
!Hard | |||
|- | |||
|rowspan="4"|Dart Monkey | |||
|0-0 | |||
|$250 | |||
|$280 | |||
|$285 | |||
|$220 | |||
|- | |||
|1-0 | |||
|$430 | |||
|$485 | |||
|$495 | |||
|$380 | |||
|- | |||
|0-1 | |||
|$330 | |||
|$370 | |||
|$380 | |||
|$292 | |||
|- | |||
|1-1 | |||
|$510 | |||
|$575 | |||
|$590 | |||
|$452 | |||
|- | |||
|rowspan="4"|Tack Shooter | |||
|0-0 | |||
|$340 | |||
|$385 | |||
|$390 | |||
|$300 | |||
|- | |||
|1-0 | |||
|$520 | |||
|$590 | |||
|$600 | |||
|$460 | |||
|- | |||
|0-1 | |||
|$430 | |||
|$485 | |||
|$495 | |||
|$380 | |||
|- | |||
|1-1 | |||
|$610 | |||
|$690 | |||
|$705 | |||
|$540 | |||
|- | |||
|rowspan="4"|Ice Ball | |||
|0-0 | |||
|$385 | |||
|$485 | |||
|$440 | |||
|$460 | |||
|- | |||
|1-0 | |||
|$655 | |||
|$790 | |||
|$750 | |||
|$700 | |||
|- | |||
|0-1 | |||
|$565 | |||
|$690 | |||
|$650 | |||
|$620 | |||
|- | |||
|1-1 | |||
|$835 | |||
|$995 | |||
|$960 | |||
|$860 | |||
|- | |||
|rowspan="4"|Cannon | |||
|0-0 | |||
|$520 | |||
|$585 | |||
|$600 | |||
|$460 | |||
|- | |||
|1-0 | |||
|$900 | |||
|$1,015 | |||
|$1,035 | |||
|$796 | |||
|- | |||
|0-1 | |||
|$700 | |||
|$790 | |||
|$810 | |||
|$620 | |||
|- | |||
|1-1 | |||
|$1,080 | |||
|$1,220 | |||
|$1,245 | |||
|$956 | |||
|- | |||
|rowspan="4"|Boomerang | |||
|0-0 | |||
|$475 | |||
|$535 | |||
|$545 | |||
|$420 | |||
|- | |||
|1-0 | |||
|$745 | |||
|$840 | |||
|$855 | |||
|$660 | |||
|- | |||
|0-1 | |||
|$610 | |||
|$690 | |||
|$700 | |||
|$540 | |||
|- | |||
|1-1 | |||
|$880 | |||
|$995 | |||
|$1,010 | |||
|$780 | |||
|- | |||
|rowspan="4"|Super Monkey | |||
|0-0 | |||
|$3,600 | |||
|$4,080 | |||
|$4,160 | |||
|$3,200 | |||
|- | |||
|1-0 | |||
|$5,760 | |||
|$6,530 | |||
|$6,655 | |||
|$5,120 | |||
|- | |||
|0-1 | |||
|$7,650 | |||
|$8,670 | |||
|$8,840 | |||
|$6,800 | |||
|- | |||
|1-1 | |||
|$9,810 | |||
|$11,120 | |||
|$11,335 | |||
|$8,720 | |||
|} | |||
==Track placeable items== | ==Track placeable items== | ||
| Line 281: | Line 440: | ||
==Maps== | ==Maps== | ||
There are three [[map]]s, each corresponding to a different [[difficulty]] level. Harder maps increase the cost of all towers, upgrades, and placeables, and reduce the number of [[life|lives]] the player starts with. Bloons take the same amount of time to reach the exit on all maps. The user interface normally blocks the right side of the maps, though towers can be placed there with glitches. | There are three [[map]]s in the game, each corresponding to a different [[difficulty]] level. Harder maps increase the cost of all towers, upgrades, and placeables, and reduce the number of [[life|lives]] the player starts with. Bloons take the same amount of time to reach the exit on all maps. The user interface normally blocks the right side of the maps, though towers can be placed there with glitches. | ||
{|class="wikitable" | |||
!Map | |||
!Properties | |||
| | !Description | ||
| | |- | ||
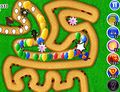
| | !id="Easy"|[[File:BTD2 easy map.png|200px]]<br>Easy | ||
|style="white-space:nowrap"| | |||
*Costs: ×0.9 | |||
*Starting lives: 100 | |||
|Easy has a cloudy blue background and a white path. Bloons enter from the left, round many corners, and exit at the bottom. | |||
= | |- | ||
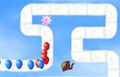
!id="Medium"|[[File:BTD2 medium map.png|200px]]<br>Medium | |||
| | |style="white-space:nowrap"| | ||
*Costs: ×1.02 | |||
| | *Starting lives: 75 | ||
|Medium resembles the map from ''[[Bloons Tower Defense (game)|Bloons Tower Defense]]'', but has a different layout. Bloons enter from the top-left, travel to the bottom over a bend, then travel straight up in the middle, then travel down again over a bend on the right side, and exit at the bottom-right. | |||
|- | |||
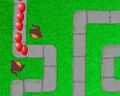
!id="Hard"|[[File:BTD2 hard map.png|200px]]<br>Hard | |||
|style="white-space:nowrap"| | |||
*Costs: ×1.04 | |||
= | *Starting lives: 50 | ||
|Hard has a sandy yellow background and brown paths. This is the only map in the game with two paths, which both start at the top and exit at the bottom, intersecting once on the left side, and have the same length. The left path reaches the intersection first. | |||
| | |} | ||
| | |||
==Rounds== | ==Rounds== | ||
{|class="wikitable sortable center-col-1 center-col-3" | {|class="wikitable sortable center-col-1 center-col-3" | ||
! | !№ | ||
!Bloon groups | !Bloon groups | ||
![[RBE]] / cash | ![[RBE]] / cash | ||
| Line 403: | Line 556: | ||
|Blue ×20<br>Green ×55<br>Blue ×20 | |Blue ×20<br>Green ×55<br>Blue ×20 | ||
|245 | |245 | ||
|Have you played Bloons? | |Have you played [[Bloons (game)|Bloons]]? | ||
|- | |- | ||
!18 | !18 | ||
| Line 593: | Line 746: | ||
==Bugs and glitches== | ==Bugs and glitches== | ||
===Incorrect sell values=== | |||
The [[sell]] value of towers is derived from the ''base cost'' of the tower and its upgrades, not the actual amount of [[cash]] spent on them as determined by the difficulty level. For example, a 0-0 Dart Monkey always sells for $220 regardless of difficulty. This makes selling more valuable on Easy and less valuable on Medium and Hard than intended. | |||
===Upgrade stacking glitch=== | ===Upgrade stacking glitch=== | ||
{{main|Upgrade stacking glitch}} | {{main|Upgrade stacking glitch}} | ||
By pressing {{key|Tab}} until an upgrade button is highlighted and pressing {{key|Enter}} to purchase it, the player can purchase that upgrade multiple times on one tower. There's no limit to the number of times the upgrade can be bought and it doesn't stop if the player can't afford it, which puts their money into the negatives. The most useful application of this glitch is to use the Tack Shooter's Faster Shooting upgrade to increase its [[attack speed]] to the cap of 40 shots per second; this specific application is often called the "hypersonic Tack Shooter glitch". | |||
==Technical information== | ==Technical information== | ||
Latest revision as of 05:54, 21 April 2026
| Developer(s) | Ninja Kiwi | |||
|---|---|---|---|---|
| Publisher(s) | Ninja Kiwi | |||
| Platform(s) | Adobe Flash | |||
| Release dates | ||||
|---|---|---|---|---|
| Ninja Kiwi | Unknown | |||
| MochiGames | 18 October 2007[1] | |||
| Newgrounds | 18 October 2007 | |||
| Kongregate | 18 October 2007 | |||
| Armor Games | 7 February 2008 | |||
| Language(s) supported |
|---|
English
|
Bloons Tower Defense 2 (also referred to with the retronyms Bloons TD 2 and BTD2) is an Adobe Flash game in the Bloons TD series developed by Ninja Kiwi and first released in 2007. It is built on Bloons Tower Defense and shares very similar gameplay, but introduces three new maps across three difficulty levels, a new tower type, two new Bloon types, and new placeable items.
Towers
[edit | edit source]| Sprites | Text | Cost | Stats | Projectile(s) |
|---|---|---|---|---|

|
Dart Monkey Shoots a single dart. Can upgrade to piercing darts and long range darts[sic] |
$250 — Easy $280 — Medium $285 — Hard |
Attack speed: "Fast"
Cooldown: 33 frames (0.825s) Range: 100 units Pierce: 1 Projectile speed: 20 units per frame Projectile lifespan: 7 frames (0.175s) Projectile size: 100% |
|

|
Tack Shooter Shoots volley[sic] of tacks in 8 directions. Can upgrade its shoot speed and its range. |
$340 — Easy $385 — Medium $390 — Hard |
Attack speed: "Medium"
Cooldown: 55 frames (1.375s) Range: 70 units Pierce: 1 Projectile speed: 15 units per frame Projectile lifespan: 5 frames (0.125s) Projectile size: 100% |
|
|
Ice Ball Freezes nearby bloons. Frozen bloons are immune to darts and tacks, but bombs will destroy them. Can upgrade to increased freeze time, and larger freeze radius. |
$385 — Easy $435 — Medium $440 — Hard |
Attack speed: "Slow"
Cooldown: 93 frames (2.325s) Range: 60 units Pierce: 50 Projectile speed: 20 units per frame Projectile lifespan: 10 frames (0.25s) Projectile size: 80% Freeze duration: 50 frames (1.25s) |
 
|

|
Cannon Launches a bomb that explodes on impact. Can upgrade to bigger bombs and longer range. |
$520 — Easy $585 — Medium $600 — Hard |
Attack speed: "Medium"
Cooldown: 48 frames (1.2s) Range: 120 units Pierce: 40 Projectile speed: 13 units per frame Projectile lifespan: 18 frames (0.45s) Projectile size: 100% |
 
|

|
Boomerang Throws a boomerang that follows a curved path back to the tower. Can pop 2 bloons at once. Sonic booom upgrade allows popping of frozen bloons. |
$475 — Easy $535 — Medium $545 — Hard |
Attack speed: "Medium"
Cooldown: 50 frames (1.25s) Range: 130 units Pierce: 2 Projectile speed: units per frame Projectile lifespan: 50 frames (1.25s) Projectile size: 100% |
|

|
Super Monkey Super monkey shoots incredibly fast. Can upgrade to epic range or laser vision! |
$3,600 — Easy $4,080 — Medium $4,160 — Hard |
Attack speed: "Hypersonic"
Cooldown: 2 frames (0.05s) Range: 140 units Pierce: 1 Projectile speed: 20 units per frame Projectile lifespan: 20 frames (0.5s) Projectile size: 100% |


Upgrades
[edit | edit source]| Images | Name | Tower | Cost | Effect |
|---|---|---|---|---|
| Piercing Darts | Dart Monkey | $180 — Easy $205 — Medium $210 — Hard |
+1 pierce | |
| Long Range Darts | $80 — Easy $90 — Medium $95 — Hard |
+25 range | ||
| Faster Shooting | Tack Shooter | $180 — Easy $205 — Medium $210 — Hard |
-15 cooldown | |
| Extra Range Tacks | $90 — Easy $100 — Medium $105 — Hard |
+10 range, +30% projectile size | ||
| Long Freeze Time | Ice Ball | $270 — Easy $305 — Medium $310 — Hard |
+20 freeze duration | |
| Wide Freeze Radius | $180 — Easy $205 — Medium $210 — Hard |
+15 range, +20% projectile size | ||
| Bigger Bombs | Cannon | $380 — Easy $430 — Medium $435 — Hard |
+50% projectile size (affects both the initial bomb and the explosion) | |
| Extra Range Bombs | $180 — Easy $205 — Medium $210 — Hard |
+20 range | ||

|
Multi Target | Boomerang | $270 — Easy $305 — Medium $310 — Hard |
+3 pierce |

|
Sonic Boom | $135 — Easy $155 — Medium $155 — Hard |
Pops frozen | |
| Epic Range | Super Monkey | $2,160 — Easy $2,450 — Medium $2,495 — Hard |
+100 range | |

|
Laser Vision | $4,050 — Easy $4,590 — Medium $4,680 — Hard |
+1 pierce, pops frozen |
Total costs and sell values
[edit | edit source]| Tower | Tiers | Total cost | Sell value | ||
|---|---|---|---|---|---|
| Easy | Medium | Hard | |||
| Dart Monkey | 0-0 | $250 | $280 | $285 | $220 |
| 1-0 | $430 | $485 | $495 | $380 | |
| 0-1 | $330 | $370 | $380 | $292 | |
| 1-1 | $510 | $575 | $590 | $452 | |
| Tack Shooter | 0-0 | $340 | $385 | $390 | $300 |
| 1-0 | $520 | $590 | $600 | $460 | |
| 0-1 | $430 | $485 | $495 | $380 | |
| 1-1 | $610 | $690 | $705 | $540 | |
| Ice Ball | 0-0 | $385 | $485 | $440 | $460 |
| 1-0 | $655 | $790 | $750 | $700 | |
| 0-1 | $565 | $690 | $650 | $620 | |
| 1-1 | $835 | $995 | $960 | $860 | |
| Cannon | 0-0 | $520 | $585 | $600 | $460 |
| 1-0 | $900 | $1,015 | $1,035 | $796 | |
| 0-1 | $700 | $790 | $810 | $620 | |
| 1-1 | $1,080 | $1,220 | $1,245 | $956 | |
| Boomerang | 0-0 | $475 | $535 | $545 | $420 |
| 1-0 | $745 | $840 | $855 | $660 | |
| 0-1 | $610 | $690 | $700 | $540 | |
| 1-1 | $880 | $995 | $1,010 | $780 | |
| Super Monkey | 0-0 | $3,600 | $4,080 | $4,160 | $3,200 |
| 1-0 | $5,760 | $6,530 | $6,655 | $5,120 | |
| 0-1 | $7,650 | $8,670 | $8,840 | $6,800 | |
| 1-1 | $9,810 | $11,120 | $11,335 | $8,720 | |
Track placeable items
[edit | edit source]| Sprites | Text | Cost | Projectile(s) |
|---|---|---|---|

|
Road Spikes Place these road spikes on the track to pop bloons. Can pop 10 bloons before wearing out. Road spikes only last until the end of the round. |
$25 — Easy $30 — Medium $30 — Hard |
|

|
Monkey Glue Monkey glue slows down bloons. Each blob can slow down 20 bloons before wearing out. Monkey glue only lasts until the end of the round. |
$35 — Easy $40 — Medium $40 — Hard |
Bloons
[edit | edit source]| Sprite | Name | RBE | Speed | Children |
|---|---|---|---|---|
| Red Bloon | 1 | ×1 | — | |
| Blue Bloon | 2 | ×1.4 | Red Bloon ×1 | |
| Green Bloon | 3 | ×1.8 | Blue Bloon ×1 | |
| Yellow Bloon | 4 | ×3.2 | Green Bloon ×1 | |
| Black Bloon | 9 | ×1.8 | Yellow Bloon ×2 | |
| White Bloon | 9 | ×2.5 | Yellow Bloon ×2 | |
| Lead Bloon | 19 | ×1 | Black Bloon ×2 | |
| Rainbow Bloon | 37 | ×2.2 | Black Bloon ×2 White Bloon ×2 |
Maps
[edit | edit source]There are three maps in the game, each corresponding to a different difficulty level. Harder maps increase the cost of all towers, upgrades, and placeables, and reduce the number of lives the player starts with. Bloons take the same amount of time to reach the exit on all maps. The user interface normally blocks the right side of the maps, though towers can be placed there with glitches.
| Map | Properties | Description |
|---|---|---|
 Easy |
|
Easy has a cloudy blue background and a white path. Bloons enter from the left, round many corners, and exit at the bottom. |
 Medium |
|
Medium resembles the map from Bloons Tower Defense, but has a different layout. Bloons enter from the top-left, travel to the bottom over a bend, then travel straight up in the middle, then travel down again over a bend on the right side, and exit at the bottom-right. |
 Hard |
|
Hard has a sandy yellow background and brown paths. This is the only map in the game with two paths, which both start at the top and exit at the bottom, intersecting once on the left side, and have the same length. The left path reaches the intersection first. |
Rounds
[edit | edit source]| № | Bloon groups | RBE / cash | Hint |
|---|---|---|---|
| 1 | Red ×12 | 12 | Easy as pie, press 'Start Round' to play the next round. |
| 2 | Red ×30 | 30 | If this is your first time playing Bloons Tower Defense, have a go at the first version as well. |
| 3 | Red ×10 Blue ×4 Red ×5 Blue ×4 |
31 | Use road spikes to pop any bloons that look like they're going to escape. |
| 4 | Red ×5 Blue ×12 Red ×5 Blue ×12 |
58 | In Bloons TD 1, you could pass with only dart towers. In TD 2, I promise you that is no longer possible... |
| 5 | Red ×10 Blue ×8 Red ×12 Blue ×20 |
78 | Boomerangs sonic boom upgrade allows boomerangs to pop frozen bloons. |
| 6 | Red ×13 Green ×7 Green ×8 |
58 | Monkey glue is useful for buying yourself some time. |
| 7 | Blue ×50 | 100 | The dart tower piercing upgrade allows darts to pop up to 2 bloons each. |
| 8 | Red ×9 Blue ×16 Red ×9 Blue ×7 Red ×9 Blue ×7 |
87 | Ice towers work best with bomb towers or sonic boom boomerangs nearby. |
| 9 | Blue ×20 Green ×15 Blue ×12 |
109 | Are you ready for a whole bunch of greens? |
| 10 | Green ×32 | 96 | If a bloon escapes, you lose as many lives as the bloon had bloons inside it plus 1. |
| 11 | Green ×12 Yellow ×7 Yellow ×4 |
80 | Check out this pretty bloon coming up... |
| 12 | Rainbow ×1 | 37 | Tower defense is a strategic game. Bloons tower defense is about monkeys with darts. Go figure. |
| 13 | Blue ×18 Red ×18 Green ×30 Blue ×20 |
184 | 23 yellows on their merry way. |
| 14 | Yellow ×23 | 92 | Yellows and greens, greens and yellows. |
| 15 | Yellow ×6 Green ×6 Yellow ×4 Green ×8 Yellow ×3 |
94 | The game is paused at the end of each level, so take a moment to eat a piece of toast or have a cup of tea. |
| 16 | Blue ×45 Green ×25 Blue ×9 Green ×25 |
258 | Relax a bit, there are no yellow bloons in the next level. |
| 17 | Blue ×20 Green ×55 Blue ×20 |
245 | Have you played Bloons? |
| 18 | Blue ×30 Yellow ×22 Green ×24 |
220 | Bomb towers are actually pretty good, in fact you might need one in the next couple of rounds. Hint hint. |
| 19 | Green ×75 | 225 | 'A man walks into a bar.... DONK.' Ok that joke went down like a lead balloon... |
| 20 | Lead ×1 | 19 | Place your towers so that they can be shooting at something for a long time, corners are good. |
| 21 | Yellow ×14 Blue ×10 Yellow ×23 Green ×10 Green ×30 |
288 | Ready for 50 straight yellows? |
| 22 | Yellow ×50 | 200 | Boomerangs multi-target upgrade increases the bloons popped up to 5 per throw. |
| 23 | Yellow ×30 Green ×35 Yellow ×30 |
345 | On medium and hard difficulties, the cost of stuff is higher. |
| 24 | Green ×30 Yellow ×45 Green ×26 Blue ×20 |
388 | There are no cheats in this game, last time I was lying. |
| 25 | Yellow ×20 Black ×15 Yellow ×22 |
303 | Half way through, well done. Now lets step things up a bit. |
| 26 | Yellow ×80 Yellow ×22 |
408 | Remember, black bloons are immune to bombs, white immune to ice, and lead immune to anything spikey... |
| 27 | Black ×28 | 252 | When you sell a tower, you get 80% of what you paid for it, including all the upgrade money you spent. |
| 28 | Black ×12 White ×10 |
198 | Monochrome level. Leads, blacks, and whites. |
| 29 | Lead ×4 Black ×11 White ×9 |
256 | 120 yellows for fun. Yellows shouldn't be any threat to you any more. Right? |
| 30 | Yellow ×120 | 480 | There are no left handed monkeys, sorry just live with it. |
| 31 | Lead ×11 | 209 | The good thing about black bloons is that they move slower than yellows. |
| 32 | Yellow ×20 White ×8 Black ×10 |
242 | 55 black bloons. |
| 33 | Black ×55 | 495 | The moon landing was not a hoax. |
| 34 | Black ×25 White ×23 Yellow ×50 |
632 | You might not need to use every tower type. But think of the wasted programming and graphic drawing if you don't[sic] |
| 35 | Rainbow ×7 | 259 | You can improve frame rate a bit by having no towers selected during the round. |
| 36 | Black ×11 Yellow ×12 Black ×10 Lead ×4 White ×10 Black ×6 |
457 | 20 lead bloons. |
| 37 | Lead ×20 | 380 | All bloons in bloons games and related products use a biodegradable material. Imagine that. |
| 38 | Yellow ×200 | 800 | Yellows, whites, blacks, leads, and rainbows for your popping pleasure. |
| 39 | Yellow ×50 Black ×15 White ×13 Lead ×8 Rainbow ×5 White ×20 |
969 | Monkey glue. Yeah I don't know where we come up with this stuff either. |
| 40 | Black ×60 | 540 | Consistency is the hallmark of a small mind. |
| 41 | White ×18 Lead ×10 Rainbow ×10 |
722 | Get ready to spam some road spikes down. |
| 42 | Yellow ×120 Black ×50 White ×40 |
1,290 | Complete this line: 'sunshine, lollipops and...' |
| 43 | Rainbow ×20 Lead ×20 |
1,120 | Letting a raindbow[sic] bloon escape will cost you the princely sum of 37 lives! |
| 44 | Black ×130 | 1,170 | Liking the white bloons? Good, heres[sic] a present for you. |
| 45 | White ×110 | 990 | Its[sic] probably lagging a bit by now. Sorry. By the way, get ready for tons of lead bloons. |
| 46 | Lead ×35 | 665 | If you're wondering what laser vision does, its like piercing darts only it can pop frozen bloons as well. |
| 47 | Black ×30 White ×40 Lead ×13 Rainbow ×8 |
1,173 | You got any super monkeys yet? |
| 48 | Lead ×20 White ×30 Black ×40 Lead ×12 |
1,238 | The LAST LEVEL.............. is coming up if you get past this one. |
| 49 | Rainbow ×30 | 1,110 | This is the last level. If you are playing on hard then I salute you. |
| 50 | Rainbow ×7 Lead ×10 Rainbow ×7 Lead ×7 Rainbow ×7 Lead ×7 Rainbow ×7 Lead ×4 Rainbow ×7 |
1,827 | — |
Releases
[edit | edit source]Kongregate
[edit | edit source]The Kongregate version has three unlockable badges.
| Image | Text | Points |
|---|---|---|
| Bloon Popper Badge Level 20 completed (easy) |
5 | |
| Bloon Destroyer Badge Level 35 completed (medium) |
15 | |
| Bloon Slaughterer Badge Hard mode completed with 40 lives remaining |
30 |
Bugs and glitches
[edit | edit source]Incorrect sell values
[edit | edit source]The sell value of towers is derived from the base cost of the tower and its upgrades, not the actual amount of cash spent on them as determined by the difficulty level. For example, a 0-0 Dart Monkey always sells for $220 regardless of difficulty. This makes selling more valuable on Easy and less valuable on Medium and Hard than intended.
Upgrade stacking glitch
[edit | edit source]By pressing Tab until an upgrade button is highlighted and pressing Enter to purchase it, the player can purchase that upgrade multiple times on one tower. There's no limit to the number of times the upgrade can be bought and it doesn't stop if the player can't afford it, which puts their money into the negatives. The most useful application of this glitch is to use the Tack Shooter's Faster Shooting upgrade to increase its attack speed to the cap of 40 shots per second; this specific application is often called the "hypersonic Tack Shooter glitch".
Technical information
[edit | edit source]| Engine | Adobe Flash (SWF version 8) |
|---|---|
| Resolution | 640×480 |
| Frame rate | 40 fps |
Descriptions
[edit | edit source]Ninja Kiwi
[edit | edit source]MochiGames
[edit | edit source]Newgrounds / Armor Games
[edit | edit source]Kongregate
[edit | edit source]Gallery
[edit | edit source]Screenshots
[edit | edit source]| This article or section needs more screenshots. See the screenshot guidelines for more information on what screenshots are needed and how to add them. |
Thumbnails
[edit | edit source]-
 Thumbnail on Ninja Kiwi (actually a screenshot of the iOS version of Bloons TD)
 -
 Thumbnail on MochiGames
 -
 Thumbnail on Newgrounds
 -
 Thumbnail on Kongregate
 -
 Thumbnail on Armor Games


References
[edit | edit source]- ↑ In bloons-tower-defense-2.zip,
__metadata__.jsoncontains this timestamp.
External links
[edit | edit source]- Bloons Tower Defense 2 on Ninja Kiwi (archived)
- Bloons Tower Defense 2 on Newgrounds
- Bloons Tower Defense 2 on Kongregate
- Bloons Tower Defense 2 on Armor Games
- Bloons Tower Defense 2 on MochiGames (archived)