Ravine: Difference between revisions
mNo edit summary |
Pymonkibot (talk | contribs) m Text replacement - "[[Bloons TD 6 v" to "[[Update history:Bloons TD 6/Version " |
||
| (15 intermediate revisions by 9 users not shown) | |||
| Line 1: | Line 1: | ||
{{BTD6 map info | {{BTD6 map info | ||
|id= | |id=Ravine | ||
|name = | |name =Ravine | ||
|image=BTD6 MapSelectRavineButton.png | |image=BTD6 MapSelectRavineButton.png | ||
|introduced= | |introduced=23.0 | ||
|difficulty=Expert | |difficulty=Expert | ||
| Line 22: | Line 22: | ||
|coop division=0 | |coop division=0 | ||
}} | }} | ||
'''Ravine''' is an [[Expert]] [[map]] in ''[[Bloons TD 6]]'', introduced in [[Bloons TD 6 | '''Ravine''' is an [[Expert]] [[map]] in ''[[Bloons TD 6]]'', introduced in [[Update history:Bloons TD 6/Version 23.0|version 23.0]]. It takes place at a ravine with a river running through it. The gap is spanned by three bridges, and there are medieval-themed objects scattered around it such as swords and shields. | ||
==Layout== | ==Layout== | ||
There are two alternating entrances and four exits on this map. On odd rounds, the Bloons spawn on the right entrance, later splitting into the left and the right. On even rounds, the Bloons spawn on the left, likewise splitting up into different paths soon after entering the map. There are 3 bridges with 6 walls in addition to trees, significantly blocking the line of sight of towers. The low elevation of the water fully blocks all water towers placed there that cannot function over walls from attacking. | |||
==Strategy== | ==Strategy== | ||
Ravine is by consensus the second hardest map in BTD6, only after [[Bloody Puddles]]. The many line-of-sight blockers, in addition to the Bloons coming from alternating paths and splitting off from them, hinder the effectiveness of almost all strategies. The | Ravine is by consensus the second hardest map in BTD6, only after [[Bloody Puddles]]. The many line-of-sight blockers, in addition to the Bloons coming from alternating paths and splitting off from them, hinder the effectiveness of almost all strategies. The bottom-left space is optimal, as it is surrounded by all 4 lanes. [[Monkey Ace (BTD6)|Monkey Aces]] stand out on Ravine thanks to them being unimpeded by the line-of-sight blockers. Supports such as [[Relentless Glue (BTD6)|Relentless Glue]] are especially vital on Ravine, due to the need to keep Bloons/blimps in place for as long as possible to counter the diverging and short lanes. | ||
===Recommended towers and upgrades=== | ===Recommended towers and upgrades=== | ||
{|class="wikitable center-col-1" | |||
!Name | |||
!Portrait | |||
!Reasoning | |||
|- | |||
|[[Sky Shredder (BTD6)|Sky Shredder]] | |||
|[[File:BTD6 500-MonkeyAce.png|x50px]] | |||
|Sky Shredder is extremely powerful in Ravine's late-game, thanks to its overcoming of the line-of-sight blockers. Its missiles can break through the outer layers of high-health blimps relatively quickly, and its darts do solid grouped damage to the insides. Pair it with a [[Stronger Stimulant (BTD6)|Stronger Stimulant]] for the best results, and cleanup towers such as [[Prince of Darkness (BTD6)|Prince of Darkness]] work well with Sky Shredder thanks to them taking care of leaks that the darts can leave. | |||
|- | |||
|[[Prince of Darkness (BTD6)|Prince of Darkness]] | |||
|[[File:BTD6 005-Wizard.png|x50px]] | |||
|Prince of Darkness, when placed at the hidden spot within the center-left trees, can constantly replenish its graveyard and perform solid cleanup and DDT damage. It pairs well with Sky Shredder and [[Corvus (BTD6)|Corvus]], both of which deal high raw damage and tend to leave stray Bloons that it can clean up. | |||
|- | |||
|[[Corvus (BTD6)|Corvus]] | |||
|[[File:BTD6 CorvusPortrait.png|x50px]] | |||
|Spear trivializes most of the early game, with Ancestral Might defeating round 40 easily. Active management of him into the mid-game, farming mana while using spells when needed, allows for the saveup to many towers that will assist to this map's difficult late-game, such as Sky Shredder and Prince of Darkness. Coupled with [[Spiked Balls (BTD6)|Spiked Balls]]/[[Spiked Mines (BTD6)|Spiked Mines]], he also simplifies the late game by deleting large about of RBE with Ancestral Might and Overload. | |||
|- | |||
|[[Spiked Balls (BTD6)|Spiked Balls]], [[Spiked Mines (BTD6)|Spiked Mines]] | |||
|[[File:BTD6 300-SpikeFactory.png|x50px]] [[File:BTD6 400-SpikeFactory.png|x50px]] | |||
|Ravine's map layout makes it easy for Bloons to leak, especially on the very short leftmost path. Spiked Balls and Spiked Mines do a good job tanking those Bloons, and they pair well with Corvus, who does tremendous mid-game and late-game damage but leaks Bloons from time to time. | |||
|- | |||
|[[Sauda (BTD6)|Sauda]] | |||
|[[File:BTD6 SaudaPortrait.png|x50px]] | |||
|When placed at the rightmost point of the bottom-left space, Sauda gains coverage for 3 of the 4 lanes, making her a solid option for Ravine. The overlapping lanes at the middle and entrances enhance Sword Charge's power greatly, further amplifying her power. She is solid in the early-game, and when paired with stuns such as [[Relentless Glue (BTD6)|Relentless Glue]], deals great amounts of damage in the late-game as well. | |||
|} | |||
== Easter Egg == | |||
There is a sword near the top of the map that will fly out towards the strongest Bloon on the screen after 24 clicks, dealing 3 damage to it. | |||
The sword when the map launched was originally purely visual, but was planned from the beginning to deal damage.<ref>{{Cite|quote=I wanted the sword hitting a bloon to be a thing from the very start, but there wasn't time to get it in before the update :SAD:|author=Rohan Ninja Kiwi|url=https://discord.com/channels/187363008610041857/454395715834216459/970514877590421545|title=Ninja Kiwi Discord|retrieved=January 17 2026|date=May 1 2022}}</ref> | |||
== Update history == | |||
{{BTD6 change list by name|Ravine}} | |||
==Gallery== | ==Gallery== | ||
<gallery> | |||
BTD6 Ravine easter.png|Easter theme | |||
BTD6 Ravine fireworks.png|Fireworks theme | |||
BTD6 Ravine halloween.png|Halloween theme | |||
BTD6 Ravine holiday.png|Holiday theme | |||
BTD6 Ravine island statue.png|Island statue | |||
</gallery> | |||
==In other languages== | ==In other languages== | ||
{{BTD6 | {{BTD6 last updated|48.1|section=y}} | ||
|ar | {{langlist | ||
|da | |key=Ravine | ||
|de | |ar =إفجيج | ||
|es | |da =Kløft | ||
|es-la | |de =Schlucht | ||
|fi | |es =Desfiladero | ||
|fr | |es-la=Desfiladero | ||
|it | |fi =Rotko | ||
|ja | |fr =Ravin | ||
|ko | |it =Baratro | ||
|nl | |ja =渓谷 | ||
|no | |ko =협곡 | ||
|pl | |nl =Ravine | ||
|pt-br | |no =Ravine | ||
|ru | |pl =Jar | ||
|sv | |pt-br=Ravina | ||
|th | |ru =Лощина | ||
|tr | |sv =Ravin | ||
|zh-cn | |th =ธารน้ำกลางหุบเขา | ||
|zh-tw | |tr =Yarık | ||
|zh-cn=峡谷 | |||
|zh-tw=深谷 | |||
}} | }} | ||
==References== | ==References== | ||
*Path lengths sourced from the [https://btd6index.win/ BTD6 Index] | *Path lengths sourced from the [https://btd6index.win/ BTD6 Index] | ||
{{References}} | |||
==Navigation== | ==Navigation== | ||
{{BTD6 map nav}} | {{BTD6 map nav}} | ||
Latest revision as of 00:47, 24 April 2026

|
| Difficulty | Expert | ||
|---|---|---|---|
| Music | Tribes & Tribulations | ||
| Default Co-op division | Free-for-all | ||
| Introduced | Version 23.0 | ||
| Entrances | 2 | Exits | 4 |
| Junctions | 2 | Water? | Yes |
| Path lengths (RBS) | ||||
|---|---|---|---|---|
| Path | Easy | Medium | Hard | |
| Left left | 10.0 | 9.1 | 8.0 | |
| Left right | 11.1 | 10.1 | 8.9 | |
| Right left | 15.1 | 13.7 | 12.1 | |
| Right right | 17.0 | 15.5 | 13.6 | |
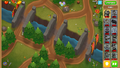
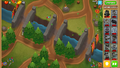
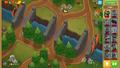
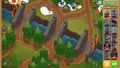
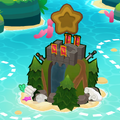
Ravine is an Expert map in Bloons TD 6, introduced in version 23.0. It takes place at a ravine with a river running through it. The gap is spanned by three bridges, and there are medieval-themed objects scattered around it such as swords and shields.
Layout
[edit | edit source]There are two alternating entrances and four exits on this map. On odd rounds, the Bloons spawn on the right entrance, later splitting into the left and the right. On even rounds, the Bloons spawn on the left, likewise splitting up into different paths soon after entering the map. There are 3 bridges with 6 walls in addition to trees, significantly blocking the line of sight of towers. The low elevation of the water fully blocks all water towers placed there that cannot function over walls from attacking.
Strategy
[edit | edit source]Ravine is by consensus the second hardest map in BTD6, only after Bloody Puddles. The many line-of-sight blockers, in addition to the Bloons coming from alternating paths and splitting off from them, hinder the effectiveness of almost all strategies. The bottom-left space is optimal, as it is surrounded by all 4 lanes. Monkey Aces stand out on Ravine thanks to them being unimpeded by the line-of-sight blockers. Supports such as Relentless Glue are especially vital on Ravine, due to the need to keep Bloons/blimps in place for as long as possible to counter the diverging and short lanes.
Recommended towers and upgrades
[edit | edit source]| Name | Portrait | Reasoning |
|---|---|---|
| Sky Shredder | 
|
Sky Shredder is extremely powerful in Ravine's late-game, thanks to its overcoming of the line-of-sight blockers. Its missiles can break through the outer layers of high-health blimps relatively quickly, and its darts do solid grouped damage to the insides. Pair it with a Stronger Stimulant for the best results, and cleanup towers such as Prince of Darkness work well with Sky Shredder thanks to them taking care of leaks that the darts can leave. |
| Prince of Darkness | 
|
Prince of Darkness, when placed at the hidden spot within the center-left trees, can constantly replenish its graveyard and perform solid cleanup and DDT damage. It pairs well with Sky Shredder and Corvus, both of which deal high raw damage and tend to leave stray Bloons that it can clean up. |
| Corvus | 
|
Spear trivializes most of the early game, with Ancestral Might defeating round 40 easily. Active management of him into the mid-game, farming mana while using spells when needed, allows for the saveup to many towers that will assist to this map's difficult late-game, such as Sky Shredder and Prince of Darkness. Coupled with Spiked Balls/Spiked Mines, he also simplifies the late game by deleting large about of RBE with Ancestral Might and Overload. |
| Spiked Balls, Spiked Mines |  
|
Ravine's map layout makes it easy for Bloons to leak, especially on the very short leftmost path. Spiked Balls and Spiked Mines do a good job tanking those Bloons, and they pair well with Corvus, who does tremendous mid-game and late-game damage but leaks Bloons from time to time. |
| Sauda | When placed at the rightmost point of the bottom-left space, Sauda gains coverage for 3 of the 4 lanes, making her a solid option for Ravine. The overlapping lanes at the middle and entrances enhance Sword Charge's power greatly, further amplifying her power. She is solid in the early-game, and when paired with stuns such as Relentless Glue, deals great amounts of damage in the late-game as well. |
Easter Egg
[edit | edit source]There is a sword near the top of the map that will fly out towards the strongest Bloon on the screen after 24 clicks, dealing 3 damage to it.
The sword when the map launched was originally purely visual, but was planned from the beginning to deal damage.[1]
Update history
[edit | edit source]| This article or section uses Cargo to generate its content. It will automatically fill up as other articles are completed. To add to this section, create the articles it is looking up. Do not add content to this section manually and do not remove this notice until you are sure this section is complete. |
 Added the Sword easter egg to Ravine
 - Note: Allows CHIMPS to be possible on this map
 Boss Bloons can no longer appear on this map in Rogue Legends
Gallery
[edit | edit source]-
 Easter theme
 -
 Fireworks theme
 -
 Halloween theme
 -
 Holiday theme
 -
 Island statue


In other languages
[edit | edit source]| Language | Text | Notes |
|---|---|---|
| Arabic | إفجيج | — |
| Danish | Kløft | — |
| German | Schlucht | — |
| Spanish | Desfiladero | — |
| Spanish (Latin America) | Desfiladero | — |
| Finnish | Rotko | — |
| French | Ravin | — |
| Italian | Baratro | — |
| Japanese | 渓谷 | — |
| Korean | 협곡 | — |
| Dutch | Ravine | — |
| Norwegian | Ravine | — |
| Polish | Jar | — |
| Portuguese (Brazil) | Ravina | — |
| Russian | Лощина | — |
| Swedish | Ravin | — |
| Thai | ธารน้ำกลางหุบเขา | — |
| Turkish | Yarık | — |
| Chinese (simplified) | 峡谷 | — |
| Chinese (traditional) | 深谷 | — |
References
[edit | edit source]- Path lengths sourced from the BTD6 Index
- ↑ "I wanted the sword hitting a bloon to be a thing from the very start, but there wasn't time to get it in before the update :SAD:" – Rohan Ninja Kiwi (Sun, 1 May 2022). "Ninja Kiwi Discord". Retrieved Sat, 17 Jan 2026.