Sunset Gulch: Difference between revisions
Qwertyxp2000 (talk | contribs) from experience there's a lot of spac in this map, despite the splitting exits. Kinda did alright with the strategy section |
Qwertyxp2000 (talk | contribs) →Strategy: no seems to complain about this map being "hard" so I guess I can do the strategization on this page, but I do invite others to look at this strategy section |
||
| (8 intermediate revisions by 5 users not shown) | |||
| Line 1: | Line 1: | ||
{{ | {{About|the map in BTD6|the area in [[Frontier Legends]] inspired by this map|Sunset Gulch (Frontier Legends)}}{{BTD6 map info | ||
{{BTD6 map info | | id = SunsetGulch | ||
|id = SunsetGulch | | name = Sunset Gulch | ||
| image = BTD6 MapSelectSunsetGulchMapButton.png | |||
|name=Sunset Gulch | | difficulty = Advanced | ||
|image=BTD6 MapSelectSunsetGulchMapButton.png | | introduced = 49.0 | ||
|difficulty=Advanced | |||
|introduced=49.0 | |||
| entrances = 2 | | entrances = 2 | ||
| exits = 2 | | exits = 2 | ||
| junctions = 0 | | junctions = 0 | ||
| path labels = | | path lengths = 19.5,10.5 | ||
| path labels = Bloon,MOAB | |||
|water=No | | water = No | ||
|music=BMC Street Party | | music = BMC Street Party | ||
|coop division=0 | | coop division = 0 | ||
}} | }} | ||
'''Sunset Gulch''' is an [[Advanced]] [[map]] in ''[[Bloons TD 6]]'', introduced in {{BTD6 version|49.0}}. This map was created to promote the [[Desperado (BTD6)|Desperado]], which released in the same update. | '''Sunset Gulch''' is an [[Advanced]] [[map]] in ''[[Bloons TD 6]]'', introduced in {{BTD6 version|49.0}}. This map takes place at badlands, with two cliffs connected by a bridge with a railroad that crosses over the valley between. Several desert mountains are in the background behind the valley, with the sun behind. This map was created to promote the [[Desperado (BTD6)|Desperado]], which released in the same update. | ||
==Layout== | ==Layout== | ||
The map features two cliffs where towers can be placed, with a few cacti that block placement and serve as minor line of sight obstacles. In the center of the map there is a the valley where towers with a footprint cannot be placed; however, there are two elevated rocks allow tower placement, the top elevated rock has enough space to support towers with large footprints like [[Spike Factory (BTD6)|Spike Factory]], and the bottom elevated rock is enough for extra-large towers such as [[Super Monkey (BTD6)|Super Monkey]]. | |||
This map has two paths for the Bloons: | |||
# Bloon path: Bloons start in the lower left and travel along the dirt path, cross the bridge from the left to the right and continue towards the right dirt path to the exit in the lower right. | |||
# MOAB path: MOAB-Class Bloons travel only along the railroad from the top left entrance to the top right exit. Once MOABs start coming out, the bell for the railroad will ring. [[Boss Bloon|Boss Bloons]] also follow this path. | |||
==Strategy== | ==Strategy== | ||
{{Strategy needed}} | {{Strategy needed|Possibly needs a re-check}} | ||
Overall a | {{BTD6 last updated|55.1|section=y}} | ||
Overall a middle-tier Advanced Map, mostly due to the splitting exits and poor central coverage. However, by focusing main defenses near the end of the map and protecting against the short MOAB exit, it can be treated as a short single-lane map. During the early-game, the left side can be used for supplementary defense in early stages, while developing the right side later on the game. | |||
===Recommended towers and upgrades=== | ===Recommended towers and upgrades=== | ||
| Line 38: | Line 37: | ||
|[[The Desert Phantom]] | |[[The Desert Phantom]] | ||
|[[File:BTD6 005-Desperado.png|x50px]] | |[[File:BTD6 005-Desperado.png|x50px]] | ||
|The straight line along the MOAB path allows pierce to be fully | |The straight line along the MOAB path allows pierce to be fully used to knock back blimps and deal high overall damage. The 2-0-5 crosspath is preferrable for this map to improve rate along the long straight lines and single-targets. | ||
|- | |||
|[[Golden Justice]] | |||
|[[File:BTD6 050-Desperado.png|x50px]] | |||
|The long straight line makes it an excellent choice for firing its near-infinite pierce rifle. Thanks to {{BTD6 version|55.0}} reworks, the rifle will have less tendency to chase if its pistol range covers the area that the rifle should not chase, reducing pierce wastage. | |||
|- | |- | ||
|[[Perma-Spike (BTD6)|Perma-Spike]] | |[[Perma-Spike (BTD6)|Perma-Spike]] | ||
| Line 46: | Line 49: | ||
|[[The Bloon Solver (BTD6)|The Bloon Solver]] | |[[The Bloon Solver (BTD6)|The Bloon Solver]] | ||
|[[File:BTD6 500-GlueGunner.png|x50px]] | |[[File:BTD6 500-GlueGunner.png|x50px]] | ||
|The splitting exits are a disadvantage for most cleanup options, | |The splitting exits are a disadvantage for most cleanup options, but the Solver remains a great way to clear Super Ceramics near the MOAB lane, while still having decent coverage for the Bloon lane. | ||
|} | |} | ||
==Gallery== | ==Gallery== | ||
<gallery> | |||
File:BTD6 Sunset Gulch fireworks.png|Fireworks theme | |||
File:BTD6 Sunset Gulch halloween.png|Halloween theme | |||
File:BTD6 Sunset Gulch Holiday.png|Holiday theme | |||
File:BTD6 Sunset Gulch island statue.png|Island statue | |||
</gallery> | |||
==In other languages== | ==In other languages== | ||
| Line 77: | Line 85: | ||
|zh-tw=日落峽谷 | |zh-tw=日落峽谷 | ||
}} | }} | ||
== References == | |||
* Path lengths sourced from the [https://btd6index.win/maps?map=Sunset+Gulch BTD6 Index] | |||
{{clear|right}} | {{clear|right}} | ||
==Navigation== | ==Navigation== | ||
{{BTD6 map nav}} | {{BTD6 map nav}} | ||
Latest revision as of 13:25, 6 June 2026

|
| Difficulty | Advanced | ||
|---|---|---|---|
| Music | BMC Street Party | ||
| Default Co-op division | Free-for-all | ||
| Introduced | Version 49.0 | ||
| Entrances | 2 | Exits | 2 |
| Junctions | 0 | Water? | No |
| Path lengths (RBS) | ||||
|---|---|---|---|---|
| Path | Easy | Medium | Hard | |
| Bloon | 24.4 | 22.2 | 19.5 | |
| MOAB | 13.1 | 11.9 | 10.5 | |
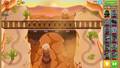
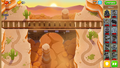
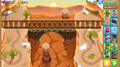
Sunset Gulch is an Advanced map in Bloons TD 6, introduced in version 49.0. This map takes place at badlands, with two cliffs connected by a bridge with a railroad that crosses over the valley between. Several desert mountains are in the background behind the valley, with the sun behind. This map was created to promote the Desperado, which released in the same update.
Layout
[edit | edit source]The map features two cliffs where towers can be placed, with a few cacti that block placement and serve as minor line of sight obstacles. In the center of the map there is a the valley where towers with a footprint cannot be placed; however, there are two elevated rocks allow tower placement, the top elevated rock has enough space to support towers with large footprints like Spike Factory, and the bottom elevated rock is enough for extra-large towers such as Super Monkey.
This map has two paths for the Bloons:
- Bloon path: Bloons start in the lower left and travel along the dirt path, cross the bridge from the left to the right and continue towards the right dirt path to the exit in the lower right.
- MOAB path: MOAB-Class Bloons travel only along the railroad from the top left entrance to the top right exit. Once MOABs start coming out, the bell for the railroad will ring. Boss Bloons also follow this path.
Strategy
[edit | edit source]| This strategy section is empty or incomplete. See the strategy guidelines for more information on how to write strategy sections. The editor who added this notice elaborates: Possibly needs a re-check |
Overall a middle-tier Advanced Map, mostly due to the splitting exits and poor central coverage. However, by focusing main defenses near the end of the map and protecting against the short MOAB exit, it can be treated as a short single-lane map. During the early-game, the left side can be used for supplementary defense in early stages, while developing the right side later on the game.
Recommended towers and upgrades
[edit | edit source]| Name | Portrait | Reasoning |
|---|---|---|
| The Desert Phantom | The straight line along the MOAB path allows pierce to be fully used to knock back blimps and deal high overall damage. The 2-0-5 crosspath is preferrable for this map to improve rate along the long straight lines and single-targets. | |
| Golden Justice | The long straight line makes it an excellent choice for firing its near-infinite pierce rifle. Thanks to version 55.0 reworks, the rifle will have less tendency to chase if its pistol range covers the area that the rifle should not chase, reducing pierce wastage. | |
| Perma-Spike | Despite the splitting exit, Spike Factories set to Set Target at that intersection handles the shorter MOAB lane and the Bloon lane at the same time, and later can be re-targeted back to only the MOAB lane. Perma-Spike in particular is an effective cleanup option for the late-game. | |
| The Bloon Solver | 
|
The splitting exits are a disadvantage for most cleanup options, but the Solver remains a great way to clear Super Ceramics near the MOAB lane, while still having decent coverage for the Bloon lane. |
Gallery
[edit | edit source]-
 Fireworks theme
 -
 Halloween theme
 -
 Holiday theme
 -
 Island statue


In other languages
[edit | edit source]| Language | Text | Notes |
|---|---|---|
| Arabic | أخدود الغروب | — |
| Danish | Solnedgangskløft | — |
| German | Sonnenuntergangs-Schlucht | — |
| Spanish | Desfiladero del anochecer | — |
| Spanish (Latin America) | Quebrada del atardecer | — |
| Finnish | Auringonlaskun rotko | — |
| French | Ravin du couchant | — |
| Italian | Gola del tramonto | — |
| Japanese | 夕暮れの渓谷 | — |
| Korean | 해넘이 협곡 | — |
| Dutch | Schemerkloof | — |
| Norwegian | Solnedgangskløften | — |
| Polish | Wąwóz zachodzącego słońca | — |
| Portuguese (Brazil) | Desfiladeiro do Pôr do Sol | — |
| Russian | Закатный овраг | — |
| Swedish | Solnedgångsravinen | — |
| Thai | ซันเซ็ตกัลช์ | — |
| Turkish | Gün Batımı Geçidi | — |
| Chinese (simplified) | 日落峡谷 | — |
| Chinese (traditional) | 日落峽谷 | — |
References
[edit | edit source]- Path lengths sourced from the BTD6 Index