Spillway is an Advancedmap in Bloons TD 6, introduced in version 12.0. It takes place in a building, possibly a factory or power plant, containing toxic and radioactive substances.
Spillway has 4 entrances and 4 exits, with all lanes active on each round and converging at the center loop. After entering the loop, the Bloons travel counterclockwise for 1.75 loops before exiting on the lane 90° clockwise from where they spawn. There is a radioactive barrel in the middle that can fit one small-footprint tower, such as the Dart Monkey. There are four valves that block most towers from reaching the middle, and they can be removed for $2,000 each.
Despite the sight blockers preventing most towers from reaching the middle, Spillway is not a particularly difficult Advanced map. The long time Bloons spend in the middle create ample time for towers that do reach there, such as Mortar Monkeys, to defend against the Bloons. In addition, the $2,000 to remove the valves is not a steep cost in the later rounds, and doing so places many more towers into a usable spot. In CHIMPS, start the game with a Ninja Monkey on the center barrel. It can save into a 1-0-0 Wizard Monkey at base, or into a Hero like Psi at 2-0-1.
Thanks to it mostly covering the central loop with the 2-5-0 crosspath, Pop and Awe, already solid on most maps, particularly excels here. Its main weakness against DDTs is covered due to the loop allowing it to hit many of them at once. Use Striker Jones with Pop and Awe, as his Concussive Shell stun, buffs to Mortars' attack speed, pierce, and blast radius to full coverage of the central loop, and Artillery Command resetting Pop and Awe's ability and becoming a Homeland Defense for Mortars at Level 20 all provide powerful assistance. Use Relentless Glue as well, even if it requires removing a valve, to add additional stun synergy.
With Guided Magic, Wizards are the cheapest option to attack Bloons in the central loop early game, and building into a 5-2-0 Archmage lets one deal great damage through the entire game. Middle crosspath is preferred here for all stages, since Bloons pass through the Wall of Fire multiple times and projectile speed is not an issue here.
Its global range allows it to deal significant damage to Bloons and blimps all throughout the map even with the valves present. Its platforms also put towers closer to the central loop and removes the need to open the valves, as towers on the top platform can see over them.
Due to the shape of the map and size of the mortar shells, you can just have TBO target the middle of the map for devastating damage. Naturally, pairing it with Striker Jones boosts the damage potential.
This article or section uses Cargo to generate its content. It will automatically fill up as other articles are completed. To add to this section, create the articles it is looking up. Do not add content to this section manually and do not remove this notice until you are sure this section is complete.


 Removables no longer display white squares instead of sparks when removed (bug fix)
 Dartling Gunners are less likely to shoot through walls (bug fix)
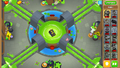 Easter theme
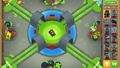 Fireworks theme
 Halloween theme
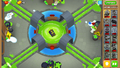 Holiday theme
 Island statue


