Quarry: Difference between revisions
→Easter eggs: lst |
Pymonkibot (talk | contribs) m Text replacement - "[[Bloons TD 6 v" to "[[Update history:Bloons TD 6/Version " |
||
| (One intermediate revision by one other user not shown) | |||
| Line 22: | Line 22: | ||
|coop division=4 | |coop division=4 | ||
}} | }} | ||
'''Quarry''' is an [[Intermediate]] [[map]] in ''[[Bloons TD 6]]'', introduced in [[Bloons TD 6 | '''Quarry''' is an [[Intermediate]] [[map]] in ''[[Bloons TD 6]]'', introduced in [[Update history:Bloons TD 6/Version 32.0|version 32.0]]. Taking place in an excavation site, this map features two water channels that increase the [[Bloon speed|speed]] of [[Bloon]]s by 25%. After [[round]] 39, a second entrance used exclusively by [[MOAB-Class Bloon]]s is opened. | ||
==Layout== | ==Layout== | ||
| Line 40: | Line 40: | ||
|[[Prince of Darkness (BTD6)|Prince of Darkness]] | |[[Prince of Darkness (BTD6)|Prince of Darkness]] | ||
|[[File:BTD6 005-Wizard.png|x50px]] | |[[File:BTD6 005-Wizard.png|x50px]] | ||
|The zombies ignore line-of-sight, and are given a good amount of time to spawn thanks to the length of this map. These zombies do especially well against DDTs, such as those on Round 95. Pair it with [[Ezili (BTD6)|Ezili]] or [[Corvus (BTD6)|Corvus]], as the former's 50% zombie pierce buff | |The zombies ignore line-of-sight, and are given a good amount of time to spawn thanks to the length of this map. These zombies do especially well against DDTs, such as those on Round 95. Pair it with [[Ezili (BTD6)|Ezili]] or [[Corvus (BTD6)|Corvus]], as the former's 50% zombie pierce buff and MOAB Hex and the latter's Ancestral Might and Overload cover its weaknesses against single-target and hyperdense rounds very well. | ||
|- | |- | ||
|[[Comanche Commander (BTD6)|Comanche Commander]] | |[[Comanche Commander (BTD6)|Comanche Commander]] | ||
|[[File:BTD6 005-HeliPilot.png|x50px]] | |[[File:BTD6 005-HeliPilot.png|x50px]] | ||
|Comanche, being a Heli Pilot, ignores the line-of-sight issues on this map. Its shoving capabilities provide good support and prevent it from chasing against the faster Bloons | |Comanche, being a Heli Pilot, ignores the line-of-sight issues on this map. Its shoving capabilities provide good support and prevent it from chasing against the faster Bloons and MOABs on the streams, and it can take advantage of the full track length. It does solid damage as well, especially when paired with [[Geraldo (BTD6)|Geraldo]] and [[Glue Storm (BTD6)|Glue Storm]], the latter of which also allows it to pop DDTs. | ||
|} | |} | ||
Latest revision as of 00:56, 24 April 2026

|
| Difficulty | Intermediate | ||
|---|---|---|---|
| Music | Sunset Samba | ||
| Default Co-op division | Diagonal (top-right to bottom-left) | ||
| Introduced | Version 32.0 | ||
| Entrances | 2 | Exits | 1 |
| Junctions | 1 | Water? | Yes |
| Path lengths (RBS) | ||||
|---|---|---|---|---|
| Path | Easy | Medium | Hard | |
| Regular | 45.8 | 41.6 | 36.6 | |
| MOAB | 40.4 | 36.7 | 32.3 | |
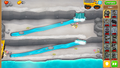
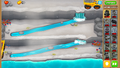
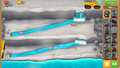
Quarry is an Intermediate map in Bloons TD 6, introduced in version 32.0. Taking place in an excavation site, this map features two water channels that increase the speed of Bloons by 25%. After round 39, a second entrance used exclusively by MOAB-Class Bloons is opened.
Layout
[edit | edit source]Quarry has three layers of elevation. The middle and lower layers have walls above them that block line of sight and channels that run from the upper right to the lower left, and the lower layer is next to a body of water that spans the bottom of the screen. The Bloons follow a zig-zag pattern that starts in the top left and ends in the bottom right, going from left to right on each layer and following the channels to the next layer. The MOAB path starts in the top right and is initially blocked by a dump truck, which moves after round 39. The regular Bloon path is the longest of all Intermediate map paths, while the MOAB path is longer than all other Intermediate maps except Moon Landing, Cracked, and KartsNDarts.
Strategy
[edit | edit source]Despite the multiple layers of elevation on this map and faster Bloons on the streams, Quarry is arguably one of the easiest Intermediate maps. The length of the track, abundance of bends, and relatively open space allow a wide swath of strategies to function. Quarry can be beaten fairly easily with general guidelines found below. The line-of-sight issues due to Quarry's layers of elevation can be overcome using Heli Pilots.
 Basic Deflation strategies
 Basic Apopalypse strategies
 Basic Half Cash strategies
 Basic Alternate Bloons Rounds strategies
 Basic Impoppable strategies
 Basic CHIMPS strategies
Some towers excel on Quarry due to being able to take advantage of its full track length, and they are listed below.
Recommended towers and upgrades
[edit | edit source]| Name | Portrait | Reasoning |
|---|---|---|
| Prince of Darkness | 
|
The zombies ignore line-of-sight, and are given a good amount of time to spawn thanks to the length of this map. These zombies do especially well against DDTs, such as those on Round 95. Pair it with Ezili or Corvus, as the former's 50% zombie pierce buff and MOAB Hex and the latter's Ancestral Might and Overload cover its weaknesses against single-target and hyperdense rounds very well. |
| Comanche Commander | Comanche, being a Heli Pilot, ignores the line-of-sight issues on this map. Its shoving capabilities provide good support and prevent it from chasing against the faster Bloons and MOABs on the streams, and it can take advantage of the full track length. It does solid damage as well, especially when paired with Geraldo and Glue Storm, the latter of which also allows it to pop DDTs. |
Easter eggs
[edit | edit source]

Interacting with certain background objects plays a sound effect and spawns dust particles. Interacting with them in a specific order plays a sound cue and causes parts of the wall to crack. There are three combinations:
- Left part:
- The cross on the right side of the upper wall
- The rock by the end of the lower channel
- The upper rock in the upper stream
- Middle part:
- The cross on the left side of the lower wall
- The topmost rock on the rock tower on the right
- The lower rock in the upper channel
- Right part:
- The cross in the middle of the lower wall
- The rock on top of the exit
- The rock in the middle of the lower channel
After cracking all three parts of the wall, repeatedly selecting part of the wall breaks it, revealing a fossil. After breaking all three parts of the wall, interacting with the upper waterfall reveals an egg.
Gallery
[edit | edit source]-
 Easter theme
 -
 Fireworks theme
 -
 Halloween theme
 -
 Holiday theme
 -
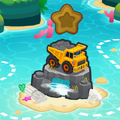 Island statue


In other languages
[edit | edit source]| Language | Text | Notes |
|---|---|---|
| Arabic | محجر | — |
| Danish | Stenbrud | — |
| German | Steinbruch | — |
| Spanish | Cantera | — |
| Spanish (Latin America) | Cantera | — |
| Finnish | Louhos | — |
| French | Carrière | — |
| Italian | Cava | — |
| Japanese | 採石場 | — |
| Korean | 채석장 | — |
| Dutch | Groeve | — |
| Norwegian | Gullgruve | — |
| Polish | Kamieniołom | — |
| Portuguese (Brazil) | Pedreira | — |
| Russian | Карьер | — |
| Swedish | Stenbrott | — |
| Thai | เหมืองหิน | — |
| Turkish | Taş Ocağı | — |
| Chinese (simplified) | 采石场 | — |
| Chinese (traditional) | 採石場 | — |
References
[edit | edit source]- Path lengths sourced from the BTD6 Index