Bazaar was designed by /u/polavux added as part of a contest to celebrate 50k subscribers to the r/BTD6 subreddit, where fans could make their own map designs.[1] It and Geared ended up winning and being added to the game.
Bazaar has two paths that alternate on each round: on even-numbered rounds, the Bloons enter from the top left and exit on the top right, and on odd-numbered rounds, the Bloons enter from the bottom right and exit on the bottom left. Both paths make an S-turn near the entrance before passing over the bridge in the center, then makes another S-turn before exiting. Only towers with small- or medium-sized footprints can be placed between the lanes in the center.
There is a water canal that splits the map down the middle and runs and under the bridge. The map is surrounded by market stalls and has four market stalls by the bridge that block line of sight. The bridge is wide enough to support up to medium-sized towers (e.g. Boomerang Monkey and most Heroes). There are groups of removable trees behind these market stalls which block line of sight and cost $500 each to cut down.
Bazaar is among the most difficult Intermediate maps in BTD6, due to its alternating paths, line-of-sight blockers, lack of open space for placements, and relatively short track length. The middle section is great for early-game towers and limited-range late-game towers, as they can see both lanes. Heli Pilots are solid on this map, due to its alternating single-round nature.
The single-lane-per-round nature of this map is optimal for Corvus, as his spirit can reliably deal with the early-game, with Spear cleaning up the rest. He excels compared to most other heroes, having long range to cover most of the map with a variety of spells, and the bends and middle of the map allow him to benefit his local-ranged spells such as Ancestral Might. His powerful spells allow additional wincons to be purchased to alleviate his weaknesses. He remains strong in the late-game, with Ancestral Might and Overload having excellent coverage on this map. Once he reaches level 7, he can move to crucial regions so he maximizes mana gains and make use of his local-ranged spells.
Carrier Flagship, thanks to the alternating single-lane nature of this map, can sweep through every round up until the late 80s and allow the purchase of almost any tower that would carry through the rest of the game. If using it, use Admiral Brickell instead of Corvus, as her Mega Mines and Naval Tactics (which also grants DDT-popping power to the front-facing darts) are pivotal.
Since only one path is active at a time, its spawn point can be changed between rounds, with the Zombie Bloons only focusing on one lane per round. Choose the 1-0-5 crosspath, as this maximizes damage potential of Zombie Bloons on maps without intersecting lanes. Both Corvus and Ezili work great with it, as the former covers its weakness against hyperdense rounds with Overload & its weakness against Rounds 97 & 100 with Ancestral Might while the latter gives 50% more pierce to the Zombies and clears out massive amounts of RBE with MOAB Hex.
Commander's ability to both stall blimps with its shoving capabilities and deal good damage shines greatly on Bazaar's alternating single-lane format. Pair it with Glue Storm, whose +2 damage to ability-glued Bloons & blimps, slowdown to Ceramics, and de-Leading of DDTs all aid significantly.
Easter eggs
The Monklish on the tea stall's sign reads "KL TEA CO".
The Monklish on the building's sign reads "CLOSED".
Interacting with the basket by the tea stall repeatedly causes a kiwi bird to pop out.
Interacting with the lamp in the bottom-right repeatedly causes a spirit to pop out.
Interacting with the cat in the cat stall repeatedly causes it to meow.
Update history
Icons indicate whether a change is beneficial or detrimental to the subject of this article, not to the player.
This article or section uses Cargo to generate its content. It will automatically fill up as other articles are completed. To add to this section, create the articles it is looking up. Do not add content to this section manually and do not remove this notice until you are sure this section is complete.


 Area between the two paths on the bridge now allows placement of towers with medium-sized footprints
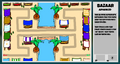 Concept art
 Easter theme
 Fireworks theme
 Halloween theme
 Holiday theme
 Island statue


