Scrapyard: Difference between revisions
No edit summary |
Qwertyxp2000 (talk | contribs) No edit summary |
||
| (3 intermediate revisions by 2 users not shown) | |||
| Line 22: | Line 22: | ||
|coop division=0 | |coop division=0 | ||
}} | }} | ||
'''Scrapyard''' is a [[Beginner]] [[map]] in ''[[Bloons TD 6]]'', introduced in [[Bloons TD 6 | '''Scrapyard''' is a [[Beginner]] [[map]] in ''[[Bloons TD 6]]'', introduced in [[Update history:Bloons TD 6/Version 31.0|version 31.0]]. It takes place at a scrapyard containing several broken vehicles and other junk. This map contains a crusher, a unique feature that can [[damage]] and [[stun]] [[Bloon]]s. | ||
Scrapyard is currently the longest map in the game, beating [[Logs]] by 0.4 RBS in [[Medium]] mode. | Scrapyard is currently the longest map in the game, beating [[Logs]] by 0.4 RBS in [[Medium]] mode. | ||
| Line 30: | Line 30: | ||
==Mechanics== | ==Mechanics== | ||
There is a crusher near the top of the map. Bloons pass through it twice, once after the top-right loop and once after the top-middle-left loop. When the sign to its right is red, the crusher is inactive, and when the sign is green, the crusher opens and can be activated. On activation, the crusher deals 6 damage (+5 versus [[Ceramic Bloon (BTD6)|Ceramics]]) to all Bloons below it and stuns them for 6 seconds. Neither the damage nor the stun works on [[MOAB-Class Bloon|MOAB-Class Bloons]]. The crusher has a 60 second cooldown (and an initial cooldown from the game's start), which can be reset with [[Geraldo (BTD6)|Geraldo]]'s [[Rejuv Potion]] or the Reset Cooldowns button in [[Sandbox (BTD6)|Sandbox]] mode. | There is a crusher near the top of the map. Bloons pass through it twice, once after the top-right loop and once after the top-middle-left loop. When the sign to its right is red, the crusher is inactive, and when the sign is green, the crusher opens and can be activated. On activation, the crusher deals 6 damage (+5 versus [[Ceramic Bloon (BTD6)|Ceramics]]) to all Bloons below it and stuns them for 6 seconds. Neither the damage nor the stun works on [[MOAB-Class Bloon|MOAB-Class Bloons]]. The crusher has a 60 second cooldown (and an equal initial cooldown from the game's start), which can be reset with [[Geraldo (BTD6)|Geraldo]]'s [[Rejuv Potion]] or the Reset Cooldowns button in [[Sandbox (BTD6)|Sandbox]] mode. | ||
==Strategy== | ==Strategy== | ||
{{cleanup|To table or not to table? Not sure if players have had major issues on beginner maps with Scrapyard yet, but what I can say is that BEZ is easy carry on this map and the most optimal pick for it.}} | {{cleanup|To table or not to table? Not sure if players have had major issues on beginner maps with Scrapyard yet, but what I can say is that BEZ is easy carry on this map and the most optimal pick for it.}} | ||
Being the longest map in BTD6, Scrapyard is among the easier | {{BTD6 last updated|55.1|section=y}} | ||
Being the longest map in ''BTD6'', Scrapyard is among the easier Beginner Maps. However, it is not the easiest, due to the limited space, relatively poor coverage that towers receive due to the spread-out track layout, and line-of-sight blockers. In general, limited-range towers are best placed on the top-left box to hit Bloons on as many different occasions as possible. If doing so, space should be saved for [[Monkey Village (BTD6)|Monkey Villages]] to be placed above that box or to the box's top-right. Scrapyard can be beaten fairly easily using general tips listed here. | |||
{{BTD6 basic map strategies}} | {{BTD6 basic map strategies}} | ||
The extremely long map-length benefits several towers that are able to overcome the spread-out track layout. Long-ranged options placed onto the boxes are great options. Among the most efficient options is [[Bloon Exclusion Zone (BTD6)|Bloon Exclusion Zone]], which gains map-wide coverage and can take advantage of this map's extremely long length and has great saveup from [[Bloon Area Denial System (BTD6)|Bloon Area Denial System]]. | The extremely long map-length benefits several towers that are able to overcome the spread-out track layout. Long-ranged options placed onto the boxes are great options. Among the most efficient options is [[Bloon Exclusion Zone (BTD6)|Bloon Exclusion Zone]], which gains map-wide coverage and can take advantage of this map's extremely long length and has great saveup from [[Bloon Area Denial System (BTD6)|Bloon Area Denial System]]. | ||
The crusher's long cooldown means it should be timed when anticipating getting overwhelmed by non-blimp Bloons. Best candidates for crushing include early Camos, early Leads, and mid-game Ceramics. Slowdowns such as glue are helpful for maximizing the burst of damage. The crusher's long initial cooldown makes it unsuitable for [[Race (BTD6)|Race]] formats except as a burst of damage after many waves are sent. | |||
==Gallery== | ==Gallery== | ||
Latest revision as of 06:09, 8 June 2026

|
| Difficulty | Beginner | ||
|---|---|---|---|
| Music | Sunshine Serenade | ||
| Default Co-op division | Free-for-all | ||
| Introduced | Version 31.0 | ||
| Entrances | 1 | Exits | 1 |
| Junctions | 0 | Water? | No |
| Path lengths (RBS) | ||
|---|---|---|
| Easy | Medium | Hard |
| 66.8 | 60.7 | 53.4 |
Scrapyard is a Beginner map in Bloons TD 6, introduced in version 31.0. It takes place at a scrapyard containing several broken vehicles and other junk. This map contains a crusher, a unique feature that can damage and stun Bloons.
Scrapyard is currently the longest map in the game, beating Logs by 0.4 RBS in Medium mode.
Layout
[edit | edit source]Bloons enter from the top-left, make a clockwise loop at the top-right, and then make a clockwise loop at the top-middle-left before exiting. There is an activatable crusher near the top that blocks line-of-sight, and its mechanics are explained in the section below. The center of the map is filled with junk, including a Bloonchipper, all of which block line-of-sight. The only placeable spots within the junk are the 4 boxes, with each being able to fit towers up to Super Monkey's size and have high elevation.
Mechanics
[edit | edit source]There is a crusher near the top of the map. Bloons pass through it twice, once after the top-right loop and once after the top-middle-left loop. When the sign to its right is red, the crusher is inactive, and when the sign is green, the crusher opens and can be activated. On activation, the crusher deals 6 damage (+5 versus Ceramics) to all Bloons below it and stuns them for 6 seconds. Neither the damage nor the stun works on MOAB-Class Bloons. The crusher has a 60 second cooldown (and an equal initial cooldown from the game's start), which can be reset with Geraldo's Rejuv Potion or the Reset Cooldowns button in Sandbox mode.
Strategy
[edit | edit source]| This article or section needs cleanup to improve the way it presents information and/or comply with the style guide. You can help out by editing this article. The editor who added this notice elaborates: To table or not to table? Not sure if players have had major issues on beginner maps with Scrapyard yet, but what I can say is that BEZ is easy carry on this map and the most optimal pick for it. |
Being the longest map in BTD6, Scrapyard is among the easier Beginner Maps. However, it is not the easiest, due to the limited space, relatively poor coverage that towers receive due to the spread-out track layout, and line-of-sight blockers. In general, limited-range towers are best placed on the top-left box to hit Bloons on as many different occasions as possible. If doing so, space should be saved for Monkey Villages to be placed above that box or to the box's top-right. Scrapyard can be beaten fairly easily using general tips listed here.
 Basic Deflation strategies
 Basic Apopalypse strategies
 Basic Half Cash strategies
 Basic Alternate Bloons Rounds strategies
 Basic Impoppable strategies
 Basic CHIMPS strategies
The extremely long map-length benefits several towers that are able to overcome the spread-out track layout. Long-ranged options placed onto the boxes are great options. Among the most efficient options is Bloon Exclusion Zone, which gains map-wide coverage and can take advantage of this map's extremely long length and has great saveup from Bloon Area Denial System.
The crusher's long cooldown means it should be timed when anticipating getting overwhelmed by non-blimp Bloons. Best candidates for crushing include early Camos, early Leads, and mid-game Ceramics. Slowdowns such as glue are helpful for maximizing the burst of damage. The crusher's long initial cooldown makes it unsuitable for Race formats except as a burst of damage after many waves are sent.
Gallery
[edit | edit source]-
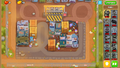 Easter theme
 -
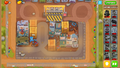 Fireworks theme
 -
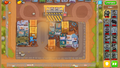 Halloween theme
 -
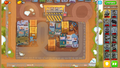 Holiday theme
 -
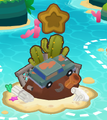 Island statue
 -
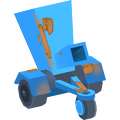 Bloonchipper model render


In other languages
[edit | edit source]| Language | Text | Notes |
|---|---|---|
| Arabic | ساحة للخردة | — |
| Danish | Skrotplads | — |
| German | Schrottplatz | — |
| Spanish | Desguace | — |
| Spanish (Latin America) | Desguace | — |
| Finnish | Romuttamo | — |
| French | La Casse | — |
| Italian | Discarica | — |
| Japanese | ジャンクヤード | — |
| Korean | 고철 처리장 | — |
| Dutch | Schroothoop | — |
| Norwegian | Skrapgård | — |
| Polish | Złomowisko | — |
| Portuguese (Brazil) | Ferro-Velho | — |
| Russian | Свалка | — |
| Swedish | Skrotupplag | — |
| Thai | ลานขยะ | — |
| Turkish | Hurdalık | — |
| Chinese (simplified) | 废料场 | — |
| Chinese (traditional) | 廢品場 | — |
References
[edit | edit source]- Path lengths sourced from the BTD6 Index