Castle Revenge: Difference between revisions
Created page with "{{BTD6 map info |id=CastleRevenge |name =Sulfur Springs |image=BTD6 MapSelectCastleRevengeMapButton.png |introduced=42.0 |difficulty=Advanced |entrances =4 |exits =2 |junctions =2 |path lengths=15.0,14.5,16.1,15.7,16.8,16.5 |path labels =Top wheel,Bottom wheel,Top MOAB,Bottom MOAB,Top water,Bottom water |water =Yes |removable costs = |removable labels = |removable amounts= |music=Jazz Theme |coop division=0 }} '''Castle Revenge''' is an Advan..." |
m →Removables and Gizmos: Grammar fix |
||
| (15 intermediate revisions by 8 users not shown) | |||
| Line 2: | Line 2: | ||
|id=CastleRevenge | |id=CastleRevenge | ||
|name = | |name =Castle Revenge | ||
|image=BTD6 MapSelectCastleRevengeMapButton.png | |image=BTD6 MapSelectCastleRevengeMapButton.png | ||
| Line 15: | Line 15: | ||
|water =Yes | |water =Yes | ||
|removable costs = | |removable costs =500 | ||
|removable labels = | |removable labels =Pressure Valve | ||
|removable amounts= | |removable amounts=1 | ||
|music=Jazz Theme | |music=Jazz Theme | ||
|coop division=0 | |coop division=0 | ||
}} | }} | ||
'''Castle Revenge''' is an [[Advanced]] [[map]] in ''[[Bloons TD 6]]'', introduced in {{BTD6 version|42.0}}. It is a walking mechanical castle. It is | '''Castle Revenge''' is an [[Advanced]] [[map]] in ''[[Bloons TD 6]]'', introduced in {{BTD6 version|42.0}}. It is a walking mechanical castle. It is a revenge map of [[Castle]] from ''[[Bloons TD 5]]''.<ref>{{Cite|Quote="Castle Revenge is a revenge of Castle"|author=NK Rohan|date=July 28 2024|url=https://discord.com/channels/187363008610041857/454395715834216459/1267334353059446855|publisher=Ninja Kiwi Discord}}</ref> | ||
==Layout== | |||
Bloons appear from the right side of the screen outside of the castle, move over the wheels and onto the castle, and then exit on the left side of the castle. Bloons are invulnerable until after they pass the wheels. There are two simultaneously active paths, one which traces the top of the castle and one which traces the bottom. | |||
There is a central platform and a wheel near the left side which are line-of-sight blockers. Towers may be placed on the platform to see the whole track. Towers may not be placed on the outside of the castle. | |||
==Strategy== | ==Strategy== | ||
{{ | Due to the divergent lanes preventing most towers from covering both lanes and the castle walls interfering with projectiles, Castle Revenge is one of the most challenging Advanced maps. [[Erosion]] and [[X Factor]] are the only Advanced maps regarded as harder than Castle Revenge by consensus. The valve at the back also blocks the placement of towers that otherwise would have been very useful on this map, such as [[Perma-Spike (BTD6)|Perma-Spike]]. Effective, separate defense for both lanes or global-range towers that can cover both lanes simultaneously is mandatory for defeating this map. | ||
===Recommended towers and upgrades=== | |||
{|class="wikitable center-col-1" | |||
!Name | |||
!Portrait | |||
!Reasoning | |||
|- | |||
|[[Carpet of Spikes (BTD6)|Carpet of Spikes]] | |||
|[[File:BTD6 050-SpikeFactory.png|x50px]] | |||
|The fact that the spikes can cover both lanes effectively and the relatively short length of this map make Carpet of Spikes a great option. It covers Condor's weakness against DDTs, which it cannot grab all into one lane, in addition to breaking the shell of ZOMGs to let clean-up towers deal with them. It also removes the need to spend anything for the round 100 BAD, allowing the addition of several more support options for rounds 96-99. | |||
|- | |||
|[[Giant Condor]] | |||
|[[File:BTD6 004-BeastHandler.png|x50px]] | |||
|It can move blimps from one of the paths to the other, effectively turning this map into a single-lane map on most rounds and greatly improving the capability of towers like Sauda, Corvus, and Spectre on this map. It is also good as a regular support option, stalling Bloons especially effectively due to the section at the start of this map where Bloons are immune and putting blimps that are almost exiting back to the front. Set its dropoff point on the bottom lane entrance, as Condor does not function correctly with its default dropoff point on the top lane. Moving the dropoff point further along the top lane does restore most of Condor's functionality, but still leaves it attacking targets it should move on the bottom lane entrance. | |||
|- | |||
|{{BTD6|Juggernaut}} | |||
|[[File:BTD6 400-Dartmonkey.png|x50px]] | |||
|All the walls make {{BTD6|Spike-o-pult}} and Juggernaut effective in all stages of the game when placed near the last bend on each side. Use 4-0-2 for camo detection, better knockback, and better projectile speed/lifespan. | |||
|} | |||
== Removables and Gizmos == | |||
Castle Revenge has one [[gizmo]], a pressure valve near the end of the track. The player may pay $500 to activate the pressure valve. It creates two projectiles that applies 200% knockback effect to non-MOAB-Class [[Bloon]]s with 5 pierce and 0.4-second pierce refresh and rehit interval for 15 seconds. This gizmo has a cooldown of 75 seconds, which can be reset by [[Rejuv Potion]]. | |||
==Update history== | ==Update history== | ||
| Line 37: | Line 60: | ||
==Gallery== | ==Gallery== | ||
<gallery> | |||
BTD6 Castle Revenge easter.png|Easter theme | |||
BTD6 Castle Revenge fireworks.png|Fireworks theme | |||
BTD6 Castle Revenge halloween.png|Halloween theme | |||
BTD6 Castle Revenge holiday.png|Holiday theme | |||
BTD6 Castle Revenge island statue.png|Island statue | |||
</gallery> | |||
==In other languages== | ==In other languages== | ||
{{BTD6 | {{BTD6 last updated|48.1|section=y}} | ||
|ar | {{langlist | ||
|da | |key=CastleRevenge | ||
|de | |ar =انتقام القلعة | ||
|es | |da =Slotshævn | ||
|es-la | |de =Burgrache | ||
|fi | |es =Venganza del castillo | ||
|fr | |es-la=Venganza del castillo | ||
|it | |fi =Linnan kosto | ||
|ja | |fr =Revanche au château | ||
|ko | |it =Vendetta del castello | ||
|nl | |ja =城のリベンジ | ||
|no | |ko =복수성 | ||
|pl | |nl =Kasteel-revanche | ||
|pt-br | |no =Slottshevn | ||
|ru | |pl =Odwet zamku | ||
|sv | |pt-br=Vingança do Castelo | ||
|th | |ru =Месть замка | ||
|tr | |sv =Slottshämnd | ||
|zh-cn | |th =ปราสาทชำระแค้น | ||
|zh-tw | |tr =Şatonun İntikamı | ||
|zh-cn=城堡复仇 | |||
|zh-tw=城堡復仇 | |||
}} | }} | ||
==References== | ==References== | ||
{{References}} | |||
*Path lengths sourced from the [https://btd6index.win/ BTD6 Index] | *Path lengths sourced from the [https://btd6index.win/ BTD6 Index] | ||
==Navigation== | ==Navigation== | ||
{{BTD6 map nav}} | {{BTD6 map nav}} | ||
Latest revision as of 18:42, 23 April 2026

|
| Difficulty | Advanced | ||
|---|---|---|---|
| Music | Jazz Theme | ||
| Default Co-op division | Free-for-all | ||
| Introduced | Version 42.0 | ||
| Entrances | 4 | Exits | 2 |
| Junctions | 2 | Water? | Yes |
| Removables and gizmos |
|---|
|
| Path lengths (RBS) | ||||
|---|---|---|---|---|
| Path | Easy | Medium | Hard | |
| Top wheel | 18.8 | 17.0 | 15.0 | |
| Bottom wheel | 18.1 | 16.5 | 14.5 | |
| Top MOAB | 20.1 | 18.3 | 16.1 | |
| Bottom MOAB | 19.6 | 17.8 | 15.7 | |
| Top water | 21.0 | 19.1 | 16.8 | |
| Bottom water | 20.6 | 18.8 | 16.5 | |
Castle Revenge is an Advanced map in Bloons TD 6, introduced in version 42.0. It is a walking mechanical castle. It is a revenge map of Castle from Bloons TD 5.[1]
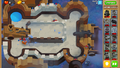
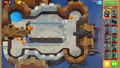
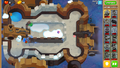
Layout
[edit | edit source]Bloons appear from the right side of the screen outside of the castle, move over the wheels and onto the castle, and then exit on the left side of the castle. Bloons are invulnerable until after they pass the wheels. There are two simultaneously active paths, one which traces the top of the castle and one which traces the bottom.
There is a central platform and a wheel near the left side which are line-of-sight blockers. Towers may be placed on the platform to see the whole track. Towers may not be placed on the outside of the castle.
Strategy
[edit | edit source]Due to the divergent lanes preventing most towers from covering both lanes and the castle walls interfering with projectiles, Castle Revenge is one of the most challenging Advanced maps. Erosion and X Factor are the only Advanced maps regarded as harder than Castle Revenge by consensus. The valve at the back also blocks the placement of towers that otherwise would have been very useful on this map, such as Perma-Spike. Effective, separate defense for both lanes or global-range towers that can cover both lanes simultaneously is mandatory for defeating this map.
Recommended towers and upgrades
[edit | edit source]| Name | Portrait | Reasoning |
|---|---|---|
| Carpet of Spikes | 
|
The fact that the spikes can cover both lanes effectively and the relatively short length of this map make Carpet of Spikes a great option. It covers Condor's weakness against DDTs, which it cannot grab all into one lane, in addition to breaking the shell of ZOMGs to let clean-up towers deal with them. It also removes the need to spend anything for the round 100 BAD, allowing the addition of several more support options for rounds 96-99. |
| Giant Condor | 
|
It can move blimps from one of the paths to the other, effectively turning this map into a single-lane map on most rounds and greatly improving the capability of towers like Sauda, Corvus, and Spectre on this map. It is also good as a regular support option, stalling Bloons especially effectively due to the section at the start of this map where Bloons are immune and putting blimps that are almost exiting back to the front. Set its dropoff point on the bottom lane entrance, as Condor does not function correctly with its default dropoff point on the top lane. Moving the dropoff point further along the top lane does restore most of Condor's functionality, but still leaves it attacking targets it should move on the bottom lane entrance. |
| Juggernaut | 
|
All the walls make Spike-o-pult and Juggernaut effective in all stages of the game when placed near the last bend on each side. Use 4-0-2 for camo detection, better knockback, and better projectile speed/lifespan. |
Removables and Gizmos
[edit | edit source]Castle Revenge has one gizmo, a pressure valve near the end of the track. The player may pay $500 to activate the pressure valve. It creates two projectiles that applies 200% knockback effect to non-MOAB-Class Bloons with 5 pierce and 0.4-second pierce refresh and rehit interval for 15 seconds. This gizmo has a cooldown of 75 seconds, which can be reset by Rejuv Potion.
Update history
[edit | edit source]| This article or section uses Cargo to generate its content. It will automatically fill up as other articles are completed. To add to this section, create the articles it is looking up. Do not add content to this section manually and do not remove this notice until you are sure this section is complete. |
- Default music changed from Sunshine Serenade to Jazz Theme
 Boss position should no longer reset on Boss Rush (bug fix)
Quotes
[edit | edit source]— Version 42.0 update notes
Gallery
[edit | edit source]-
 Easter theme
 -
 Fireworks theme
 -
 Halloween theme
 -
 Holiday theme
 -
 Island statue


In other languages
[edit | edit source]| Language | Text | Notes |
|---|---|---|
| Arabic | انتقام القلعة | — |
| Danish | Slotshævn | — |
| German | Burgrache | — |
| Spanish | Venganza del castillo | — |
| Spanish (Latin America) | Venganza del castillo | — |
| Finnish | Linnan kosto | — |
| French | Revanche au château | — |
| Italian | Vendetta del castello | — |
| Japanese | 城のリベンジ | — |
| Korean | 복수성 | — |
| Dutch | Kasteel-revanche | — |
| Norwegian | Slottshevn | — |
| Polish | Odwet zamku | — |
| Portuguese (Brazil) | Vingança do Castelo | — |
| Russian | Месть замка | — |
| Swedish | Slottshämnd | — |
| Thai | ปราสาทชำระแค้น | — |
| Turkish | Şatonun İntikamı | — |
| Chinese (simplified) | 城堡复仇 | — |
| Chinese (traditional) | 城堡復仇 | — |
References
[edit | edit source]- Path lengths sourced from the BTD6 Index