Adora's Temple: Difference between revisions
mNo edit summary |
Pymonkibot (talk | contribs) m Text replacement - "[[Bloons TD 6 v" to "[[Update history:Bloons TD 6/Version " |
||
| (11 intermediate revisions by 7 users not shown) | |||
| Line 14: | Line 14: | ||
|path labels =Horizontal,Vertical | |path labels =Horizontal,Vertical | ||
|water = | |water =Yes | ||
|removable costs = | |removable costs = | ||
|removable labels = | |removable labels = | ||
| Line 22: | Line 22: | ||
|coop division=1 | |coop division=1 | ||
}} | }} | ||
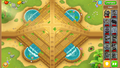
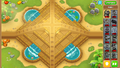
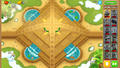
'''Adora's Temple''' is an [[Intermediate]] [[map]] in ''[[Bloons TD 6]]'', introduced in [[Bloons TD 6 | '''Adora's Temple''' is an [[Intermediate]] [[map]] in ''[[Bloons TD 6]]'', introduced in [[Update history:Bloons TD 6/Version 14.0|version 14.0]]. It takes place on a pyramid which somewhat resembles a Mayan temple. The temple features multiple layers that block [[line of sight]]. | ||
==Layout== | ==Layout== | ||
On odd rounds, Bloons enter from the left and the right, while on even rounds, Bloons enter from the top and bottom. They take one complete loop around the bottom of the temple, traverse through the steps on the temple, and exit at the spot opposite to their entrance. There are 4 layers on the temple, with each successive layer (except for the first) blocking the line-of-sight of towers placed on all layers below. There are 4 spots at the temple's peak, each able to fit up to a [[Boomerang Monkey (BTD6)|Boomerang Monkey]] and not blocked by line-of-sight. There are 4 ponds at the periphery of the temple that can fit water towers. | |||
==Strategy== | ==Strategy== | ||
{{ | In general, the win condition(s) (towers that concentrate most of the defense's power) are best placed at the top 2 spots at the peak of the temple, where they are uninhibited by line-of-sight and can see large sections of the track on the temple's bottom. In [[CHIMPS]] mode, only place towers there early-game if they are to be upgraded to a win condition later on, and do not place towers too close to these 2 spots on the lower layer of the temple either, as these towers may block the placement of towers at the top. With proper usage of the top 2 spots in mind, Adora's Temple can be beaten with general strategies listed here. | ||
{{BTD6 basic map strategies}} | |||
Towers that excel on the top 2 spots are shown below. | |||
===Recommended towers and upgrades=== | |||
{|class="wikitable center-col-1" | |||
!Name | |||
!Portrait | |||
!Reasoning | |||
|- | |||
|[[MOAB Domination (BTD6)|MOAB Domination]] | |||
|[[File:BTD6 005-BoomerangMonkey.png|x50px]] | |||
|At one of the top 2 peak spots of the temple, MOAB Domination's Press attack gains practically map-wide coverage, wiping out large clumps of high-tier blimps easily. Its Kylie attack also gains widespread coverage, cleaning up large clumps of low-tier MOABs and Bloons with ease. Given [[Primary Training (BTD6)|Primary Training]] with [[Radar Scanner (BTD6)|Radar Scanner]] and [[Stronger Stimulant (BTD6)|Stronger Stimulant]], MOAB Domination trivializes the entire late-game, including the Round 100 [[BAD (BTD6)|BAD]]. | |||
|- | |||
|[[Glaive Lord (BTD6)|Glaive Lord]] | |||
|[[File:BTD6 500-BoomerangMonkey.png|x50px]] | |||
|When placed on one of the temple's 2 top peak spots, Glaive Lord's constantly thrown ricocheting glaives can bounce repeatedly all over the map, dealing massive damage. The rotating glaives can catch any Bloon/low-tier blimp and clean them up well. Glaive Lord also works well with MOAB Domination, catching the leaks that the latter may leave while doing solid damage in its own right. | |||
|} | |||
==Easter eggs== | ==Easter eggs== | ||
{{ | {{#lst:List of Easter eggs in BTD6|Adora's Temple}} | ||
==Gallery== | ==Gallery== | ||
<gallery> | |||
BTD6 Adora's Temple easter.png|Easter theme | |||
BTD6 Adora's Temple fireworks.png|Fireworks theme | |||
BTD6 Adora's Temple halloween.png|Halloween theme | |||
BTD6 Adora's Temple holiday.png|Holiday theme | |||
BTD6 Adora's Temple island statue.png|Island statue | |||
</gallery> | |||
==In other languages== | ==In other languages== | ||
{{BTD6 | {{BTD6 last updated|48.1|section=y}} | ||
|ar | {{langlist | ||
|da | |key=AdorasTemple | ||
|de | |ar =معبد أدورا | ||
|es | |da =Adoras tempel | ||
|es-la | |de =Adoras Tempel | ||
|fi | |es =Templo de Adora | ||
|fr | |es-la=Templo de Adora | ||
|it | |fi =Adoran torni | ||
|ja | |fr =Temple d'Adora | ||
|ko | |it =Tempio di Adora | ||
|nl | |ja =アドラの神殿 | ||
|no | |ko =아도라의 사원 | ||
|pl | |nl =Adora's tempel | ||
|pt-br | |no =Adoras tempel | ||
|ru | |pl =Świątynia Adory | ||
|sv | |pt-br=Templo de Adora | ||
|th | |ru =Храм Адоры | ||
|tr | |sv =Adoras tempel | ||
|zh-cn | |th =วิหารของอดอร่า | ||
|zh-tw | |tr =Adora’nın Tapınağı | ||
|zh-cn=阿多拉神庙 | |||
|zh-tw=安多拉神廟 | |||
}} | |||
==Footnotes== | |||
}} | {{footnotes}} | ||
==References== | ==References== | ||
Latest revision as of 01:02, 24 April 2026

|
| Difficulty | Intermediate | ||
|---|---|---|---|
| Music | Tribes & Tribulations | ||
| Default Co-op division | Horizontal | ||
| Introduced | Version 14.0 | ||
| Entrances | 4 | Exits | 4 |
| Junctions | 0 | Water? | Yes |
| Path lengths (RBS) | ||||
|---|---|---|---|---|
| Path | Easy | Medium | Hard | |
| Horizontal | 37.8 | 34.3 | 30.2 | |
| Vertical | 34.8 | 31.6 | 27.8 | |
Adora's Temple is an Intermediate map in Bloons TD 6, introduced in version 14.0. It takes place on a pyramid which somewhat resembles a Mayan temple. The temple features multiple layers that block line of sight.
Layout
[edit | edit source]On odd rounds, Bloons enter from the left and the right, while on even rounds, Bloons enter from the top and bottom. They take one complete loop around the bottom of the temple, traverse through the steps on the temple, and exit at the spot opposite to their entrance. There are 4 layers on the temple, with each successive layer (except for the first) blocking the line-of-sight of towers placed on all layers below. There are 4 spots at the temple's peak, each able to fit up to a Boomerang Monkey and not blocked by line-of-sight. There are 4 ponds at the periphery of the temple that can fit water towers.
Strategy
[edit | edit source]In general, the win condition(s) (towers that concentrate most of the defense's power) are best placed at the top 2 spots at the peak of the temple, where they are uninhibited by line-of-sight and can see large sections of the track on the temple's bottom. In CHIMPS mode, only place towers there early-game if they are to be upgraded to a win condition later on, and do not place towers too close to these 2 spots on the lower layer of the temple either, as these towers may block the placement of towers at the top. With proper usage of the top 2 spots in mind, Adora's Temple can be beaten with general strategies listed here.
 Basic Deflation strategies
 Basic Apopalypse strategies
 Basic Half Cash strategies
 Basic Alternate Bloons Rounds strategies
 Basic Impoppable strategies
 Basic CHIMPS strategies
Towers that excel on the top 2 spots are shown below.
Recommended towers and upgrades
[edit | edit source]| Name | Portrait | Reasoning |
|---|---|---|
| MOAB Domination | At one of the top 2 peak spots of the temple, MOAB Domination's Press attack gains practically map-wide coverage, wiping out large clumps of high-tier blimps easily. Its Kylie attack also gains widespread coverage, cleaning up large clumps of low-tier MOABs and Bloons with ease. Given Primary Training with Radar Scanner and Stronger Stimulant, MOAB Domination trivializes the entire late-game, including the Round 100 BAD. | |
| Glaive Lord | 
|
When placed on one of the temple's 2 top peak spots, Glaive Lord's constantly thrown ricocheting glaives can bounce repeatedly all over the map, dealing massive damage. The rotating glaives can catch any Bloon/low-tier blimp and clean them up well. Glaive Lord also works well with MOAB Domination, catching the leaks that the latter may leave while doing solid damage in its own right. |
Easter eggs
[edit | edit source]
- The Monklish on top of the temple reads "MAX SDN"[fn 1] and "APEX DARK".
- If Adora is placed and transformed into her Vengeful form (by creating a VTSG with her in its range), the map changes to a dark version with red water. This remains even if Adora and/or the VTSG are sold.
Gallery
[edit | edit source]-
 Easter theme
 -
 Fireworks theme
 -
 Halloween theme
 -
 Holiday theme
 -
 Island statue


In other languages
[edit | edit source]| Language | Text | Notes |
|---|---|---|
| Arabic | معبد أدورا | — |
| Danish | Adoras tempel | — |
| German | Adoras Tempel | — |
| Spanish | Templo de Adora | — |
| Spanish (Latin America) | Templo de Adora | — |
| Finnish | Adoran torni | — |
| French | Temple d'Adora | — |
| Italian | Tempio di Adora | — |
| Japanese | アドラの神殿 | — |
| Korean | 아도라의 사원 | — |
| Dutch | Adora's tempel | — |
| Norwegian | Adoras tempel | — |
| Polish | Świątynia Adory | — |
| Portuguese (Brazil) | Templo de Adora | — |
| Russian | Храм Адоры | — |
| Swedish | Adoras tempel | — |
| Thai | วิหารของอดอร่า | — |
| Turkish | Adora’nın Tapınağı | — |
| Chinese (simplified) | 阿多拉神庙 | — |
| Chinese (traditional) | 安多拉神廟 | — |
Footnotes
[edit | edit source]- ↑ Presumably a misspelling of "MAX SUN", due to the Monklish glyphs for "U" and "D" being the inverse of each other.
References
[edit | edit source]- Path lengths sourced from the BTD6 Index