Firing Range: Difference between revisions
mNo edit summary |
Pymonkibot (talk | contribs) m Text replacement - "[[Bloons TD 6 v" to "[[Update history:Bloons TD 6/Version " |
||
| (8 intermediate revisions by 6 users not shown) | |||
| Line 22: | Line 22: | ||
|coop division=0 | |coop division=0 | ||
}} | }} | ||
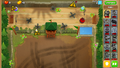
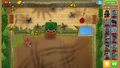
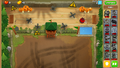
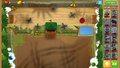
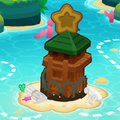
'''Firing Range''' is an [[Intermediate]] [[map]] in ''[[Bloons TD 6]]'', introduced in [[Bloons TD 6 | '''Firing Range''' is an [[Intermediate]] [[map]] in ''[[Bloons TD 6]]'', introduced in [[Update history:Bloons TD 6/Version 2.0|version 2.0]]. It takes place at a military outpost, with various explosives and warning signs scattered about. | ||
==Layout== | ==Layout== | ||
Firing Range has two entrances with two exits. The top-left entrance exits on the right, while the top-right entrance exits on the left, and two lanes both make 3 turns before exiting. There are two benches that have good coverage of the track, but they can only fit small footprint towers such as [[Dart Monkey (BTD6)|Dart Monkeys]] and cannot fit any heroes. The fence and outpost in the center prevent non-global land towers at the bottom from having good coverage of the track in the early-game, but the outpost can be removed for $1,000 to clear up a good space to put towers. There is also a small amount of water that has good coverage of the track. | |||
==Strategy== | ==Strategy== | ||
Firing Range may seem intimidating due to the lack of good placements for almost all towers at the start. However, the track compactness, track length, good spots obtained by removing the center's outpost, and good water spots make this map relatively simple to beat. This map can be beaten fairly easily with strategies found down below. | |||
{{BTD6 basic map strategies}} | {{BTD6 basic map strategies}} | ||
Some towers excel on this map, and they are listed below. | |||
===Recommended towers and upgrades=== | |||
{|class="wikitable center-col-1" | |||
!Name | |||
!Portrait | |||
!Reasoning | |||
|- | |||
|[[Destroyer (BTD6)|Destroyer]] | |||
|[[File:BTD6 300-MonkeyBuccaneer.png|x50px]] | |||
|It wipes the floor with the mid-game thanks to its good coverage on the water when paired with [[Berserker Brew (BTD6)|Berserker Brew]] and given [[Camo Bloon (BTD6)|Camo]] detection. [[Grape Shot (BTD6)|Grape Shot]], Destroyer's favored crosspath, is an optimal choice for the first few rounds, simplifying the early-game. | |||
|- | |||
|[[Pop and Awe (BTD6)|Pop and Awe]] | |||
|[[File:BTD6 050-MortarMonkey.png|x50px]] | |||
|The compactness of this map makes Pop and Awe's explosions hit wide swaths of the track at once. Destroyer aids in its difficult saveup, and once obtained, it trivializes the late-game, especially when paired with [[Striker Jones (BTD6)|Striker Jones]] and given stun bonuses with [[Relentless Glue (BTD6)|Relentless Glue]]. Make sure to get extra defense against the BAD, Pop and Awe's greatest weakness. | |||
|} | |||
==Gallery== | ==Gallery== | ||
<gallery> | |||
BTD6 Firing Range easter.png|Easter theme | |||
BTD6 Firing Range fireworks.png|Fireworks theme | |||
BTD6 Firing Range halloween.png|Halloween theme | |||
BTD6 Firing Range holiday.png|Holiday theme | |||
BTD6 Firing Range island statue.png|Island statue | |||
</gallery> | |||
==In other languages== | ==In other languages== | ||
{{BTD6 | {{BTD6 last updated|48.1|section=y}} | ||
|ar | {{langlist | ||
|da | |key=FiringRange | ||
|de | |ar =ميدان الرماية | ||
|es | |da =Skydebane | ||
|es-la | |de =Schießplatz | ||
|fi | |es =Campo de Tiro | ||
|fr | |es-la=Campo de Tiro | ||
|it | |fi =Ampumarata | ||
|ja | |fr =Stand de tir | ||
|ko | |it =Poligono | ||
|nl | |ja =射撃練習場 | ||
|no | |ko =사격장 | ||
|pl | |nl =Schietbaan | ||
|pt-br | |no =Skytebane | ||
|ru | |pl =Strzelnica | ||
|sv | |pt-br=Estande de Tiro | ||
|th | |ru =Стрельбище | ||
|tr | |sv =Skjutbana | ||
|zh-cn | |th =ระยะยิง | ||
|zh-tw | |tr =Ateşleme Menzili | ||
|zh-cn=靶场 | |||
|zh-tw=靶場 | |||
}} | }} | ||
Latest revision as of 00:48, 24 April 2026

|
| Difficulty | Intermediate | ||
|---|---|---|---|
| Music | Tropical Carnival | ||
| Default Co-op division | Free-for-all | ||
| Introduced | Version 2.0 | ||
| Entrances | 2 | Exits | 2 |
| Junctions | 0 | Water? | Yes |
| Removables and gizmos |
|---|
|
| Path lengths (RBS) | ||||
|---|---|---|---|---|
| Path | Easy | Medium | Hard | |
| Left | 37.4 | 34.0 | 29.9 | |
| Right | 37.1 | 33.8 | 29.7 | |
Firing Range is an Intermediate map in Bloons TD 6, introduced in version 2.0. It takes place at a military outpost, with various explosives and warning signs scattered about.
Layout
[edit | edit source]Firing Range has two entrances with two exits. The top-left entrance exits on the right, while the top-right entrance exits on the left, and two lanes both make 3 turns before exiting. There are two benches that have good coverage of the track, but they can only fit small footprint towers such as Dart Monkeys and cannot fit any heroes. The fence and outpost in the center prevent non-global land towers at the bottom from having good coverage of the track in the early-game, but the outpost can be removed for $1,000 to clear up a good space to put towers. There is also a small amount of water that has good coverage of the track.
Strategy
[edit | edit source]Firing Range may seem intimidating due to the lack of good placements for almost all towers at the start. However, the track compactness, track length, good spots obtained by removing the center's outpost, and good water spots make this map relatively simple to beat. This map can be beaten fairly easily with strategies found down below.
 Basic Deflation strategies
 Basic Apopalypse strategies
 Basic Half Cash strategies
 Basic Alternate Bloons Rounds strategies
 Basic Impoppable strategies
 Basic CHIMPS strategies
Some towers excel on this map, and they are listed below.
Recommended towers and upgrades
[edit | edit source]| Name | Portrait | Reasoning |
|---|---|---|
| Destroyer | It wipes the floor with the mid-game thanks to its good coverage on the water when paired with Berserker Brew and given Camo detection. Grape Shot, Destroyer's favored crosspath, is an optimal choice for the first few rounds, simplifying the early-game. | |
| Pop and Awe | 
|
The compactness of this map makes Pop and Awe's explosions hit wide swaths of the track at once. Destroyer aids in its difficult saveup, and once obtained, it trivializes the late-game, especially when paired with Striker Jones and given stun bonuses with Relentless Glue. Make sure to get extra defense against the BAD, Pop and Awe's greatest weakness. |
Gallery
[edit | edit source]-
 Easter theme
 -
 Fireworks theme
 -
 Halloween theme
 -
 Holiday theme
 -
 Island statue


In other languages
[edit | edit source]| Language | Text | Notes |
|---|---|---|
| Arabic | ميدان الرماية | — |
| Danish | Skydebane | — |
| German | Schießplatz | — |
| Spanish | Campo de Tiro | — |
| Spanish (Latin America) | Campo de Tiro | — |
| Finnish | Ampumarata | — |
| French | Stand de tir | — |
| Italian | Poligono | — |
| Japanese | 射撃練習場 | — |
| Korean | 사격장 | — |
| Dutch | Schietbaan | — |
| Norwegian | Skytebane | — |
| Polish | Strzelnica | — |
| Portuguese (Brazil) | Estande de Tiro | — |
| Russian | Стрельбище | — |
| Swedish | Skjutbana | — |
| Thai | ระยะยิง | — |
| Turkish | Ateşleme Menzili | — |
| Chinese (simplified) | 靶场 | — |
| Chinese (traditional) | 靶場 | — |
References
[edit | edit source]- Path lengths sourced from the BTD6 Index