Sanctuary: Difference between revisions
mNo edit summary |
Pymonkibot (talk | contribs) m Text replacement - "[[Bloons TD 6 v" to "[[Update history:Bloons TD 6/Version " |
||
| (15 intermediate revisions by 10 users not shown) | |||
| Line 1: | Line 1: | ||
{{BTD6 map info | {{About|the map in BTD6|the area in [[Frontier Legends]] inspired by this map|The Sanctuary}}{{BTD6 map info | ||
|id=Sanctuary | |id=Sanctuary | ||
| Line 22: | Line 22: | ||
|coop division=0 | |coop division=0 | ||
}} | }} | ||
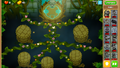
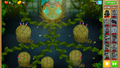
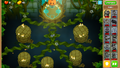
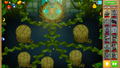
'''Sanctuary''' is an [[Expert]] [[map]] in ''[[Bloons TD 6]]'', introduced in [[Bloons TD 6 | '''Sanctuary''' is an [[Expert]] [[map]] in ''[[Bloons TD 6]]'', introduced in [[Update history:Bloons TD 6/Version 26.0|version 26.0]]. It takes place above an open space with vines and several platforms. The platforms move and/or rotate at the start of each [[round]]. | ||
==Layout== | ==Layout== | ||
Sanctuary has 2 entrances, which mostly merge together in the middle and split off into 4 exits. There are 6 moving platforms to place towers on, and the only other map to share this mechanic of having platforms that move towers being [[Geared]]. There is a statue at the top resembling | Sanctuary has 2 entrances, which mostly merge together in the middle and split off into 4 exits. There are 6 moving platforms to place towers on, and the only other map to share this mechanic of having platforms that move towers being [[Geared]]. There is a statue at the top resembling {{BTD6|Psi}}, the hero released alongside Sanctuary in [[Update history:Bloons TD 6/Version 26.0|version 26.0]]. The platforms move in a cyclic pattern that places all of them in the same spots every 24 rounds. Unusually for an expert map, Sanctuary has no line-of-sight blockers, despite the Psi statue appearing to have a high elevation relative to the rest of the map. | ||
Due to a bug related to how the segmented paths are coded, birds from [[Beast Handler (BTD6)|Beast Handler]] may sometimes grab the Bloons forwards when playing on [[Reverse (BTD6)|Reverse]]. | |||
==Strategy== | ==Strategy== | ||
Sanctuary is | Sanctuary is fairly difficult during the early-game due to the moving platforms. The middle part of the track where the paths overlap, however, reduces this map's difficulty during the mid-game and late-game, allowing a variety of strategies to work. Sanctuary is considered to be much easier than the true experts, being around the same difficulty level of [[Workshop (BTD6)|Workshop]]. | ||
===Recommended towers and upgrades=== | ===Recommended towers and upgrades=== | ||
{|class="wikitable center-col-1" | |||
!Name | |||
!Portrait | |||
!Reasoning | |||
|- | |||
|[[Perma-Spike (BTD6)|Perma-Spike]] | |||
|[[File:BTD6 005-SpikeFactory.png|x50px]] | |||
|There is a precise spot on the bottom-middle platform where Perma-Spike can be placed so that it shoots spikes toward a spot where it can tank all leaking Bloons when paired with a village and a [[Stronger Stimulant (BTD6)|Stronger Stimulant]]. Use ''Set Target'' and ensure it keeps targeting that location. That way, the late game is usually made trivial. | |||
|- | |||
|[[Corvus (BTD6)|Corvus]] | |||
|[[File:BTD6 CorvusPortrait.png|x50px]] | |||
|He makes the early game, a difficult part of the game in Sanctuary, much easier with his Spear spell and ability to constantly gain mana. Corvus can save up for many win conditions throughout the mid-game, such as Glaive Lord, Bloon Exclusion Zone, and Perma-Spike. In particular, if Perma-Spike is used, Corvus can remove large amounts of RBE in the late-game with Ancestral Might and Overload and alleviate large of amounts of pressure for Perma-Spike. | |||
|- | |||
|[[Bloon Exclusion Zone (BTD6)|Bloon Exclusion Zone]] | |||
|[[File:BTD6 005-DartlingGunner.png|x50px]] | |||
|The layout of this map makes BEZ very potent and able to easily solo the entire late-game in CHIMPS with proper support, including Alchemist buffs, [[Relentless Glue (BTD6)|Relentless Glue]], [[Monkey Intelligence Bureau (BTD6)|MIB]]/[[Glue Storm (BTD6)|Glue Storm]], [[Bloon Sabotage (BTD6)|Bloon Sabotage]], and [[Overclock (BTD6)|Overclock]]. [[Bloon Area Denial System (BTD6)|Bloon Area Denial System]] is a solid Tier 4 upgrade that can do most of the work in saving up for BEZ. Outside of Reverse, bottom platform is recommended, to shoot against the grain and avoids shots getting clogged. | |||
|} | |||
===CHIMPS Starts=== | |||
{{#ev:youtube|xaKa-uwexN4|dimensions=320x240px}} | |||
== Update history == | |||
{{BTD6 change list by name|Sanctuary}} | |||
==Gallery== | ==Gallery== | ||
<gallery> | |||
BTD6 Sanctuary easter.png|Easter theme | |||
BTD6 Sanctuary fireworks.png|Fireworks theme | |||
BTD6 Sanctuary halloween.png|Halloween theme | |||
BTD6 Sanctuary holiday.png|Holiday theme | |||
BTD6 Sanctuary island statue.png|Island statue | |||
</gallery> | |||
==In other languages== | ==In other languages== | ||
{{BTD6 | {{BTD6 last updated|48.1|section=y}} | ||
|ar | {{langlist | ||
|da | |key=Sanctuary | ||
|de | |ar =الملاذ الآمن | ||
|es | |da =Fristed | ||
|es-la | |de =Heiligtum | ||
|fi | |es =Santuario | ||
|fr | |es-la=Santuario | ||
|it | |fi =Turvapaikka | ||
|ja | |fr =Sanctuaire | ||
|ko | |it =Santuario | ||
|nl | |ja =サンクチュアリ | ||
|no | |ko =성소 | ||
|pl | |nl =Heiligdom | ||
|pt-br | |no =Fristed | ||
|ru | |pl =Sanktuarium | ||
|sv | |pt-br=Santuário | ||
|th | |ru =Святилище | ||
|tr | |sv =Helgedom | ||
|zh-cn | |th =วิหาร | ||
|zh-tw | |tr =Mabet | ||
|zh-cn=避难所 | |||
|zh-tw=聖殿 | |||
}} | }} | ||
Latest revision as of 00:49, 24 April 2026

|
| Difficulty | Expert | ||
|---|---|---|---|
| Music | Tribes & Tribulations | ||
| Default Co-op division | Free-for-all | ||
| Introduced | Version 26.0 | ||
| Entrances | 2 | Exits | 4 |
| Junctions | 2 | Water? | Yes |
| Path lengths (RBS) | ||||
|---|---|---|---|---|
| Path | Easy | Medium | Hard | |
| Far left | 16.0 | 14.5 | 12.8 | |
| Middle left | 13.5 | 12.3 | 10.8 | |
| Middle right | 13.5 | 12.3 | 10.8 | |
| Far right | 16.0 | 14.5 | 12.8 | |
Sanctuary is an Expert map in Bloons TD 6, introduced in version 26.0. It takes place above an open space with vines and several platforms. The platforms move and/or rotate at the start of each round.
Layout
[edit | edit source]Sanctuary has 2 entrances, which mostly merge together in the middle and split off into 4 exits. There are 6 moving platforms to place towers on, and the only other map to share this mechanic of having platforms that move towers being Geared. There is a statue at the top resembling Psi, the hero released alongside Sanctuary in version 26.0. The platforms move in a cyclic pattern that places all of them in the same spots every 24 rounds. Unusually for an expert map, Sanctuary has no line-of-sight blockers, despite the Psi statue appearing to have a high elevation relative to the rest of the map.
Due to a bug related to how the segmented paths are coded, birds from Beast Handler may sometimes grab the Bloons forwards when playing on Reverse.
Strategy
[edit | edit source]Sanctuary is fairly difficult during the early-game due to the moving platforms. The middle part of the track where the paths overlap, however, reduces this map's difficulty during the mid-game and late-game, allowing a variety of strategies to work. Sanctuary is considered to be much easier than the true experts, being around the same difficulty level of Workshop.
Recommended towers and upgrades
[edit | edit source]| Name | Portrait | Reasoning |
|---|---|---|
| Perma-Spike | There is a precise spot on the bottom-middle platform where Perma-Spike can be placed so that it shoots spikes toward a spot where it can tank all leaking Bloons when paired with a village and a Stronger Stimulant. Use Set Target and ensure it keeps targeting that location. That way, the late game is usually made trivial. | |
| Corvus | 
|
He makes the early game, a difficult part of the game in Sanctuary, much easier with his Spear spell and ability to constantly gain mana. Corvus can save up for many win conditions throughout the mid-game, such as Glaive Lord, Bloon Exclusion Zone, and Perma-Spike. In particular, if Perma-Spike is used, Corvus can remove large amounts of RBE in the late-game with Ancestral Might and Overload and alleviate large of amounts of pressure for Perma-Spike. |
| Bloon Exclusion Zone | 
|
The layout of this map makes BEZ very potent and able to easily solo the entire late-game in CHIMPS with proper support, including Alchemist buffs, Relentless Glue, MIB/Glue Storm, Bloon Sabotage, and Overclock. Bloon Area Denial System is a solid Tier 4 upgrade that can do most of the work in saving up for BEZ. Outside of Reverse, bottom platform is recommended, to shoot against the grain and avoids shots getting clogged. |
CHIMPS Starts
[edit | edit source]Update history
[edit | edit source]| This article or section uses Cargo to generate its content. It will automatically fill up as other articles are completed. To add to this section, create the articles it is looking up. Do not add content to this section manually and do not remove this notice until you are sure this section is complete. |
 Monkey Aces should now fly correctly when platforms move (bug fix)
Gallery
[edit | edit source]-
 Easter theme
 -
 Fireworks theme
 -
 Halloween theme
 -
 Holiday theme
 -
 Island statue


In other languages
[edit | edit source]| Language | Text | Notes |
|---|---|---|
| Arabic | الملاذ الآمن | — |
| Danish | Fristed | — |
| German | Heiligtum | — |
| Spanish | Santuario | — |
| Spanish (Latin America) | Santuario | — |
| Finnish | Turvapaikka | — |
| French | Sanctuaire | — |
| Italian | Santuario | — |
| Japanese | サンクチュアリ | — |
| Korean | 성소 | — |
| Dutch | Heiligdom | — |
| Norwegian | Fristed | — |
| Polish | Sanktuarium | — |
| Portuguese (Brazil) | Santuário | — |
| Russian | Святилище | — |
| Swedish | Helgedom | — |
| Thai | วิหาร | — |
| Turkish | Mabet | — |
| Chinese (simplified) | 避难所 | — |
| Chinese (traditional) | 聖殿 | — |
References
[edit | edit source]- Path lengths sourced from the BTD6 Index