Spa Pits: Difference between revisions
Pymonkibot (talk | contribs) m Text replacement - "BTD6 (.*) easter\.png\|Easter theme" to "BTD6 $1 easter.png|Easter theme BTD6 $1 fireworks.png|Fireworks theme" |
Overclockbtd (talk | contribs) |
||
| (12 intermediate revisions by 8 users not shown) | |||
| Line 1: | Line 1: | ||
{{BTD6 map info | {{BTD6 map info | ||
| id = SpaPits | |||
| name = Spa Pits | | name = Spa Pits | ||
| image = BTD6 MapSelectSpaPitsButton.png | | image = BTD6 MapSelectSpaPitsButton.png | ||
| Line 6: | Line 7: | ||
| coop division = 0 | | coop division = 0 | ||
| introduced = 48.0 | | introduced = 48.0 | ||
| entrances | | entrances = 1 | ||
| exits | | exits = 1 | ||
| junctions | | junctions = 0 | ||
| path lengths=48.7 | | path lengths = 48.7 | ||
| path labels = | | path labels = | ||
| water = Yes | | water = Yes | ||
}} | }} | ||
| Line 18: | Line 19: | ||
This map has a similar layout to Tar Pits, but with several major changes to make it easier: | This map has a similar layout to Tar Pits, but with several major changes to make it easier: | ||
* The five pits of tar are replaced with hot springs that allow water towers to be placed in them. | * The five pits of tar are replaced with hot springs that allow water towers to be placed in them. | ||
*All the loops are joined into a single path, with new sections around the pool in the middle connecting them. The Bloons enter from the upper half of the top-left pool and take a full clockwise loop around the bottom- | *All the loops are joined into a single path, with new sections around the pool in the middle connecting them. The Bloons enter from the upper half of the top-left pool and take a full clockwise loop around the bottom-right pool, then the topmost pool, then the bottom-left pool, then the top-right pool, then exit from the other half of the top-left pool, taking partial anti-clockwise loops around the middle in between each loop. | ||
* The five caves now function as line of sight blockers. Around the edges, the plants block tower placement. However, neither of these changes significantly increase the track's difficulty. | * The five caves now function as line of sight blockers. Around the edges, the plants block tower placement. However, neither of these changes significantly increase the track's difficulty. | ||
* There are still four other entrances/exits that spawn {{BTD6 mk|Pre-game Prep}} spikes, though these entrances/exits are permanently inactive unless the player activates the secret. | * There are still four other entrances/exits that spawn {{BTD6 mk|Pre-game Prep}} spikes, though these entrances/exits are permanently inactive unless the player activates the secret. | ||
| Line 24: | Line 25: | ||
== Easter egg == | == Easter egg == | ||
[[ | <!-- [[Help:Transclusion]] --> | ||
{{#lst:List of Easter eggs in BTD6|Spa Pits}} | |||
== Strategy == | == Strategy == | ||
===Easy version=== | ===Easy version=== | ||
Spa Pits is considered to be the | {{BTD6 last updated|54.0|section=y}} | ||
Spa Pits is considered to be the 4th easiest map in BTD6, only behind [[Logs]], [[Resort]], and [[Three Mines 'Round]]. It is extremely long, has plenty of overlap, and has a compact layout that allows towers to maximize their pierce and range. However, the somewhat lackluster space for towers prevents it from being optimal for [[Freeplay]]. Water towers excel further on this map, thanks to the central water space. As a result, water-based strategies are highly recommended, though a great variety of strategies work. Save at least one of the spots adjacent to the central pool for a {{BTD6|Monkey Village}}, as {{BTD6|Jungle Drums}} is an extremely versatile upgrade that is pivotal for all strategies. With general guidelines, Spa Pits can be beaten easily. | |||
{{BTD6 basic map strategies}} | {{BTD6 basic map strategies}} | ||
| Line 45: | Line 43: | ||
|[[Carrier Flagship (BTD6)|Carrier Flagship]] | |[[Carrier Flagship (BTD6)|Carrier Flagship]] | ||
|[[File:BTD6 500-MonkeyBuccaneer.png|x50px]] | |[[File:BTD6 500-MonkeyBuccaneer.png|x50px]] | ||
|Flagship transitions smoothly from its two preceding upgrades, {{ | |Flagship transitions smoothly from its two preceding upgrades, {{BTD6|Destroyer}} and {{BTD6|Aircraft Carrier}}. It has incredible damage output for its cost, wiping out the mid-game and early late-game with ease, and on this map covering each region of the map with little trouble. It's recommended to support it with [[Admiral Brickell (BTD6)|Admiral Brickell]], which boosts its DPS and also improves saveup from [[Destroyer (BTD6)|Destroyer]], and use the 5-2-0 crosspath for higher DPS and take advantage of its rapid-fire grapes. If using it, spamming Destroyers buffed by {{BTD6|Permanent Brew}} fully guarantees victory in all game modes. | ||
|- | |- | ||
|[[Bloontonium Reactor (BTD6)|Bloontonium Reactor]] | |[[Bloontonium Reactor (BTD6)|Bloontonium Reactor]] | ||
| Line 53: | Line 51: | ||
|[[Orca]] | |[[Orca]] | ||
|[[File:BTD6 400-BeastHandler.png|x50px]] | |[[File:BTD6 400-BeastHandler.png|x50px]] | ||
|The compact map layout allows the pierce of Orca's thrashes to be maximized, greatly enhancing Orca's effectiveness. The long track length also gives plenty of time for the sporadic Bloon leaks that it tends to leave to be cleaned up, with towers such as {{ | |The compact map layout allows the pierce of Orca's thrashes to be maximized, greatly enhancing Orca's effectiveness. The long track length also gives plenty of time for the sporadic Bloon leaks that it tends to leave to be cleaned up, with towers such as {{BTD6|The Bloon Solver}}, {{BTD6|Prince of Darkness}}, and {{BTD6|Perma-Spike}} serving this purpose well. Merge [[Great White]]s to the main Orca to reach Power 64, which is required for maximized power, allowing Orca to drag in {{BTD6|ZOMG}}s and {{BTD6|DDT}}s while having the most powerful thrash possible. | ||
|} | |} | ||
===Hard version=== | ===Hard version=== | ||
{{BTD6 last updated|54.0|section=y}} | |||
{{strategy needed}} | {{strategy needed}} | ||
The hard version is significantly harder, not only due to the very short lanes, but also still retains Beginner hero leveling (i.e. slowest leveling rate). Early-game is | The hard version is significantly harder, not only due to the very short lanes, but also still retains Beginner hero leveling (i.e. slowest leveling rate). Early-game CHIMPS is impossible due to Mermonkey's price increase in v54.0 and requires extra starting cash. | ||
For CHIMPS, its late-game focuses on [[Admiral Brickell (BTD6)|Admiral Brickell]] with [[Carrier Flagship (BTD6)|Carrier Flagship]], multiple [[Aircraft Carrier (BTD6)|Aircraft Carrier]]s, [[Snowstorm (BTD6)|Snowstorm]], and [[Glue Storm (BTD6)|Glue Storm]]. | For CHIMPS, its late-game focuses on [[Admiral Brickell (BTD6)|Admiral Brickell]] with [[Carrier Flagship (BTD6)|Carrier Flagship]], multiple [[Aircraft Carrier (BTD6)|Aircraft Carrier]]s, [[Snowstorm (BTD6)|Snowstorm]], and [[Glue Storm (BTD6)|Glue Storm]]. | ||
{|class="wikitable center-col-1" | {|class="wikitable center-col-1" | ||
| Line 69: | Line 68: | ||
|[[Carrier Flagship (BTD6)|Carrier Flagship]] | |[[Carrier Flagship (BTD6)|Carrier Flagship]] | ||
|[[File:BTD6 500-MonkeyBuccaneer.png|x50px]] | |[[File:BTD6 500-MonkeyBuccaneer.png|x50px]] | ||
|Similar reasoning and strategies for Spa Pits, with a few differences: it excels at carrying mid-game, and towards the late-game add [[Arctic Wind (BTD6)|Arctic Wind]] to account for the very short lanes against Super Ceramics plus [[Glue Storm (BTD6)|Glue Storm]] to ensure that blimps are killed quicker. | |Similar reasoning and strategies for Spa Pits, with a few differences: it excels at carrying mid-game, and towards the late-game add [[Arctic Wind (BTD6)|Arctic Wind]] to account for the very short lanes against Super Ceramics plus [[Glue Storm (BTD6)|Glue Storm]] to ensure that blimps are killed quicker. Pair with Brickell. | ||
|- | |- | ||
|[[Triple Guns (BTD6)|Triple Guns]] | |[[Triple Guns (BTD6)|Triple Guns]] | ||
| Line 77: | Line 76: | ||
==Related achievements== | ==Related achievements== | ||
{{BTD6 achievement list | {{BTD6 achievement list|exclude others=y|include=Nah, I'd Win}} | ||
== Update history == | == Update history == | ||
| Line 87: | Line 86: | ||
BTD6 Spa Pits easter.png|Easter theme | BTD6 Spa Pits easter.png|Easter theme | ||
BTD6 Spa Pits fireworks.png|Fireworks theme | BTD6 Spa Pits fireworks.png|Fireworks theme | ||
BTD6 Spa Pits halloween.png|Halloween theme | |||
BTD6 Spa Pits Holiday.png|Holiday theme | |||
BTD6 Spa Pits island statue.png|Island statue | BTD6 Spa Pits island statue.png|Island statue | ||
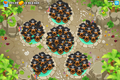
File:BTD6 max sub on spa pits.png|Maximum Monkey Sub placements (67) | File:BTD6 max sub on spa pits.png|Maximum Monkey Sub placements (67) | ||
Latest revision as of 01:31, 10 April 2026

|
| Difficulty | Beginner | ||
|---|---|---|---|
| Music | Tribes & Tribulations | ||
| Default Co-op division | Free-for-all | ||
| Introduced | Version 48.0 | ||
| Entrances | 1 | Exits | 1 |
| Junctions | 0 | Water? | Yes |
| Path lengths (RBS) | ||
|---|---|---|
| Easy | Medium | Hard |
| 60.9 | 55.3 | 48.7 |
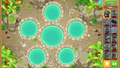
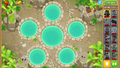
Spa Pits is a Beginner map in Bloons TD 6, introduced in version 48.0. It is a spa-themed rendition of Tar Pits from Bloons TD 5, but set in a tropical environment with a rocky substrate, hot springs, and plant life.
Layout
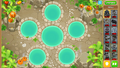
[edit | edit source]This map has a similar layout to Tar Pits, but with several major changes to make it easier:
- The five pits of tar are replaced with hot springs that allow water towers to be placed in them.
- All the loops are joined into a single path, with new sections around the pool in the middle connecting them. The Bloons enter from the upper half of the top-left pool and take a full clockwise loop around the bottom-right pool, then the topmost pool, then the bottom-left pool, then the top-right pool, then exit from the other half of the top-left pool, taking partial anti-clockwise loops around the middle in between each loop.
- The five caves now function as line of sight blockers. Around the edges, the plants block tower placement. However, neither of these changes significantly increase the track's difficulty.
- There are still four other entrances/exits that spawn
 Pre-game Prep spikes, though these entrances/exits are permanently inactive unless the player activates the secret.
Spa Pits is the third longest map in BTD6, only behind Scrapyard and Logs.
Easter egg
[edit | edit source]
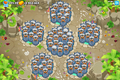
The map has a secret that changes its appearance and layout to be more like Tar Pits. The player can only activate it before starting the first round (making it impossible to activate in Apopalypse).
Interacting with the loose rocks blocking the four inactive entrances/exits, in the order indicated by the number of scratch marks on the rocks (bottom-left, top-right, top, bottom-right), causes a prompt to appear asking "Make map heaps harder?". If confirmed, the path around the center pit will disappear, splitting the layout back into five small clockwise loops used by all five entrances/exits, and the five outer hot springs turn into tar, which renders them unusable for tower placement and sells any towers that were originally placed in the water. While now unused by the Bloons, the path around the center pit is still considered a valid location for on-track projectiles such as Bloon Traps. Sauda's Sword Charge is modified when the secret is enabled; it now only uses the five short lanes instead of the long single lane.
The harder version is based on its layout in the multiplatform version of Bloons TD 5. It differs from the the Flash version, where the paths alternate directions based on the round and the player can place towers on the tar pits.
Strategy
[edit | edit source]Easy version
[edit | edit source]Spa Pits is considered to be the 4th easiest map in BTD6, only behind Logs, Resort, and Three Mines 'Round. It is extremely long, has plenty of overlap, and has a compact layout that allows towers to maximize their pierce and range. However, the somewhat lackluster space for towers prevents it from being optimal for Freeplay. Water towers excel further on this map, thanks to the central water space. As a result, water-based strategies are highly recommended, though a great variety of strategies work. Save at least one of the spots adjacent to the central pool for a Monkey Village, as Jungle Drums is an extremely versatile upgrade that is pivotal for all strategies. With general guidelines, Spa Pits can be beaten easily.
 Basic Deflation strategies
 Basic Apopalypse strategies
 Basic Half Cash strategies
 Basic Alternate Bloons Rounds strategies
 Basic Impoppable strategies
 Basic CHIMPS strategies
The following towers are especially powerful on this map.
| Name | Portrait | Reasoning |
|---|---|---|
| Carrier Flagship | Flagship transitions smoothly from its two preceding upgrades, Destroyer and Aircraft Carrier. It has incredible damage output for its cost, wiping out the mid-game and early late-game with ease, and on this map covering each region of the map with little trouble. It's recommended to support it with Admiral Brickell, which boosts its DPS and also improves saveup from Destroyer, and use the 5-2-0 crosspath for higher DPS and take advantage of its rapid-fire grapes. If using it, spamming Destroyers buffed by Permanent Brew fully guarantees victory in all game modes. | |
| Bloontonium Reactor | If placed around the middle of the central pool, Reactor provides almost guaranteed decamo around almost anywhere around the map and performs solid mid-game cleanup. This also applies to Energizer, which does decent cleanup while pairing very well with Admiral Brickell and water-focused strategies. | |
| Orca | The compact map layout allows the pierce of Orca's thrashes to be maximized, greatly enhancing Orca's effectiveness. The long track length also gives plenty of time for the sporadic Bloon leaks that it tends to leave to be cleaned up, with towers such as The Bloon Solver, Prince of Darkness, and Perma-Spike serving this purpose well. Merge Great Whites to the main Orca to reach Power 64, which is required for maximized power, allowing Orca to drag in ZOMGs and DDTs while having the most powerful thrash possible. |
Hard version
[edit | edit source]| This strategy section is empty or incomplete. See the strategy guidelines for more information on how to write strategy sections. |
The hard version is significantly harder, not only due to the very short lanes, but also still retains Beginner hero leveling (i.e. slowest leveling rate). Early-game CHIMPS is impossible due to Mermonkey's price increase in v54.0 and requires extra starting cash.
For CHIMPS, its late-game focuses on Admiral Brickell with Carrier Flagship, multiple Aircraft Carriers, Snowstorm, and Glue Storm.
| Name | Portrait | Reasoning |
|---|---|---|
| Carrier Flagship | Similar reasoning and strategies for Spa Pits, with a few differences: it excels at carrying mid-game, and towards the late-game add Arctic Wind to account for the very short lanes against Super Ceramics plus Glue Storm to ensure that blimps are killed quicker. Pair with Brickell. | |
| Triple Guns | This and Airburst Darts are necessary for early-game with Advanced Intel to handle middle stages of early-game; no other early-game tower is more flexible at catching all nearby lanes reliably. |
Related achievements
[edit | edit source] |
Nah, I'd Win Basically NAPSFRILLS'd it Reward(s): |
|---|
Update history
[edit | edit source]| This article or section uses Cargo to generate its content. It will automatically fill up as other articles are completed. To add to this section, create the articles it is looking up. Do not add content to this section manually and do not remove this notice until you are sure this section is complete. |
 Bloons speed should no longer scale too much in Reverse mode. (bug fix)
 Towers placed on the exterior pits will now be sold when the map is transformed.
 Ascended Shadow should now correctly apply its Grand Sabotage effect (bug fix)
- No longer spawns Pre-Game Prep Road Spikes at 'secret' exits
Gallery
[edit | edit source]| This article or section needs more screenshots. See the screenshot guidelines for more information on what screenshots are needed and how to add them. The editor that added this notice elaborates: Fixed sub placements |
-
 Easter theme
 -
 Fireworks theme
 -
 Halloween theme
 -
 Holiday theme
 -
 Island statue
 -
 Maximum Monkey Sub placements (67)
 -
 Maximum Monkey Buccaneer placements (53)
 -
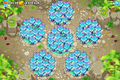 Maximum Mermonkey placements within water (72)


In other languages
[edit | edit source]| Language | Text | Notes |
|---|---|---|
| Arabic | أماكن الاسترخاء | — |
| Danish | Spa-huller | — |
| German | Wellness-Gruben | — |
| Spanish | Pozos spa | — |
| Spanish (Latin America) | Pozos de spa | — |
| Finnish | Kylpyläaltaat | — |
| French | Fosses thermales | — |
| Italian | Piscine termali | — |
| Japanese | スパ浴場 | — |
| Korean | 노천탕 | — |
| Dutch | Bronputten | — |
| Norwegian | Spagroper | — |
| Polish | Wodne Doły | — |
| Portuguese (Brazil) | Piscinas de Spa | — |
| Russian | Спа-ямы | — |
| Swedish | Spagropar | — |
| Thai | สปาพิท | — |
| Turkish | Kaplıca Havuzları | — |
| Chinese (simplified) | 水疗温泉 | — |
| Chinese (traditional) | 溫泉鬥場 | — |
References
[edit | edit source]- Path lengths sourced from the BTD6 Index