Flooded Valley: Difference between revisions
Pixelentropy (talk | contribs) |
Pymonkibot (talk | contribs) m Text replacement - "[[Bloons TD 6 v" to "[[Update history:Bloons TD 6/Version " |
||
| (14 intermediate revisions by 7 users not shown) | |||
| Line 22: | Line 22: | ||
|coop division=0 | |coop division=0 | ||
}} | }} | ||
'''Flooded Valley''' is an [[Expert]] [[map]] in ''[[Bloons TD 6]]'', introduced in [[Bloons TD 6 | '''Flooded Valley''' is an [[Expert]] [[map]] in ''[[Bloons TD 6]]'', introduced in [[Update history:Bloons TD 6/Version 18.0|version 18.0]]. It takes place at a dam which is holding back a reservoir of water. | ||
==Layout== | ==Layout== | ||
| Line 28: | Line 28: | ||
==Strategy== | ==Strategy== | ||
This map severely limits options for the early-game, as all land towers that cannot function over walls are | {{BTD6 last updated|52.2|section=y}} | ||
This map severely limits options for the early-game, as all land towers that cannot function over walls are useless before affording [[Silas (BTD6)|Silas]] or an [[Arctic Wind (BTD6)|Arctic Wind]], unless they have long/global range and are placed on a rock. Water towers, therefore, dominate the early game of this map. The overlapping lanes make it hard to see when Bloons are leaking, making gameplay often frustrating on this map. | |||
===Recommended towers and upgrades=== | ===Recommended towers and upgrades=== | ||
| Line 35: | Line 36: | ||
!Portrait | !Portrait | ||
!Reasoning | !Reasoning | ||
|- | |||
|[[Silas (BTD6)|Silas]] | |||
|[[File:BTD6 SilasPortrait.png|x50px]] | |||
|Silas allows for land towers to be placed on water in the early game, making non-water based strategies easier. His level 7 ability combined with base Ice Monkeys or [[Icicles (BTD6)|Icicles]] can clear waves of Ceramics and MOABs easily in the mid to late game. Alongside this, his stalling potential allows for plenty of strategies to survive the ramping speed of Bloons past round 80, especially his Frozen Burial ability to stop many MOAB-Class Bloons at once. An Ice Monkey focused strategy covers for towers such as [[Carpet of Spikes (BTD6)|Carpet of Spikes]] or [[Golden Justice]] which easily beat round 100 but struggle to dense and fast rounds, respectively. | |||
|- | |||
|[[Admiral Brickell (BTD6)|Admiral Brickell]] | |||
|[[File:BTD6 AdmiralBrickellPortrait.png|x50px]] | |||
|She sees use during all parts of the game. Her Naval Tactics ability and granting of +1 pierce greatly improve the capability of water towers are very important in the early game, especially due to Carrier Flagship being unaffordable until the late 50s in CHIMPS. These support capabilities see great midgame and lategame use as well due to helping powerful water towers, such as Carrier Flagship, [[Pirate Lord (BTD6)|Pirate Lord]], and [[Permanent Brew (BTD6)|Perma-Brewed]] [[Destroyer (BTD6)|Destroyer]]. Mega Mines also has a wide range of uses, from clearing out a large amount of RBE at once to dealing with DDTs to quickly pop the ZOMG layer. | |||
|- | |- | ||
|[[Carrier Flagship (BTD6)|Carrier Flagship]] | |[[Carrier Flagship (BTD6)|Carrier Flagship]] | ||
|[[File:BTD6 500-MonkeyBuccaneer.png|x50px]] | |[[File:BTD6 500-MonkeyBuccaneer.png|x50px]] | ||
|Carrier Flagship, thanks to its solid mid-game and early late-game power, can perform solid saveups into the 80s and still have decent power in the 90s | |Carrier Flagship, thanks to its solid mid-game and early late-game power, can perform solid saveups into the 80s and still have decent power in the 90s. | ||
|- | |- | ||
|[[ | |[[Absolute Zero (BTD6)|Absolute Zero]] | ||
|[[File:BTD6 | |[[File:BTD6 050-IceMonkey.png|x50px]] | ||
| | |Ever since allowing Ice to be placed on water, Ice is a strong support on this map when paired with water-specific buffs. Absolute Zero stands out in this map layout as a cost-efficient support T5, due to the intersecting lanes allowing it to keep freezing Bloons and blimps. | ||
|} | |} | ||
| Line 51: | Line 60: | ||
!Portrait | !Portrait | ||
!Reasoning | !Reasoning | ||
|- | |||
|[[Silas (BTD6)|Silas]] | |||
|[[File:BTD6 SilasPortrait.png|x50px]] | |||
|His platform allows placement near him, and he can solo all Camo rounds in standard<!--i.e. up to r40; r100 p-only is a different challenge--> Primary Only with Frostbite for round 37. The frozen immunity can be get around with things like [[Juggernaut (BTD6)|Juggernaut]] and [[Bomb Shooter (BTD6)|Bomb Shooter]]s. | |||
|- | |- | ||
|[[Corvus (BTD6)|Corvus]] | |[[Corvus (BTD6)|Corvus]] | ||
|[[File:BTD6 CorvusPortrait.png|50x50px]] | |[[File:BTD6 CorvusPortrait.png|50x50px]] | ||
| rowspan="3" |These | | rowspan="3" |These Heroes can see over walls, and can effectively pop Bloons in the early game including [[Lead Bloon (BTD6)|Lead Bloons]]. Corvus in particular can solo the entire game mode with effective use of his spells, though placing additional towers makes it significantly easier. | ||
Admiral Brickell is another Hero option, but is less reliable against the Lead Bloons on rounds 37 and 38. | Admiral Brickell is another Hero option, but is less reliable against the Lead Bloons on rounds 37 and 38. | ||
|- | |- | ||
| Line 87: | Line 100: | ||
|On round 40, towers may be sold to purchase MOAB Assassin, whose ability attacks through walls and can fully destroy the [[MOAB (BTD6)|MOAB]] in one shot. | |On round 40, towers may be sold to purchase MOAB Assassin, whose ability attacks through walls and can fully destroy the [[MOAB (BTD6)|MOAB]] in one shot. | ||
|} | |} | ||
===CHIMPS Starts=== | ===CHIMPS Starts=== | ||
{{#ev:youtube|HCO-8QSt1x4|dimensions=320x240px}} | {{#ev:youtube|HCO-8QSt1x4|dimensions=320x240px}} | ||
{{#ev:youtube|-KRaPk3qhdE|dimensions=320x240px}} | |||
== Easter egg == | == Easter egg == | ||
<!-- [[Help:Transclusion]] --> | <!-- [[Help:Transclusion]] --> | ||
{{#lst:List of Easter eggs in BTD6|Flooded Valley}} | {{#lst:List of Easter eggs in BTD6|Flooded Valley}} | ||
==Update history== | |||
{{BTD6 change list by name|Flooded Valley}} | |||
==Gallery== | ==Gallery== | ||
<gallery> | <gallery> | ||
BTD6 Flooded Valley easter.png|Easter theme | BTD6 Flooded Valley easter.png|Easter theme | ||
| Line 103: | Line 118: | ||
BTD6 Flooded Valley halloween.png|Halloween theme | BTD6 Flooded Valley halloween.png|Halloween theme | ||
BTD6 Flooded Valley holiday.png|Holiday theme | BTD6 Flooded Valley holiday.png|Holiday theme | ||
File:BTD6_flooded_valley_flooded.png|Flooded version | |||
BTD6 Flooded Valley water levels.png|The different water levels of Flooded Valley, demonstrated by submerged Monkey Subs | |||
BTD6 Flooded Valley island statue.png|Island statue | BTD6 Flooded Valley island statue.png|Island statue | ||
</gallery> | </gallery> | ||
Latest revision as of 00:57, 24 April 2026

|
| Difficulty | Expert | ||
|---|---|---|---|
| Music | Tribes & Tribulations | ||
| Default Co-op division | Free-for-all | ||
| Introduced | Version 18.0 | ||
| Entrances | 2 | Exits | 2 |
| Junctions | 0 | Water? | Yes |
| Removables and gizmos |
|---|
|
| Path lengths (RBS) | ||
|---|---|---|
| Easy | Medium | Hard |
| 11.1 | 10.1 | 8.9 |
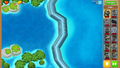
Flooded Valley is an Expert map in Bloons TD 6, introduced in version 18.0. It takes place at a dam which is holding back a reservoir of water.
Layout
[edit | edit source]Flooded Valley's two paths completely overlap, and are located on top of the dam, with water to the right and land to the left. Bloons simultaneously enter from the top and bottom, exiting on the opposite side they entered from. Towers on land to the left, except those on the rocks or with the ability to attack over walls, cannot attack the Bloons due to line-of-sight. No towers can be placed on the dam itself.
Strategy
[edit | edit source]This map severely limits options for the early-game, as all land towers that cannot function over walls are useless before affording Silas or an Arctic Wind, unless they have long/global range and are placed on a rock. Water towers, therefore, dominate the early game of this map. The overlapping lanes make it hard to see when Bloons are leaking, making gameplay often frustrating on this map.
Recommended towers and upgrades
[edit | edit source]| Name | Portrait | Reasoning |
|---|---|---|
| Silas | Silas allows for land towers to be placed on water in the early game, making non-water based strategies easier. His level 7 ability combined with base Ice Monkeys or Icicles can clear waves of Ceramics and MOABs easily in the mid to late game. Alongside this, his stalling potential allows for plenty of strategies to survive the ramping speed of Bloons past round 80, especially his Frozen Burial ability to stop many MOAB-Class Bloons at once. An Ice Monkey focused strategy covers for towers such as Carpet of Spikes or Golden Justice which easily beat round 100 but struggle to dense and fast rounds, respectively. | |
| Admiral Brickell | She sees use during all parts of the game. Her Naval Tactics ability and granting of +1 pierce greatly improve the capability of water towers are very important in the early game, especially due to Carrier Flagship being unaffordable until the late 50s in CHIMPS. These support capabilities see great midgame and lategame use as well due to helping powerful water towers, such as Carrier Flagship, Pirate Lord, and Perma-Brewed Destroyer. Mega Mines also has a wide range of uses, from clearing out a large amount of RBE at once to dealing with DDTs to quickly pop the ZOMG layer. | |
| Carrier Flagship | Carrier Flagship, thanks to its solid mid-game and early late-game power, can perform solid saveups into the 80s and still have decent power in the 90s. | |
| Absolute Zero | Ever since allowing Ice to be placed on water, Ice is a strong support on this map when paired with water-specific buffs. Absolute Zero stands out in this map layout as a cost-efficient support T5, due to the intersecting lanes allowing it to keep freezing Bloons and blimps. |
Primary Only
[edit | edit source]This map is particularly difficult on Primary Only because most Primary towers cannot be placed on water, and most of them cannot see over the dam and attack Bloons. The following towers are recommended for specifically Primary Only on Flooded Valley.
| Name | Portrait | Reasoning |
|---|---|---|
| Silas | His platform allows placement near him, and he can solo all Camo rounds in standard Primary Only with Frostbite for round 37. The frozen immunity can be get around with things like Juggernaut and Bomb Shooters. | |
| Corvus | 
|
These Heroes can see over walls, and can effectively pop Bloons in the early game including Lead Bloons. Corvus in particular can solo the entire game mode with effective use of his spells, though placing additional towers makes it significantly easier.
Admiral Brickell is another Hero option, but is less reliable against the Lead Bloons on rounds 37 and 38. |
| Adora | ||
| Obyn Greenfoot | ||
| Arctic Wind | 
|
Ice Monkeys are the only Primary Monkeys that can naturally be placed on water. Alongside Heroes that can catch fast-moving Bloons, Ice handles groups of Bloons, and once Arctic Wind is bought will make Primary Monkey placements easier. |
| Crossbow, Sharp Shooter |  
|
Sharp Shooter, when placed on the rightmost rocks on the top and bottom of the land, can just barely see the track and shoot Bloons. Crossbow can see Bloons when placed on the bottom rightmost rock. |
| Glaive Ricochet, M.O.A.R Glaives |  
|
When placed as right as possible on the bottom rightmost rock and given the Long Range Rangs crosspath, this tower can just barely see the track. |
| Big Iron | 
|
A Big Iron when placed on the bottom rightmost rock can also barely see the track, which is excellent for maximizing their attack speed upgrades and Bullseye critical chance, leading it to work well with proper cleanup. |
| Blade Maelstrom | Blades from Blade Maelstrom's ability can travel through walls. | |
| MOAB Assassin | 
|
On round 40, towers may be sold to purchase MOAB Assassin, whose ability attacks through walls and can fully destroy the MOAB in one shot. |
CHIMPS Starts
[edit | edit source]Easter egg
[edit | edit source]
- This map contains a hidden removable, revealed by interacting with the two panels on the dam:
- Press the top panel five times, revealing a button.
- Press the bottom panel five times, revealing a button.
- Press the top button.
- Press the bottom button.
A large button will then be revealed in the middle. Interacting with the large button gives the option to pay $5,000 to cause a dam breach. This floods almost the entire left side of the map, filling it with water and forcibly selling any non-water towers which get flooded.
Update history
[edit | edit source]| This article or section uses Cargo to generate its content. It will automatically fill up as other articles are completed. To add to this section, create the articles it is looking up. Do not add content to this section manually and do not remove this notice until you are sure this section is complete. |
- "Resolved an issue with Flooded Valley blocking vision on some towers at times when it should not"
- "Resolved some collision on Flooded Valley"
 Boss Bloons can no longer appear on this map in Rogue Legends
Gallery
[edit | edit source]-
 Easter theme
 -
 Fireworks theme
 -
 Halloween theme
 -
 Holiday theme
 -
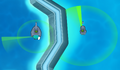
 Flooded version
 -
 The different water levels of Flooded Valley, demonstrated by submerged Monkey Subs
 -
 Island statue


In other languages
[edit | edit source]| Language | Text | Notes |
|---|---|---|
| Arabic | وادي الفيضانات | — |
| Danish | Oversvømmet dal | — |
| German | Überflutetes Tal | — |
| Spanish | Valle Inundado | — |
| Spanish (Latin America) | Valle Inundado | — |
| Finnish | Tulvinut laakso | — |
| French | Vallée inondée | — |
| Italian | Valle allagata | — |
| Japanese | 洪水の谷 | — |
| Korean | 홍수 계곡 | — |
| Dutch | Overstroomde vallei | — |
| Norwegian | Flomfylt dal | — |
| Polish | Zalana dolina | — |
| Portuguese (Brazil) | Vale Inundado | — |
| Russian | Затопленная долина | — |
| Swedish | Översvämmad dal | — |
| Thai | หุบเขาน้ำท่วม | — |
| Turkish | Suyla Kaplı Vadi | — |
| Chinese (simplified) | 水淹山谷 | — |
| Chinese (traditional) | 水淹山谷 | — |
References
[edit | edit source]- Path lengths sourced from the BTD6 Index