Social Season Event: Difference between revisions
mNo edit summary |
Planterror (talk | contribs) →Dr. Monkey Needs You!: collapsing season 1 tables to prepare for season 2 |
||
| Line 47: | Line 47: | ||
===Dr. Monkey Needs You!=== | ===Dr. Monkey Needs You!=== | ||
{|class="wikitable" | {|class="wikitable mw-collapsible mw-collapsed" | ||
!Type | !Type | ||
!Objective | !Objective | ||
| Line 75: | Line 75: | ||
|{{BTD6 rewards|Perk:MonkeyTycoon}}, Season 1 Ultimate Medal | |{{BTD6 rewards|Perk:MonkeyTycoon}}, Season 1 Ultimate Medal | ||
|} | |} | ||
{| class="wikitable" | {| class="wikitable mw-collapsible mw-collapsed" | ||
|+Team Goals breakdown | |+Team Goals breakdown | ||
!rowspan="2"|Tier | !rowspan="2"|Tier | ||
Revision as of 10:13, 6 June 2026

Social Season Events are events in Bloons TD 6. Support for them was added in version 54.0, but the first event did not start until 28 April 2026, after the release of version 54.2. During a Social Season, players participate in themed challenges similar in structure to Sweepstakes Events.[1] There are both Global Goals, which count progress made by all players, and Team Goals, which count progress made by members within a Team. Participating earns rewards including Team Trophies, exclusive cosmetic items, and items called Perks that apply passive buffs in certain game modes.
Goals
| The information in this article or section is specified server-side and can be changed by the developers at any time without warning. This information may become out-of-date at any time without notice. This information was last verified as up-to-date on: 28 April 2026 |
In Social Season Events, players complete objectives called Goals to earn rewards. There are two types of Goals: Global Goals, which count progress made by all BTD6 players worldwide; and Team Goals, which are specific to a Team and consist of objectives that must be completed individually by each member. Goals only progress after winning a game. Freeplay, Advanced Challenges, Deflation, Content Browser games, Quests, Legends, and Race Events[fn 1] do not count towards Goal progress. Rewards for either milestone are granted as soon their requirements are fulfilled.
Team Goals
Completing Team Goals earns Stars. All members of a Team earn rewards when the total number of Stars earned by the Team reaches certain thresholds.
Team Goals are divided into two phases, each with five categories, each with five tiers, for a total of 50 Team Goals per event. The first category of a phase is available immediately, while the rest unlock in order when the player completes tier 1 of the previous category. The first phase is available at the start of the season, while the second phase unlocks after the first week of the season. The amount of stars earned depends on the Tier of the goal, and some tiers additionally reward Team Trophies.
| Tier | Reward |
|---|---|
| 1 | |
| 2 | |
| 3 | |
| 4 | |
| 5 |
List of Social Season Events
| № | Icon | Text | Start time | End time |
|---|---|---|---|---|
| 1 | 
|
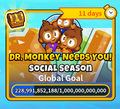
Dr. Monkey Needs You! The Monkeys have been cooking up new ideas to try on the battlefield. Grab your Team, complete goals, and try out the newest innovations from the Monkey Department of Innovation! |
28 April 2026 | 12 May 2026 |
Dr. Monkey Needs You!
| Type | Objective | Rewards |
|---|---|---|
| Global Goals | Generate 300,000,000,000 in-game Cash and complete the game | |
| Generate 1,000,000,000,000 in-game Cash and complete the game | ||
| Team Goals | ||
| Tier | Phase 1 | Phase 2 | ||||
|---|---|---|---|---|---|---|
| Group | Goal | Amount | Group | Goal | Amount | |
| 1 | Earn Cash | Generate 25,000 in-game Cash and complete the game | 25,000 | Beat Maps | Win games with only Dart Monkeys and Heroes | 5 |
| 2 | Generate 500,000 in-game Cash and complete the game | 500,000 | Win games with only Monkey Buccaneers and Heroes | 5 | ||
| 3 | Generate 1,000,000 in-game Cash and complete the game | 1,000,000 | Win games with only Engineer Monkeys and Heroes | 7 | ||
| 4 | Generate 3,000,000 in-game Cash and complete the game | 3,000,000 | Win games with only Desperados and Heroes | 10 | ||
| 5 | Generate 10,000,000 in-game Cash and complete the game | 10,000,000 | Win games with only Mermonkeys and Heroes | 15 | ||
| 1 | Beat Maps | Beat any Advanced Map on Any difficulty | 1 | Remove Obstacles | Remove obstacles 20 times and win the game | 20 |
| 2 | Beat Maps on Impoppable | 5 | Remove obstacles 40 times and win the game | 40 | ||
| 3 | Beat Maps on Half Cash | 10 | Remove obstacles 70 times and win the game | 70 | ||
| 4 | Beat Maps on Alternate Bloon Rounds | 15 | Remove obstacles 125 times and win the game | 125 | ||
| 5 | Beat any Expert Map on Any difficulty | 30 | Remove obstacles 200 times and win the game | 200 | ||
| 1 | Support Monkeys | Win games with only Support Monkeys and Heroes | 2 | Pop Bloons | Pop MOAB Bloons with Primary Monkeys | 50 |
| 2 | 5 | Pop BFB Bloons with Military Monkeys | 250 | |||
| 3 | 15 | Pop ZOMG Bloons with Magic Monkeys | 150 | |||
| 4 | 30 | Pop BAD Bloons with Support Monkeys | 5 | |||
| 5 | 50 | Pop BAD Bloons with any Monkey | 10 | |||
| 1 | Activate Abilities | Activate 50 abilities | 50 | Beat Maps | Win any games using Monkeys no higher than Tier 4 | 3 |
| 2 | Activate 500 abilities | 500 | Win Alternate Bloons Rounds games using Monkeys no higher than Tier 4 | 5 | ||
| 3 | Activate 1,500 abilities | 1,500 | Win any games using Monkeys no higher than Tier 3 | 5 | ||
| 4 | Activate 3,000 abilities | 3,000 | Win Alternate Bloons Rounds games using Monkeys no higher than Tier 3 | 5 | ||
| 5 | Activate 7,500 abilities | 7,500 | Win Impoppable games using Monkeys no higher than Tier 3 | 10 | ||
| 1 | Paragon Upgrades | Purchase any Paragon Upgrades 2 times | 2 | Tower Limits | Win any Gamemode using no more than 5 Monkeys | 5 |
| 2 | Purchase Primary Paragon Upgrades 4 times | 4 | Win Apopalypse using no more than 4 Monkeys | 5 | ||
| 3 | Purchase Military Paragon Upgrades 5 times | 5 | Win Reverse using no more than 3 Monkeys | 5 | ||
| 4 | Purchase Magic Paragon Upgrades 8 times | 8 | Win Alternate Bloon Rounds using no more than 3 Monkeys | 5 | ||
| 5 | Purchase Support Paragon Upgrades 10 times | 10 | Win CHIMPS using no more than 2 Monkeys | 5 | ||
Notes:
- For the "Earn X Cash goals", it only counts extra income from any source that registers to the tower's stats (e.g. Banana Farms but not Lead to Gold).
- For the "Win games with Support Monkeys" and other tower-specific goals, the player can only use the required tower, Heroes, and Powers. The player must place at least one of respective tower for it to count.
Tips
- It is not recommended to exit to the main menu, retry or use continues or checkpoints because the progress may not be tracked properly.
- The player can tackle on different goals at the same time, like for example, doing the Support Only goals in the game mode indicated by the "Beat Maps" goals.
- Another example is to build a Sniper Monkey farm (which minimizes button presses for the abilities) to advance the Abilities and Cash goals, and then using the farmed cash to buy Paragons.
- The easiest way to complete the goals for activating abilities is to spam Tech Bot's link and unlink abilities.
- Alternatively, if one wants to make progress without having to manually press ability buttons, create a regrow farm while having Tech Bots on non-money making abilities with an Energizer to speed the cooldowns up. Deadeye's Take Aim is one of the cheapest while having a fast ability cooldown and does not ruin a regrow farm. Other contenders include Glue Strike, Artillery Battery's Bombardment, and Bloon Sabotage.
- For the cash goals, play Impoppable on Beginner maps, Boss Challenge, or Boss Events, as these give many rounds to snowball income. Strategy:Boss Bloon Event contains examples of farming setups.
- To speed up the Paragon placement goals, accumulate a large sum of cash and then buy and sell Degree 1 Paragons repeatedly (with no additional sacrifices or cash investment). It is recommended to use the cheapest Paragon per category and upgrade the most expensive Tier 5 to lose the least amount of cash after selling. The recommended Paragons and Tier 5's are:
- Primary: Apex Plasma Master (Upgrade Plasma Monkey Fan Club)
- Military: Nautic Siege Core (Upgrade Pre-emptive Strike)
- Magic: Ascended Shadow (Upgrade Master Bomber)
- Support: Master Builder (Upgrade Ultraboost)
- To speed up the obstacle goals, play maps with many removable obstacles, particularly High Finance which has the most. Use 0-1-4 Bloon Trap to accelerate farming while surviving rounds and acquiring enough money to buy all buildings on Easy.
- All tower limit goals should be played on Beginner maps for the least difficulty. For most game modes, optimal strategies for 2TC also work for the tower limit goals.
- For the goals involving winning many games, play Easy for the fastest results.
- Captain Churchill, Corvus, or Geraldo are generally the best Heroes to use for specific tower only goals.
- It is possible to get all the Pop Bloons goals of Phase 2 during a single game against Elite Bloonarius:
- Play on an easy map with plenty of farm space (e.g. Resort, Logs, Cubism) and avoid insta-kills (Bloon Master Alchemist, Navarch of the Seas) because they skip the children from spawning.
- Play as normal until Tier 2 (Round 60), then use only Primary Towers as attacking towers such as Plasma Monkey Fan Club, Golden Justice, Inferno Ring and/or The Tack Zone with Super Brittle and Glue Storm as support. Bloonarius spawns 16 BFBs per skull which should be more than enough to cover the 50 MOABs needed with their children.
- On Tier 3 (Round 80 or after Tier 2 is defeated), switch the entire defense to Military Towers to start popping BFBs. Degree 1 Nautic Siege Core is recommended to beat Bloonarius, but if it cannot be afforded right away, use strong Tier 5s like M.A.D, Ray of Doom and Flying Fortress in the meanwhile. There are more than 250 BFBs in rounds 80 − 99, including natural spawns, ZOMG children and Bloonarius' BAD spawns, so they should cover this goal.
- When Tier 4 starts (Round 100), switch the defense to Magic Towers, a Degree 20 Ascended Shadow should be enough to deal with the boss at this Tier with its spawns. It is important that the player defends with Magic Towers only on this phase as there is barely enough ZOMGs to cover the necessary amount (129 natural spawns + 6 BAD children on Round 119 + 28 from Tier 4 Bloonarius spawns for 163 total)
- At the start of Tier 5, only use Master Builder and Mega Massive Munitions Factory (Degree 40+ on both should be able to beat Bloonarius on the easier maps) to attack Bloonarius for the first two Skulls so it spawns 8 BADs to cover the Support goal, after that, if needed, the player can build other Paragons to finish off Bloonarius as it will spawn 20 more BADs with the other 5 skulls.
- For the goals that require using towers no higher than Tier 4, use strong options such as Overdrive + Embrittlement, Aircraft Carrier or Bloon Area Denial System for group damage while MOAB Assassin, Maim MOAB, Sticky Bomb, Arctic Knight and Orca can deal with the MOAB-Class spawns, without forgetting about support options which are plentiful at Tier 4.
- For the goals that require using towers no higher than Tier 3, it is recommended to use a Hero that can carry the early game with little support to cover their weaknesses, specially on ABR (Sauda, Ezili) or has a very strong late game (Churchill, Adora) and use the Tier 3 Super Monkeys as the bulk of the defense because they are the strongest options available that can reliably beat Impoppable, Dark Knight and Robo Monkey can be used to carry the mid-game and from there, the player can proceed to spam those towers or switch to Sun Avatars. Support towers are more limited at Tier 3, with the main options narrowing down to Berserker Brew, MOAB Glue and Villages with Jungle Drums or Monkey Commerce. Another option to clear this goal could be Destroyer spam with Brickell and camo support on a map such as Spa Pits.
Related achievements
 |
Season Starts Achieve Tier 1 in any Stage in a Social Season Reward(s): |
|---|
|
Mid Season Earn 7,500 Stars in any Social Season Reward(s): |
|---|
|
Season Champion Earn a perfect 15,000 Stars in any Social Season Reward(s): |
|---|
Pre-release
Ninja Kiwi revealed Social Seasons in the update notes for version 47.0. They were originally named "Social Goals" and implied to include both Team-specific goals and goals that apply to all players.[2]
Ninja Kiwi originally stated in the update notes for version 49.0 that Social Goals would come in version 51.0.[3] In the update notes for version 50.0, they gave more details about the event, including a new feature called "Boost Rewards", and stated that all of the intended features may not be ready in time for 51.0.[4]
Ninja Kiwi did not acknowledge Social Goals in the update notes for version 51.0. In the update notes for version 52.0, they announced Social Seasons instead, featuring items called Perks instead of Boost Rewards,[1] which seems to be the replacement for Social Goals.
Gallery
Screenshots
-
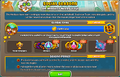 Social Season Event information pop-up
 -
 Social Season Event menu
 -
 Team Goals menu before phase 2 unlocks
 -
 Pop-up that appears after completing a Team Goal
 -
 Pop-up that appears after completing a Team Goal that rewards Team Trophies
 -
 Pip that appears on the main menu when a goal is complete
 -
 Pip that appears on the Team menu when a goal is complete
 -
 Message that appears in a Team's message log when a player completes a Team Goal
 -
 Star counter on a Team member
 -
 Rewards for completing a Global Goal
 -
 Season end screen


Assets
-
 Event icon
 -
 Global Goal icon
 -
 Team Goals button
 -
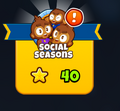
 Social Season #1 icon
 -
 Social Season #1 banner
 -
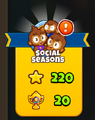
 Social Season #1 medium banner
 -
 Social Season #1 small banner


Footnotes
- ↑ Time Attack tiles in Contested Territory do count, however.
References
- ↑ 1.0 1.1 Rohan Sharpe-Anforth. "Bloons TD 6 v52.0 - Update Notes!". Reddit. Retrieved Fri, 24 Apr 2026.
- ↑ Rohan Sharpe-Anforth. "Bloons TD 6 v47.0 - Update Notes!". Reddit. Retrieved Fri, 24 Apr 2026.
- ↑ Rohan Sharpe-Anforth. "Bloons TD 6 v49.0 - Update Notes!". Reddit. Retrieved Fri, 24 Apr 2026.
- ↑ "Bloons TD 6 v50.0 - Update Notes!". Reddit. Retrieved Fri, 24 Apr 2026.
Navigation
| Events in Bloons TD 6 |
|---|