Double Shot (BTD6) (Ninja Monkey): Difference between revisions
Qwertyxp2000 (talk | contribs) No edit summary Tag: Reverted |
Qwertyxp2000 (talk | contribs) No edit summary Tag: Reverted |
||
| Line 22: | Line 22: | ||
==Stats== | ==Stats== | ||
{{incomplete|Add the projectile deviation stuff (trust me, superbuff | {{incomplete|Add the projectile deviation stuff (trust me, superbuff the ninja without bottom crosspath and watch the projs look like a shotgun)}} | ||
{{BTD6 stat list by tiers|Ninja Monkey|300}} | {{BTD6 stat list by tiers|Ninja Monkey|300}} | ||
| Line 31: | Line 31: | ||
{{Strategy needed}} | {{Strategy needed}} | ||
{{BTD6 last updated|50.2|section=y}} | {{BTD6 last updated|50.2|section=y}} | ||
Double Shot is a decent T3 that increases Ninja's early-game carry for low cost, as its double shurikens double its potential for cleanup for less cost than another Ninja. While decent on most maps, | Double Shot is a decent T3 that increases Ninja's early-game carry for low cost, as its double shurikens double its potential for cleanup for less cost than buying another Ninja. While decent on most maps, Double Shot stands out as an early-game support on [[Ouch|#Ouch]] CHIMPS to cover each lane. | ||
[[Seeking Shuriken (BTD6)|Seeking Shuriken]] is the optimal crosspath for Double Shot for most cases, with [[Caltrops (BTD6)|Caltrops]] being an optional bonus. Middle crosspaths are okay for extra blowback and decamo, though Shinobi spam or other towers cover that role more efficiently. | [[Seeking Shuriken (BTD6)|Seeking Shuriken]] is the optimal crosspath for Double Shot for most cases, with [[Caltrops (BTD6)|Caltrops]] being an optional bonus. Middle crosspaths are okay for extra blowback and decamo, though Shinobi spam or other towers cover that role more efficiently. | ||
Revision as of 23:46, 15 September 2025

|
 Throws 2 shurikens at once. Throws 2 shurikens at once.
|
| Tower | Ninja Monkey — Path 1 — Tier 3 | |
|---|---|---|
| XP cost | 2,000 | |
| Cash cost | $765 — Easy $900 — Medium $970 — Hard $1,080 — Impoppable With  Cheaper Doubles: Cheaper Doubles:$665 — Easy $800 — Medium $870 — Hard $980 — Impoppable | |
Double Shot is the Ninja Monkey's path 1 tier 3 upgrade in Bloons TD 6. It allows the Ninja Monkey to throw two shurikens at a time instead of one, spread across an 18° arc from the centre. Unlike previous upgrades, shurikens have a small amount of angular deviation.
Stats

|
This section is incomplete. You can help out by expanding it. The editor who added this notice elaborates: Add the projectile deviation stuff (trust me, superbuff the ninja without bottom crosspath and watch the projs look like a shotgun) |
| Tower | ||||||
|---|---|---|---|---|---|---|
| ||||||
| Attack | |||||||||||||||||||
|---|---|---|---|---|---|---|---|---|---|---|---|---|---|---|---|---|---|---|---|
| |||||||||||||||||||
|
3-1-0
| Attack | |||||||||||
|---|---|---|---|---|---|---|---|---|---|---|---|
|
3-2-0
| Attack | |||||||
|---|---|---|---|---|---|---|---|
|
3-0-1
| Tower | ||
|---|---|---|
| ||
| Attack | |||||||||||
|---|---|---|---|---|---|---|---|---|---|---|---|
| |||||||||||
|
3-0-2
| Caltrops | |||||||||||||||||
|---|---|---|---|---|---|---|---|---|---|---|---|---|---|---|---|---|---|
| |||||||||||||||||
|
Costs and sell values
| Tiers | Total cost | Sell value | ||||||
|---|---|---|---|---|---|---|---|---|
| Easy | Medium | Hard | Impoppable | Easy | Medium | Hard | Impoppable | |
| 3-0-0 | $1,705 | $2,000 | $2,160 | $2,400 | $1,194 | $1,400 | $1,512 | $1,680 |
| 3-1-0 | $1,915 | $2,250 | $2,430 | $2,700 | $1,341 | $1,575 | $1,701 | $1,890 |
| 3-2-0 | $2,255 | $2,650 | $2,860 | $3,180 | $1,579 | $1,855 | $2,002 | $2,226 |
| 3-0-1 | $1,960 | $2,300 | $2,485 | $2,760 | $1,372 | $1,610 | $1,740 | $1,932 |
| 3-0-2 | $2,345 | $2,750 | $2,970 | $3,300 | $1,642 | $1,925 | $2,079 | $2,310 |
Strategy

|
This strategy section is empty or incomplete. See the strategy guidelines for more information on how to write strategy sections. |
Double Shot is a decent T3 that increases Ninja's early-game carry for low cost, as its double shurikens double its potential for cleanup for less cost than buying another Ninja. While decent on most maps, Double Shot stands out as an early-game support on #Ouch CHIMPS to cover each lane.
Seeking Shuriken is the optimal crosspath for Double Shot for most cases, with Caltrops being an optional bonus. Middle crosspaths are okay for extra blowback and decamo, though Shinobi spam or other towers cover that role more efficiently.
Update history

|
This article or section uses Cargo to generate its content. It will automatically fill up as other articles are completed. To add to this section, create the articles it is looking up. Do not add content to this section manually and do not remove this notice until you are sure this section is complete. |
 "[S]hould no longer be able to occasionally shoot with an infinite range in specific setups" (bug fix)
— Update notes
 Camo Prioritization filter added
— Update notes
- Range decreased ― 47 units → 40 units
 Seeking Shuriken crosspath is unchanged
— Update notes
- Upgrade cost increased ― $850 → $900
- Overall cost is unchanged (due to cost changes for previous tiers)
- 3-0-2
- Caltrop attack: Attack cooldown increased ― 2.728s → 2.73s (attack speed reduced by 0.07%)
Gallery
Screenshots

|
This article or section needs more screenshots. See the screenshot guidelines for more information on what screenshots are needed and how to add them. |
-
 Double Shot with no crosspath
 -
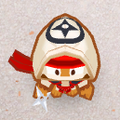 Double Shot with 310 crosspath
 -
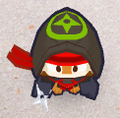 Double Shot with 320 crosspath
 -
 Double Shot with 301 crosspath
 -
 Double Shot with 302 crosspath
 -
 Double Shot shooting two projectiles at once


Assets
-
 Portrait
 -
 Upgrade icon
 -
 Insta Monkey icon

In other languages
| Language | Text | Notes |
|---|---|---|
| Arabic | طلقة مزدوجة | — |
| Danish | Dobbeltskud | — |
| German | Doppelschuss | — |
| Spanish | Tiro doble | — |
| Spanish (Latin America) | Tiro doble | — |
| Finnish | Tuplalaukaus | — |
| French | Double tir | — |
| Italian | Colpo doppio | — |
| Japanese | ダブルショット | — |
| Korean | 더블 샷 | — |
| Dutch | Dubbelschot | — |
| Norwegian | Dobbelskudd | — |
| Polish | Podwójny strzał | — |
| Portuguese (Brazil) | Tiro Duplo | — |
| Russian | Двойной выстрел | — |
| Swedish | Dubbelskott | — |
| Thai | ขว้างสองครั้ง | — |
| Turkish | Çifte Atış | — |
| Chinese (simplified) | 双重攻击 | — |
| Chinese (traditional) | 雙倍射擊 | — |
| Language | Text | Notes |
|---|---|---|
| Arabic | رمي 2 شوريكنز في وقت واحد. | — |
| Danish | Kaster 2 ninjastjerner på én gang. | — |
| German | Wirft gleichzeitig 2 Shuriken. | — |
| Spanish | Lanza 2 shuriken a la vez. | — |
| Spanish (Latin America) | Lanza 2 shuriken a la vez. | — |
| Finnish | Heittää 2 shurikenia kerralla. | — |
| French | Lance 2 shurikens d’un coup. | — |
| Italian | Lancia 2 shuriken alla volta. | — |
| Japanese | 一度に二枚の手裏剣を投げる。 | — |
| Korean | 한번에 2개의 표창을 던집니다. | — |
| Dutch | Gooit 2 shurikens tegelijk. | — |
| Norwegian | Kaster 2 kastestjerner samtidig. | — |
| Polish | Rzuca 2 shurikeny naraz. | — |
| Portuguese (Brazil) | Lança 2 shurikens de vez. | — |
| Russian | Бросает по 2 сюрикена. | — |
| Swedish | Kastar 2 kaststjärnor samtidigt. | — |
| Thai | ขว้างชูริเคนคราวละ 2 อัน | — |
| Turkish | Tek seferde 2 ninja yıldızı fırlatır. | — |
| Chinese (simplified) | 一次投掷2支手里剑。 | — |
| Chinese (traditional) | 一次擲出2把手裡劍。 | — |
Navigation
| Ninja Monkey in Bloons TD 6 | ||||||||
|---|---|---|---|---|---|---|---|---|
| ||||||||
| Stats • Strategies • Update history |